Showing posts with label tutorial. Show all posts

Friday, October 30, 2020

Video: Tonic Studios Party Animals Stamp Club Release and Giveaway!

Hello everybody and welcome to the second Stamp Club launch from Tonic Studios! This launch is called Party Animals (UK) and is perfect for making so many different cards. The Party Animals stamp and die are sold as a bundle exclusively from Tonic Studios USA (Tonic UK) for an incredible price of $34.99! There are a limited number of sets so if you want one please make sure to grab yours before they sell out. To check out the release and all of the details head over to Tonic Studios USA or Tonic Studios UK. Here's a look at one of the cards I'll be sharing today (how to video later in post).

#tonicstudios,#tonicstudiosusa,#tonicstudiosstampclub,#cards,#cardmaking,#stamps,#stamping,ink,paper,#art,#diy,#handmade,#handmadecards,#video,#videotutorial,tutorial,#shaker card,

In addition to the Party Animal Bundle there is also a new die set called Banners and Strips (UK) that goes for $14.99. Check out this video I made sharing all of the products included in this launch...

If you're having trouble watching this video you can view it HERE


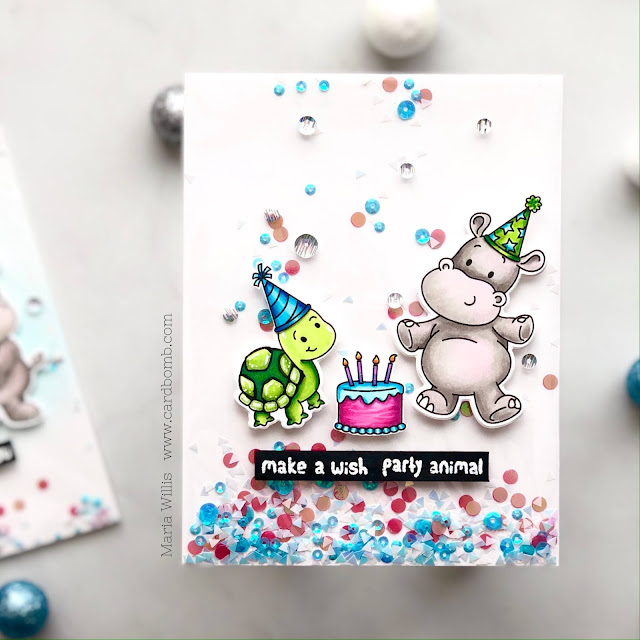
Now I want to share a couple of really fun shaker cards that I made with you. These are frameless shaker cards and are really easy to make. I got the idea from my friend Ilda Dias and had to try it for myself. I was thrilled at how easy it was to do so I made you a video for this too.

    
If you're having trouble watching this video you can view it HERE.

I started out by stamping and coloring a bunch of the images from the Party Animals set. I used my copic markers to color them.
#tonicstudios,#tonicstudiosusa,#tonicstudiosstampclub,#cards,#cardmaking,#stamps,#stamping,ink,paper,#art,#diy,#handmade,#handmadecards,#video,#videotutorial,tutorial,#shaker card,

After I was done coloring the images I used the coordinating dies to cut them out. This made the process so easy and gave me perfectly cut images without the effort of having to hand cut them all.
#tonicstudios,#tonicstudiosusa,#tonicstudiosstampclub,#cards,#cardmaking,#stamps,#stamping,ink,paper,#art,#diy,#handmade,#handmadecards,#video,#videotutorial,tutorial,#shaker card,

I ink blended some blue onto a piece of cardstock cut at 4.25" x 5.25" so that there would be some color in the background. I used the large round blending brushes which work like such a dream for super smooth blending.
#tonicstudios,#tonicstudiosusa,#tonicstudiosstampclub,#cards,#cardmaking,#stamps,#stamping,ink,paper,#art,#diy,#handmade,#handmadecards,#video,#videotutorial,tutorial,#shaker card,

Next, I cut down a clear, plastic envelope so that it was one quarter inch larger on every side than my card face. I also put adhesive strips on the back of my card face. 
#tonicstudios,#tonicstudiosusa,#tonicstudiosstampclub,#cards,#cardmaking,#stamps,#stamping,ink,paper,#art,#diy,#handmade,#handmadecards,#video,#videotutorial,tutorial,#shaker card,

I put the plastic sheet face down on my table and scooped shaker guts out on top of it. When I had enough shaker guts I put my card face (ink blended side down) on top of the guts. Then, I peeled off the release paper and folded the edges of the plastic sheet onto the back of my card. This trapped all of the shaker guts inside the card and allowed them to move freely.
#tonicstudios,#tonicstudiosusa,#tonicstudiosstampclub,#cards,#cardmaking,#stamps,#stamping,ink,paper,#art,#diy,#handmade,#handmadecards,#video,#videotutorial,tutorial,#shaker card,

Once the shaker portion of my card was put together I adhered my party animals and sentiment to the front of the card using foam adhesive. After that I added a few sequins to the front and glued the whole thing to a card base. These are seriously the easiest shaker cards I have ever made!
#tonicstudios,#tonicstudiosusa,#tonicstudiosstampclub,#cards,#cardmaking,#stamps,#stamping,ink,paper,#art,#diy,#handmade,#handmadecards,#video,#videotutorial,tutorial,#shaker card,


One of the things that I really love about this new Party Animals release is how versatile it is. It's easy to make simple but fun cards. It's also perfect for building scenes and making really detailed cards. Here is a video I made to show you just how easy it is to make a wide variety of styles of cards with this set.
 
If you are having trouble watching this video you can view it HERE.

Now that you've watched the video here are some close up pictures of the cards I made...
#tonicstudios,#tonicstudiosusa,#tonicstudiosstampclub,#cards,#cardmaking,#stamps,#stamping,ink,paper,#art,#diy,#handmade,#handmadecards,#video,#videotutorial,tutorial,#shaker card,

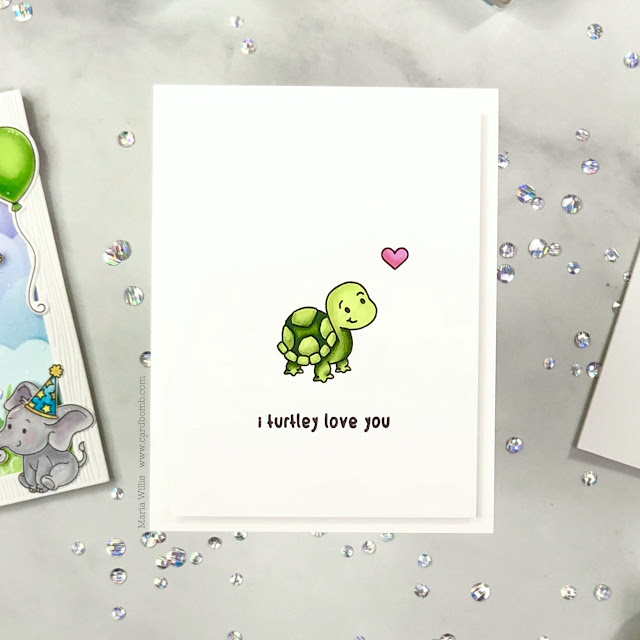
This little turtle is so fun and I love the punny sentiments that go along with him.
#tonicstudios,#tonicstudiosusa,#tonicstudiosstampclub,#cards,#cardmaking,#stamps,#stamping,ink,paper,#art,#diy,#handmade,#handmadecards,#video,#videotutorial,tutorial,#shaker card,

I used my Nuvo alcohol markers and watercolor pencils to color in the turtle and sweet little heart.
#tonicstudios,#tonicstudiosusa,#tonicstudiosstampclub,#cards,#cardmaking,#stamps,#stamping,ink,paper,#art,#diy,#handmade,#handmadecards,#video,#videotutorial,tutorial,#shaker card,

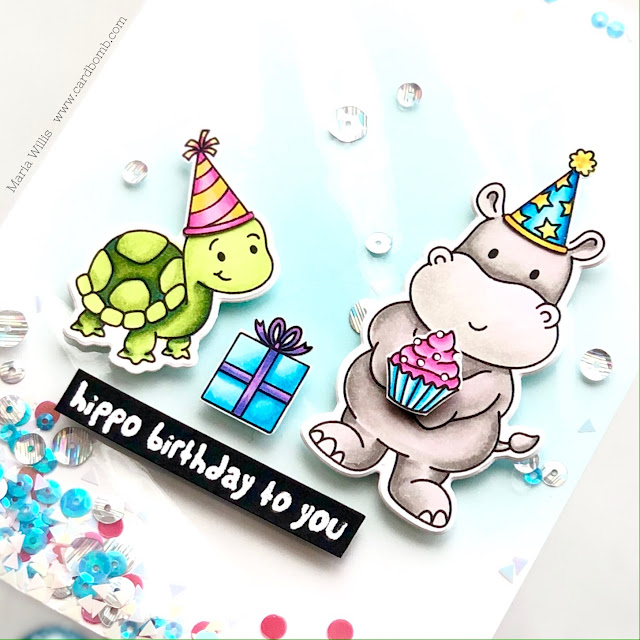
My next card uses the same layout as my first card does. I stepped it up by adding stenciling to the background (the stencils were made with dies from the set). I also added dimension by die cutting the hippo and bouquet and popping them up with foam adhesive.
#tonicstudios,#tonicstudiosusa,#tonicstudiosstampclub,#cards,#cardmaking,#stamps,#stamping,ink,paper,#art,#diy,#handmade,#handmadecards,#video,#videotutorial,tutorial,#shaker card,

Did you notice the cute little flagged ends on my sentiment? I cut that out with one of the dies from the Banners and Strips die set and it was perfect!
#tonicstudios,#tonicstudiosusa,#tonicstudiosstampclub,#cards,#cardmaking,#stamps,#stamping,ink,paper,#art,#diy,#handmade,#handmadecards,#video,#videotutorial,tutorial,#shaker card,

The ink blending in the background was done with two different kinds of blending brushes. The dreamy looking sky was done using the new large blending brushes (on sale this weekend!). The grass needed a heavier application of ink so I used the blending brushes with handles for that.
#tonicstudios,#tonicstudiosusa,#tonicstudiosstampclub,#cards,#cardmaking,#stamps,#stamping,ink,paper,#art,#diy,#handmade,#handmadecards,#video,#videotutorial,tutorial,#shaker card,

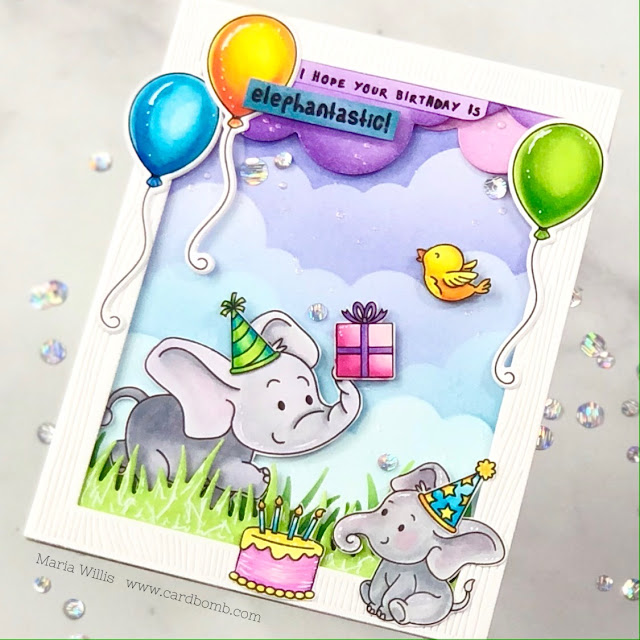
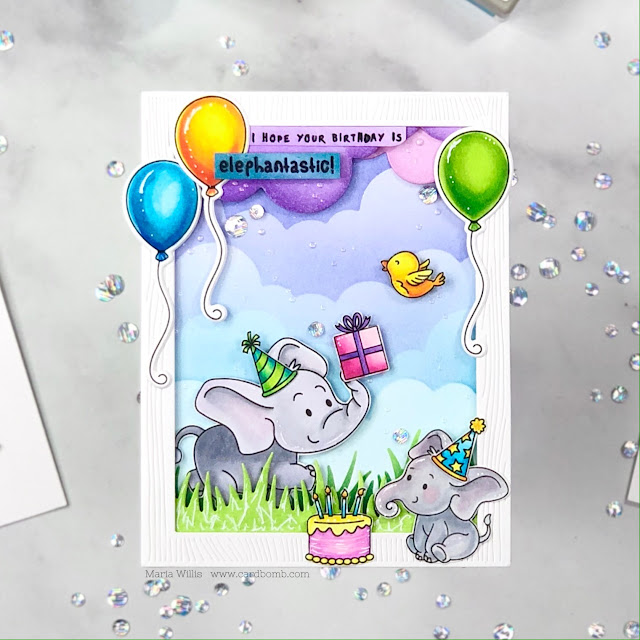
My last card is quite a bit more intricate than the last two. This card incorporates everything from the last two cards (coloring, stenciling, dimension and scene building) to make a card that tells more of a story (party time!).
#tonicstudios,#tonicstudiosusa,#tonicstudiosstampclub,#cards,#cardmaking,#stamps,#stamping,ink,paper,#art,#diy,#handmade,#handmadecards,#video,#videotutorial,tutorial,#shaker card,

This card has layers of stenciled clouds and grass which gives it lots of depth. I've also tucked the large elephant behind a layer of grass to make it look like he's set further back in the scene.
#tonicstudios,#tonicstudiosusa,#tonicstudiosstampclub,#cards,#cardmaking,#stamps,#stamping,ink,paper,#art,#diy,#handmade,#handmadecards,#video,#videotutorial,tutorial,#shaker card,
Adding balloons, a bird, gifts and cake plus the little elephant in the front creates a fun party scene.
#tonicstudios,#tonicstudiosusa,#tonicstudiosstampclub,#cards,#cardmaking,#stamps,#stamping,ink,paper,#art,#diy,#handmade,#handmadecards,#video,#videotutorial,tutorial,#shaker card,


#tonicstudios,#tonicstudiosusa,#tonicstudiosstampclub,#cards,#cardmaking,#stamps,#stamping,ink,paper,#art,#diy,#handmade,#handmadecards,#video,#videotutorial,tutorial,#shaker card, giveaway


GIVEAWAY!!
Tonic Studios will be giving one lucky winner a $100 gift card ( £100 if you're in the UK!)! That is such a fantastic giveaway and someone is going to be so happy! To enter the giveaway you need to comment on every blog in this blog hop (the list of blog hoppers is down below). Get your comments in by 11:59 pm PST on November 4th, 2020. The winner will be announced on the Tonic Studios Instagram and Facebook accounts on November 6th, 2020 (so make sure you're following the Tonic social media accounts). Good luck to you all!


Ok, the blog hop list is below (or just head over to Michelle's blog right now). I've also linked most of the products that I've used today in case you'd like to check anything out. 

Have an awesome day (or evening if you're on the other side of the Earth from me)! Bye for now.

Maria.


PRODUCT SUPPLY LIST:

Thursday, January 4, 2018

Creating Kindness: Celebrate

Hi Everybody! Happy Thursday or whichever day it might be in your part of the world. I'm happy to have you stop by today because today is the Creating Kindness Blog and Video Hop day. Myself and some other talented Stampin' Up! demonstrators from around the world have gotten together to share some fun projects and video tutorials as well!

Our theme for this month's hop is "Celebrate." There is always so much to celebrate at this time of year (Winter Holidays, New Year's Eve, and five December birthdays for me)... but right now, as I've taken a couple of days off of work, I am choosing to celebrate the little things. For me, that means some time in my craft room to experiment with my supplies. That's something to celebrate, right?! So, as I celebrated my alone time in my craft room I tried this new (to me anyways) technique. I don't know what it's called so I'm calling it Alcohol Stamping and I've got a video tutorial at the end of my blog post. Here's what I made with this fun technique...

Believe it or not, this technique is so easy! I started with a piece of Shimmery White Cardstock and sponged it with Tempting Turquoise and Melon Mambo (the purple hue in the middle is where I overlapped the two colors). After that I took a stamp from Flirty Flowers and a Stampin' Spritzer filled with rubbing alcohol and spritzed my stamp. I pressed it firmly onto the sponged background, held it there for a couple of seconds to let the paper absorb the alcohol, and lifted the stamp off the paper. The watermark-like effect is visible immediately and is stunning! I dried off my stamp and block with a paper towel and repeated the alcohol stamping multiple times until I had the background I desired.

I added a silver embossed "celebrate" sentiment (from Weather Together), some Glitter & Clear Epoxy Shapes (145632) which are new in the Occasions Catalog, and some Black Metallic Thread. I wanted the background to be the star of show so I tried not to over do it. The background is layered on a Basic Black mat and that is popped up on dimensionals on a Pool Party card base.


Want to try this technique out for yourself? Here's a quick video tutorial with some tips to help you out. 


And that's it for today folks. I am sure glad that you've stopped by to visit my blog today and I hope you will continue on the hop by heading down under to my visit my friend Cheryll! Just click her name or the next button below. 

In case you didn't know Sale-A-Bration has just begun! It's the best time of year to buy all of your favorite things as you get rewarded for every $50 you spend! It's also an amazing time to join my team-so if you've been thinking about it let me know. I'm happy to answer any questions and generally enable you to fill your craft space with fun things.

Have an amazing day you guys!
Maria Willis


BLOG ROLL:

Want to shop with me? No problem, just click the button below. 
Let me know if you have any questions!
Email: mariawillis@hotmail.com


Want a great discount on Stampin' Up! Products and to have a fun new stamping family? Join me on this fun adventure! I can't wait to be your super excited Stampin' Up! side kick and support lady! In case you didn't know, you can join Stampin' Up! just for the discount and never sell a single product. If you want to know the details just let me know. If you're looking for a discount on your favorite hobby (stamping and paper crafting with Stampin' Up! products) and want to earn money doing it... let me know! I'd love to talk with you whatever your interest might be! If you want to see a little more info go ahead and click the button below. Looking forward to hearing from you!


Thursday, September 14, 2017

Paper Tole Tutorial with an Adorable Elf!

Hey everybody! I'm really excited today because I've just tried a new, and super awesome technique for the first time and I absolutely love it. The technique is called Paper Tole and it's a fairly simple technique that has a lot of wow factor. It's hard to see the 3D effect in this pic because the pic was taken straight on...


but check this pic out! See how the image is lifting off of the page? That's what Paper Tole is all about. 

I'm happy to say that I've got a full tutorial to share with you today. Here's what you will need...

Supplies:
·      Stamp Set: Festive Phrases
·      Cardstock: Basic Black, Shimmery White, Merry Little Christmas DSP
·      Ink: Basic Black Archival, Real Red, Old Olive, Chocolate Chip, Powder Pink, Soft Sky
·      Other: Aquapainter, Iridescent Sequin Assortment, Fast Fuse, Mini Dimensionals, X-acto  Knife

Measurements:
·      Card Base (Basic Black): 4 ¼” X 11” and scored at 5 ½”
·      Shimmery White: 2 5/8” X 4”
·      Basic Black Mat: 2 ¾” X 4 1/8”
·      DSP strip (black): 2”X 5 ¼”
·      Basic Black Mat: 2 1/8” X 5 ¼”
·      DSP (green): 4” X 5 ¼”
·      Basic Black Mat: 4 1/8” X 5 7/8”

Instructions:

1.     Stamp the image in Basic Black Archival ink on Shimmery White Cardstock.


2.  Use your Aquapainter to color the image using Real Red, Old Olive, Chocolate Chip, Powder Pink and Soft Sky inks.


Here's what it will look like...


3. Put your image piece on top of a safe cutting surface. I used a thick piece of cardboard.  


4. Using the X-acto knife cut carefully around the elf’s hat, right side ear, bangs, shoe tops and the four corners of the sign. These are the areas that will be raised on your finished card. Make sure that you leave space between the cuts (do not connect the cuts or the image will become disconnected from the page).


5. Flip your cut image piece over and add mini dimensionals to the areas that are to be raised. Add a strong adhesive to the rest of the background. It is important to make sure you have adhesive between the areas with dimensionals. If you don’t add enough adhesive then the image piece will raise up and become level with the cut/raised edges and you will lose the 3D effect.


6. Adhere your image piece to the appropriately sized black mat using Fast Fuse and do the same with the DSP pieces. Adhere the black strip of DSP vertically to the green DSP using fast fuse. Adhere the DSP to the card base using dimensionals. Finally, adhere the image piece to the card using dimensional and embellish with sequins.


This technique is so easy and fun! I can't believe that I haven't seen it used very often. I hope this tutorial will help you feel confident enough to give it a try. If you do give it a shot please let me know how it turned out.

Thanks for stopping by my blog today. I always love having you visit. If you'd like to purchase the materials to make this card on your own please click the shop now button below or shoot me an email as I'd love to help with any of your questions. 

Have an amazing day!
Maria.


Want to shop with me? No problem, just click the button below. 
Let me know if you have any questions!
Email: mariawillis@hotmail.com


Want a great discount on Stampin' Up! Products and to have a fun new stamping family? Join me on this fun adventure! I can't wait to be your super excited Stampin' Up! side kick and support lady! In case you didn't know, you can join Stampin' Up! just for the discount and never sell a single product. If you want to know the details just let me know. If you're looking for a discount on your favorite hobby (stamping and paper crafting with Stampin' Up! products) and want to earn money doing it... let me know! I'd love to talk with you whatever your interest might be! If you want to see a little more info go ahead and click the button below. Looking forward to hearing from you!


01 09 10