Showing posts with label #mermaid. Show all posts

Wednesday, July 24, 2019

Shaker Card vs. Mixed Media Card for Tonic Studios

maria willis, #cardbomb, #card, #cards, #handmade, #handmadecards, #stamp, #ink, #paper, #papercraft, #art, #diy, #tonicstudios, #tonicstudiosusa, #mermaid, #diecutting, #shaker card, #mixedmedia,
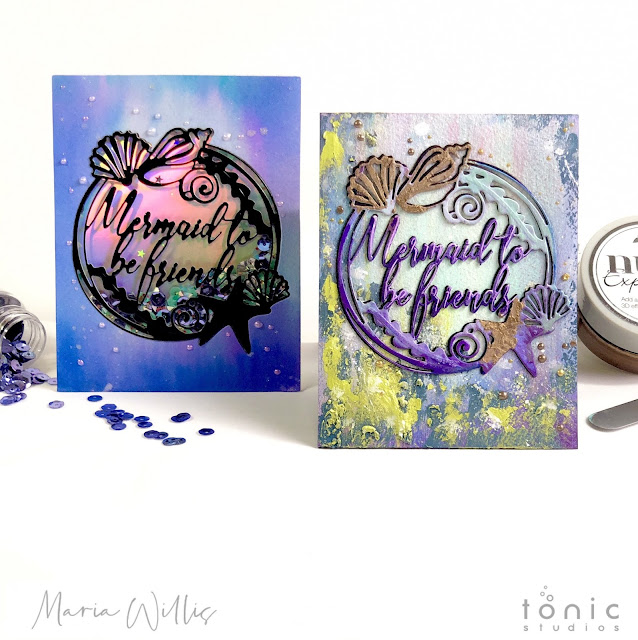
Hey, everyone! It's Maria from Cardbomb here to share two totally different cards made from the same layout. In fact, not only did I use the same layout but I even used the same die. One of my favorite things about Tonic Studios is the diverse range of products they carry. Whether you want gorgeous paper, pens, pencils, watercolors, alcohol markers, mousses, drops, embellishments, etc. Tonic Studios has it! Today I've decided to share how you can make your cards dramatically different just by switching out your papers and art mediums.

CARD #1: MERMAID SHAKER CARD

For my first card I decided to do a clean and simple shaker card...

maria willis, #cardbomb, #card, #cards, #handmade, #handmadecards, #stamp, #ink, #paper, #papercraft, #art, #diy, #tonicstudios, #tonicstudiosusa, #mermaid, #diecutting, #shaker card, #mixedmedia,

SHAKER CARD HOW TO:
  • Start with a piece of watercolor paper cut to 4.25" x 5.5"
  • Use Nuvo Aqua Flow Pens and a wet paint brush to watercolor the background
  • Cut the "Mermaid to Be Friends" die out of the watercolored background. You will use the background for this card. Save the die cut for card #2.
  • Then, put double sided adhesive sheet onto the back of a piece of glossy black cardstock. Cut the "Mermaid to Be Friends" die out of this piece too.
  • Cut a piece of Holo Waves Mirror Cardstock to fill the front of a white card base and adhere it. Set this aside.
  • Adhere a piece of clear acetate to the backside of your watercolored background.
  • Peel the backing off of your black, glossy die cut and fit it into the watercolored background and adhering it to the acetate.
  • Flip the watercolor background over and add foam adhesive. Make sure that it is not visible through the acetate window. Also make sure that you create a foam barrier around the die cut sentiment so that your sequins cannot fall out of the shaker.
  • Add as many sequins and embellishments as you want to in a pile in the center of the Holo Waves cardstock. Make sure to use thin embellishments like glitter and sequins so that they will slide easily in your shaker card.
  • Stick the watercolored piece onto the card base trapping the embellishments behind the acetate window and within the foam adhesive barrier you created earlier.
  • Splatter the front of the card with Glitter Gloss sparkle!
  • Embellish with Dream Drops in Cloud 9
  • Shake the card and smile!

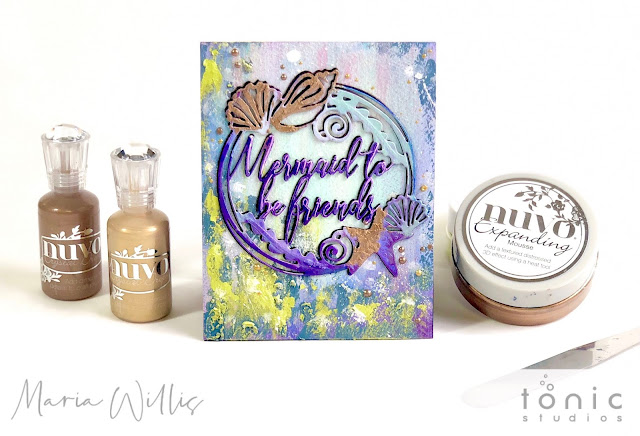
CARD #2: MIXED MEDIA MERMAID CARD

For my second card I decided to go for a completely different look. I used Nuvo Aqua Flow Pens, Embellishment Mousse, Expanding Mousse and Nuvo Drops to get a tarnished, under the sea, mixed media look...

maria willis, #cardbomb, #card, #cards, #handmade, #handmadecards, #stamp, #ink, #paper, #papercraft, #art, #diy, #tonicstudios, #tonicstudiosusa, #mermaid, #diecutting, #shaker card, #mixedmedia,

MIXED MEDIA CARD HOW TO:

  • Cut a piece of watercolor paper to 4.25" x 5.5"
  • Watercolor wash the background using Nuvo Aqua Flow Pens and a wet paintbrush.
  • Using a dry paint brush, brush some Nuvo Embellishment Mousse over the watercolor background. This will add color, texture and a sparkly sheen.
  • Grab a palette knife and use it to smear some Nuvo Expanding Mousse onto the background. Heat the mousse with a heat tool until it expands.
  • After you've gone crazy with your mousses on top of the watercolor background grab the leftover sentiment die from the first card. Add mousse and texture as you like.
  • It's important that the die will stand out on the background so add extra color using the Aqua Flow Pens if needed.
  • Cut two more "Mermaid to Be Friends" pieces out of black cardstock. Adhere these pieces together adding the colorful one on top.
  • Glue the tripled up die cut to the front of the card.
  • Splatter the card with Midas Touch Aqua Flow Pen.
  • Embellish the card with Nuvo Drops in Dirty Bronze and Mustard Gold.

HOT TIPS FOR USING NUVO MOUSSES:

  • HOT TIP #1: The more Expanding Mousse that you add (I am referring to thickness), the more the product will expand and give you incredible texture as you heat it. Thinly applied Expanding Mousse will not give you the same result.
  • HOT TIP #2: As the Expanding Mousse reacts to heat it will lose its sheen and have a more matte finish. This provides a wonderful contrast between the Expanding Mousse and the shinier Embellishment Mousse.
  • HOT TIP #3: You can brush either Embellishment or Expanding Mousse over the top of the heated Embellishment Mousse. This will not just add color but will add sheen as well.


maria willis, #cardbomb, #card, #cards, #handmade, #handmadecards, #stamp, #ink, #paper, #papercraft, #art, #diy, #tonicstudios, #tonicstudiosusa, #mermaid, #diecutting, #shaker card, #mixedmedia,

That is it for today you guys. I hope you're feeling inspired to break out all of your Tonic products and have a good play. There will be a video sharing how I made both of these cards. So, if you're interested please be on the lookout for that. Thank you for your patience with this as I've just moved and am not properly set up yet so everything is taking just a bit longer than normal. In the meantime I would love to hear which card you like better? Are you more of a clean and simple cardmaker? Or, do you like get messy and slap down layers of product onto your projects? Please leave a comment below and let me know!

Have an amazing day you all! Thanks so much for checking out today's projects and we will see you back here soon!

Maria


PS: These Mermaid dies are not available in the Tonic USA shop but you can still have them! No matter where you might be in the world you can order from the Tonic UK shop. Tonic UK offers affordable, fast shipping for international customers making it easy for you to purchase whatever you want from the UK shop!

TONIC UK SUPPLY LIST:


TONIC USA SUPPLY LIST:


Monday, April 15, 2019

Mermaid Kisses and Starfish Wishes

Hey everybody! I am so excited to have you here today because today is my first post for Tonic Studios as a member of their Social Media Design Team. Tonic Studios has a new blog, and with it, a new design team. Every week day the Tonic DT will be sharing fun projects and lots of inspiration on the blog. The team is made up of some very talented artists and I am absolutely thrilled that Tonic has chosen me to help represent them. When you have a few minutes please go check out Tonic's new blog. It's a fun place to go for inspiration and I hope you'll enjoy it as much as I do. Here's a link to go check them out: CLICK HERE.

Now, on to today's project...
#cardbomb, #mariawillis, #tonicstudios, #tonicstudiosusa, #mermaid, diecutting, #ocean, #watercolor, #color, #art, #diy, shells, #cards, #handmade, #paper, #papercraft, #ink, #stamp, #craft,


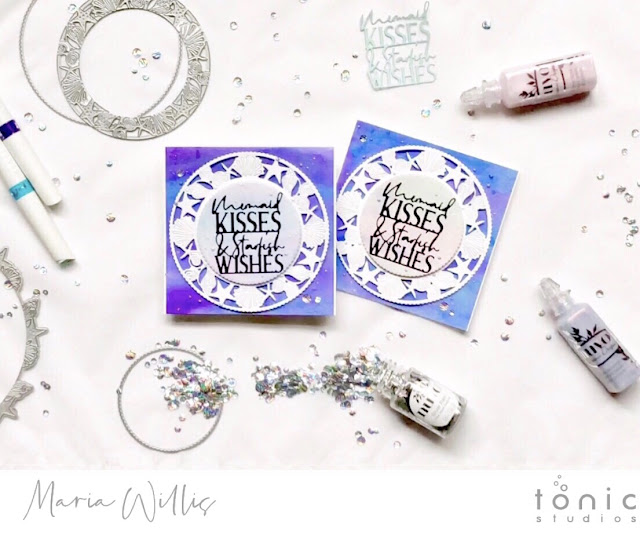
Today I am sharing a project using the Mermaid With Love range of dies. When I saw these dies I knew I had to have them because I love shells, sea stars, mermaids and well designed layering dies. I had so much fun playing around with them and coming up with fun ideas for them that it was hard to decide what kind of project I wanted to share with you. I decided on a shimmery, watercolor project that I hope you will enjoy but mixed media was a close second. There is a video tutorial for this project towards the bottom of this post. I hope you'll take a few minutes to watch it as I share how versatile this die range is. Until I opened these dies and started playing with them I really had no idea how many things you could do with them. In the video I also share some tips for using the dies as well as some tips for assembling this card.

#cardbomb, #mariawillis, #tonicstudios, #tonicstudiosusa, #mermaid, diecutting, #ocean, #watercolor, #color, #art, #diy, shells, #cards, #handmade, #paper, #papercraft, #ink, #stamp, #craft,


SUPPLIES:
I started with a white card base cut to 5" x 10" and scored at 5" and a piece of watercolor paper cut to 4 & 7/8"squared. I also had a piece of white cardstock for cutting my large die piece, a small piece of watercolor paper for cutting my layering circle (behind sentiment) and a piece of black glossy cardstock backed with double sided adhesive for cutting out the sentiment die. Aside from cardstock you will need Nuvo Markers (Aqua Splash, True Turquoise, Azure Blue, Indigo Dawn), Dream Drops (Indigo Eclipse and Fairy Wings), dimensional foam adhesive, tape runner adhesive, a smooth precision glue pen, and Silver Rain sequins. You will also need my favorite die set from this collection, the Marina Layering Dies and the Mermaid Kisses & Starfish Wishes sentiment die.

HOW TO:
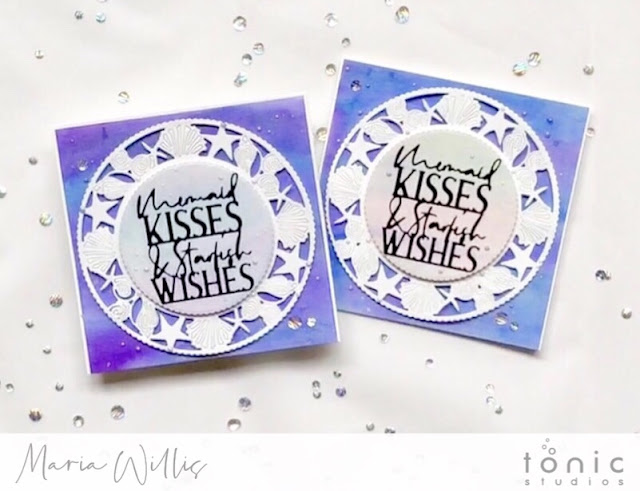
I started by watercoloring my two watercolor pieces using a paint brush and ink from Nuvo Markers. I saturated my watercolor cardstock with water and painted both pieces at the same time making sure that my background piece was much more saturated with color than the smaller piece. I set these aside to dry and did my die cutting next. I used the round seashell and starfish die with a larger cutting ring to cut the detailed die cut from white cardstock. Then I used the smaller cutting ring to die cut a layering circle from the smaller piece of watercolor paper. Last, I cut the sentiment die from the piece of black glossy cardstock and removed the negative pieces from the die being careful to leave the die cut inside of the die. After splattering my watercolor pieces generously with Glitter Gloss I put my card layers together. Both of the larger die cut pieces are popped up on foam adhesive. The sentiment is adhered after removing the backing from the double sided adhesive. Then, I embellished the card with sequins and Dream Drops. Side note: Dream Drops are epic!! Not only are they absolutely gorgeous but they must also be magic because I'm able to get perfect drops with them every. single. time. They are amazing and added just the right touch to this card as they look like pearls.
#cardbomb, #mariawillis, #tonicstudios, #tonicstudiosusa, #mermaid, diecutting, #ocean, #watercolor, #color, #art, #diy, shells, #cards, #handmade, #paper, #papercraft, #ink, #stamp, #craft,

Here's that video I keep talking about. I hope you'll find it has some helpful information, both about this entire die collection, as well as for putting this card together.


Here's one more look at the cards I'm sharing today...

#cardbomb, #mariawillis, #tonicstudios, #tonicstudiosusa, #mermaid, diecutting, #ocean, #watercolor, #color, #art, #diy, shells, #cards, #handmade, #paper, #papercraft, #ink, #stamp, #craft,


That's all for today folks! If you're interested in checking out any of the products I've shared today I've added links to all of them below. These are affiliate links and if you make a purchase through them I will make a small commission (thank you!). Thanks so much for stopping today. I hope you all have an amazing day and I will see you back here soon.

Maria


SUPPLY LIST UK SHOP


SUPPLY LIST USA

Sunday, August 19, 2018

Sparkly, Shiny Mermaid!

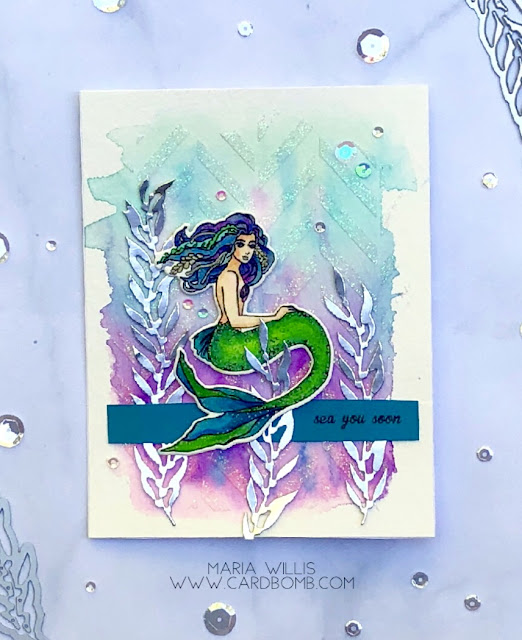
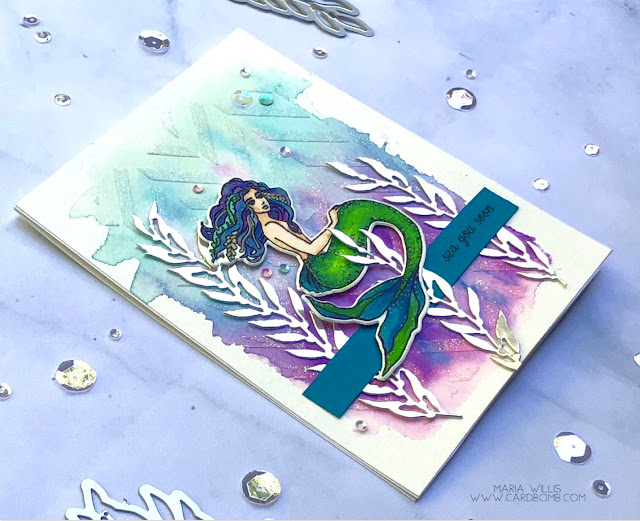
Well, holy moly. It's been a really long time since I've been here to share with you. Not surprising since I don't think I've actually finished a project in over a month (yikes!). I've just gotten back from an amazing trip to Belize where I visited a ton of family and snuck a few days of vacation on an island into the trip. While I was on vacation I did get a little coloring in and now that I'm back it's time to turn my colored bits into cards... I got inspired by this month's A Blog Named Hero challenge of Sparkle & Shine and decided to work with that.

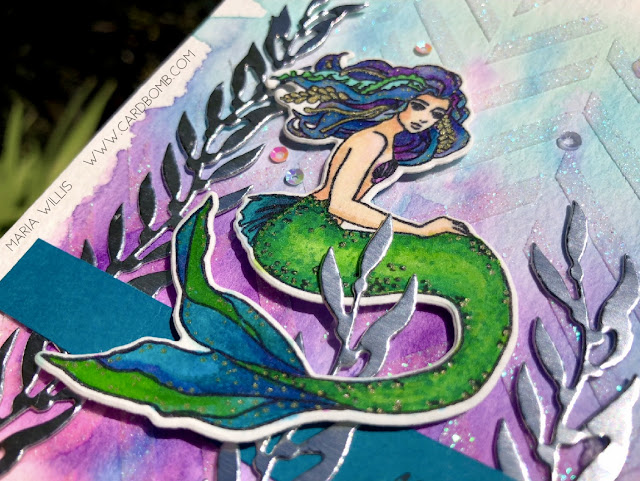
I actually watercolored this mermaid before I went on vacation but decided she was perfect for this challenge. I used the Hero Arts liquid watercolors then I added a little bit of copic coloring and some gold gel pen on her hair and tail. 

#cardbomb, #mariawillis, #heroarts, #ablognamedhero, #cards, #watercolor, #art, #create, #emboss, #mermaid, #copics, #paper, #stamp, #ink, #papercraft,

The background was watercolored in some fun colors and then I used a Hero Arts stencil and some sparkly embossing paste to create a subtle but glittery background. I love the texture that this creates on the card without totally stealing the attention from the mermaid.
#cardbomb, #mariawillis, #heroarts, #ablognamedhero, #cards, #watercolor, #art, #create, #emboss, #mermaid, #copics, #paper, #stamp, #ink, #papercraft,

I die cut some long fronds (are they fronds?) of seaweed in silver foil and attached those with glue dots. The sentiment and some sparkly sequins finished the card off.
#cardbomb, #mariawillis, #heroarts, #ablognamedhero, #cards, #watercolor, #art, #create, #emboss, #mermaid, #copics, #paper, #stamp, #ink, #papercraft,

Thanks for stopping by my blog today-I am sorry that I have been so MIA! If you have any questions about this card please feel free to leave me a comment below or shoot me an email. This challenge was really fun for me so if you are interested in playing along, or, just want to check out the gorgeous projects from the design team and other participants then head on over to the A Blog Named Hero challenge blog and enjoy!

Have an awesome day you guys! I'll be back soon!
Maria

mariawillis@hotmail.com


SUPPLY LIST:
-Hero Arts: DC226 Mermaid Stamp & Cut
-Hero Arts: DI455 Coral Fancy Dies (D)
-Hero Arts: Liquid Watercolors
-Hero Arts: SA002 Tweed Pattern

Tuesday, July 24, 2018

Honeybee Mermaid: Have a Fintastic Day!

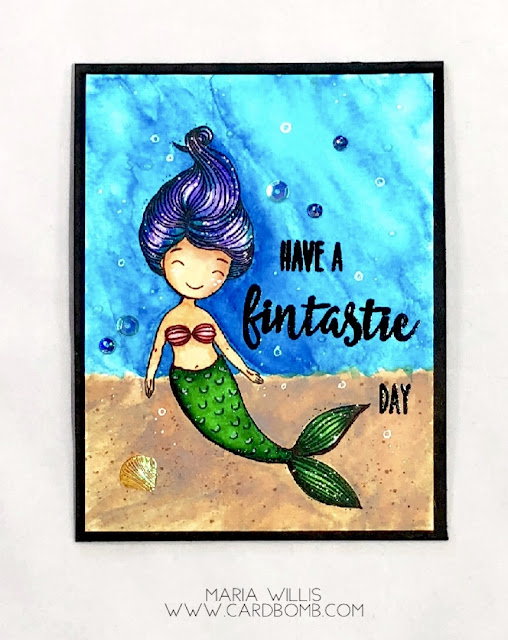
Hey Everybody! I'm here today with a quick post. I finally had time to get back into my craft room last night (think VERY early this morning) and I had a little fun with this gorgeous mermaid from the Swimming By stamp set from Honeybee Stamps. I also used my new Arteza Real Brush Pens for the first time and I love them! 
#cardbomb, #mariawillis, #cards, #stamp, #ink, #paper, #papercraft, #honeybeestamps, #rangerink, #arteza, #artezarealbrushpens, #art, #watercolor, #mermaid, #mermaidsong, #swimmingby, #distressoxideinks,

I started out with the Mermaid's tail and used two green markers and a blue to get some fun shading. Then I moved on to her skin and shells. For most of the card I applied color directly to the watercolor paper with my Arteza Real Brush Pens and then I used a water brush (paint brush with a water-filled barrel) to blend the colors. I did her shells a little differently as the red color that I wanted to use was a bit bolder than I wanted it to be. I colored the red ink onto a piece of acrylic. Then I used my water brush to pick up the color and paint it onto her shells. It worked perfectly to dilute the color. I wanted a little extra shading on the sides of the shells so I went back in with my brush pen, added a little color directly to the edges and then blended it with my water brush. It worked the way it was hoping I would and I love how versatile these pens are.
#cardbomb, #mariawillis, #cards, #stamp, #ink, #paper, #papercraft, #honeybeestamps, #rangerink, #arteza, #artezarealbrushpens, #art, #watercolor, #mermaid, #mermaidsong, #swimmingby, #distressoxideinks,

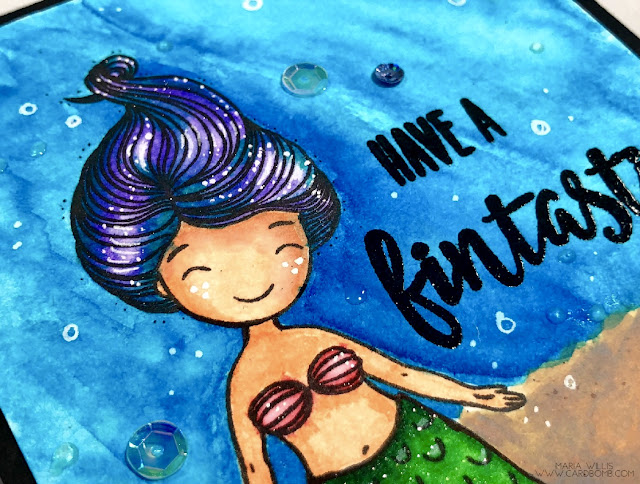
My favorite part to color on this mermaid was her hair. I'm a little obsessed with mixing and blending odd colors right now and for her hair I picked two purples (light and dark) and a teal green color. They blended together to make some really fun shades of purples, blues and greens. I laid down the color first, then blended making sure to leave the highlighted areas with less pigment. After watercoloring I went back in and added more color where it was needed.
#cardbomb, #mariawillis, #cards, #stamp, #ink, #paper, #papercraft, #honeybeestamps, #rangerink, #arteza, #artezarealbrushpens, #art, #watercolor, #mermaid, #mermaidsong, #swimmingby, #distressoxideinks,


I painted my background using both my Arteza Real Brush Pens (two blues for the water) and Distress Oxide Ink in Frayed Burlap (sand). Then I heat embossed the sentiment in black (sentiment is from Mermaid Song by Honeybee Stamps). I finished off my card by using a white gel pen to add highlights and details to the mermaid and background and glueing on some sequins from Hero Arts.
#cardbomb, #mariawillis, #cards, #stamp, #ink, #paper, #papercraft, #honeybeestamps, #rangerink, #arteza, #artezarealbrushpens, #art, #watercolor, #mermaid, #mermaidsong, #swimmingby, #distressoxideinks,

That's it for today folks! Just in case you'd like to pick up a set of these amazing watercolor markers or one of the stamp sets I used for this card I will add some links for you below. If you have any questions please shoot me an email or leave me a comment below.

Have an awesome day!
Maria

mariawillis@hotmail.com


You can shop all of the Distress Oxide Inks at: Ranger Ink Industries

Wednesday, April 25, 2018

Mermaid Kisses

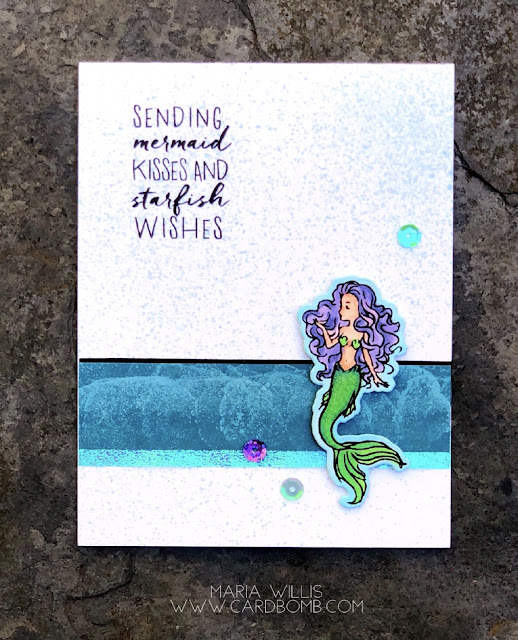
Hey guys! Happy Wednesday! I'm just stopping by to share this fun mermaid card using Mermaid Kisses (CM160) and matching frame cuts (D1456 E) from Hero Arts. This set has three gorgeous mermaids and lots of sea creatures that are so much fun to color.  I thought the mermaid would look cool with some purple hair so I busted out my Copics and colored away. It looks to me like the mermaid is blowing a kiss so this sentiment is her perfect match. The background of my card is spritzed with a mixture of alcohol and Stampin' Up! reinker in Island Indigo. I love the fun ocean spray look that a spritzer can give you (and mixing with alcohol instead of water means it drys even faster). 

Cardbomb, Maria Willis, Hero Arts, Simon Says Stamp, #simonsaysstamp, #ssswchallenge, #cardbomb, #heroarts, #cards, #stamps, #ink, #mermaidkisses, #mermaid, #copics, #handmade, #papercraft, #paper, #color, #ocean, #creative, #crafty

One of my favorite things about coloring this mermaid was adding the stippling on her tail. First, I colored her tail with a mixture of greens. Then, I took the colorless blender pen and tapped it over the tail so that it would lift just a little color and mimic the look of scales. 
Cardbomb, Maria Willis, Hero Arts, Simon Says Stamp,  #cardbomb, #heroarts, #simonsaysstamp, #ssswchallenge,  #cards, #stamps, #ink, #mermaidkisses, #mermaid, #copics, #handmade, #papercraft, #paper, #color, #ocean, #creative, #crafty

Simon Says Stamp has an awesome Wednesday challenge going on today. It's an "Anything Goes" challenge and that means that this card fits the bill. If you want to check out the amazing cards that the SSS Design Team has made to share some inspiration just click HERE

I hope you liked my card today. I've got more mermaid fun heading your way soon. If you don't want to miss out on future posts I'd love to have you subscribe to my blog by clicking on the subscribe by email button at the top right of my blog.  If you've got any questions please feel free to let me know. You can get in touch with me via the comments below or by email.

Have an awesome day you guys!

Maria
mariawillis@hotmail.com


Monday, June 19, 2017

Basic Mermaid

Hey everybody! Happy Tuesday to ya! Yesterday I shared a Magical Mermaid card that was possibly one of my favorite cards ever. Today I've got what I'm calling the Basic Mermaid... because after yesterday's mermaid this one just seems... basic. But let's be real! Sometimes you don't have hours to make a card and you need a quick and easy card that is still pretty. 

I watercolored this mermaid after heat embossing in clear onto watercolor paper. Her tail is Lemon Lime Twist and Emerald Envy with some sparkly Clear Wink of Stella on top. Her skin is Powder Pink and her hair is Real Red. The new Naturally Eclectic DSP made my job super easy as it provided me with an easy "water" background. 


I heat embossed my sentiment in white onto vellum and layered the mermaid on top. Adding some of the new and fabulous Iridescent Sequins in different sizes and colors helped to finish the card off easily.

I really am loving this mermaid set! I do have some ideas on how to experiment with it but haven't had time to do it yet. Soon, I hope! Please let me know if you have any questions at all. If you are interested in purchasing any of the supplies to make this set yourself please let me know. You can also click the "Shop Now" button below, or, click on any of the products in the carousel below and it will take you to my online store.

Thanks for stopping by today! Hope your day is terrific!
Maria.


PRODUCT LIST:


Need more stamps now? Never fear! I've got you covered!
Let me know if you have any questions!


Want a great discount on Stampin' Up! Products and to have a fun new stamping family? Join me on this fun adventure! I can't wait to be your super excited (possibly way too enthusiastic... No! That's not possible!) Stampin' Up! side kick and support lady! In case you didn't know, you can join Stampin' Up! just for the discount and never sell a single product. If you want to know the details just let me know. If you're looking for a discount on your favorite hobby (stamping and paper crafting with Stampin' Up! products) and want to earn money doing it... let me know! I'd love to talk with you whatever your interest might be! If you want to see a little more info go ahead and click the button below. Looking forward to hearing from you!


Sunday, June 18, 2017

Magical Mermaid

Hey Everybody! Happy Monday! I hope you've all had a great weekend and a terrific Father's Day if you were celebrating it. I made my husband a pile of french toast and sausage and then we went to see The Mummy. It's gotta be over 100 degrees Fahrenheit today (yesterday hit 117) and we are roasting. I really need to get some yard work done but i'm thinking hitting the craft room and sweating less is probably a better idea. Anyhow, not so long ago I shared a technique for Glossy Paper called Alcohol Ink Blending. In my tutorial video I shared some samples and I thought it would be fun to show you what I made with them. So, this is the first of those cards and I love how well the background pairs with the Magical Mermaid stamp set...


I had so much fun with every single detail of this card. Luckily that background was already made and once I got a good look at it I knew I'd be pairing it with this gorgeous mermaid!

The mermaid was the first thing I did. I heat embossed her in clear on watercolor paper and then watercolored her using an aqua painter. Her tail is a combination of Lemon Lime Twist, Emerald Envy and a healthy coating of Clear Wink of Stella. Her skin is Powder Pink and her hair is a combo of Perfect Plum and Elegant Eggplant. If you look closely you can see that I colored outside of the lines. I did that on purpose so that when I cut my mermaid out she wouldn't have a white outline that would contrast with the background of the card. Also, because I heat embossed her in clear (which appears white), if I had a white border I think she would've looked weird-as if the details of her body didn't have an edge or were not grounded. I'm not sure I'm explaining that well so I hope it makes sense. 

One of my favorite details of this card is this fun little tag! I cut it out by hand, punched a hole in the top and heat embossed the sea star in white. Adding the gold ribbon and the gold thread added a nice contrast and helped tie it in to the rest of the card.

I heat embossed the seaweed (the seaweed!! isn't it beautiful!! I love that stamp.) in gold multiple times across the bottom of the card. Then I added some of these new iridescent sequins... so, take a second and check out these sequins. They are amazing! The colors are so rad and I love that they come in different sizes! I used my fine tip glue pen to stick those down. 

To finish my card off I heat embossed my sentiment in black onto vellum (stamp in versa mark, then in black archival, stamp image on vellum, then use clear embossing powder) and added a strip of Basic Black to ground it a little better onto the card. I love the way the curve of the mermaid seems to fit so perfectly with that stitched oval. 

I've seen a lot of people requesting to see the insides of cards lately. I always finish the insides of my cards but I rarely share them. I'll try to work on that since it seems that there really is interest. I heat embossed the seaweed in gold onto whisper white cardstock (it's really whisper white, not shimmer paper). Then I used a combination of my aqua painter and my clear wink of stella to paint this in (Emerald Envy, Lemon Lime Twist and Tempting Turquoise). The Wink of Stella works amazingly for "watercoloring" on regular cardstock. The solution helps move the color around without saturating the paper and causing pilling or warping. Pretty awesome!

Alright, here's a last look at this Magical Mermaid. I sure hope you think she's magical too!


In case you missed my post on how to create Alcohol Ink Blended backgrounds, like the one I featured today, here's a link to my video tutorial:

Alright folks, that's it for today. Thank you so much for stopping by and checking out my card today. As always, if you are interested in purchasing any of the products that I showcased today, you can shop in my online store by clicking on the link below or by clicking on any of the products in the carousel below. If you have any questions or comments please ask! I'm here to help and I love hearing back from you.

Have an amazing day you all!
Maria.


PRODUCT LIST:


Need more stamps now? Never fear! I've got you covered!
Let me know if you have any questions!


Want a great discount on Stampin' Up! Products and to have a fun new stamping family? Join me on this fun adventure! I can't wait to be your super excited (possibly way too enthusiastic... No! That's not possible!) Stampin' Up! side kick and support lady! In case you didn't know, you can join Stampin' Up! just for the discount and never sell a single product. If you want to know the details just let me know. If you're looking for a discount on your favorite hobby (stamping and paper crafting with Stampin' Up! products) and want to earn money doing it... let me know! I'd love to talk with you whatever your interest might be! If you want to see a little more info go ahead and click the button below. Looking forward to hearing from you!


01 09 10