Showing posts with label #heatemboss. Show all posts

Thursday, September 3, 2020

Hero Arts Sending Peace, Happiness and Love

Hey Everybody! I'm just popping in to let you know that I'm up on the Hero Arts blog today sharing this card using the beautiful Bare Branched Tree Background stamp. To get all the details head on over to the Hero Arts blog. For now, here are a couple of pics...
Cardbomb, Maria Willis, Hero Arts, cards, card making, stamping, handstamped, ink, paper, paper craft, create, heat emboss, ink blending

This wonderful sentiment is from the Stocking Bouquet stamp set.

Cardbomb, Maria Willis, Hero Arts, cards, card making, stamping, handstamped, ink, paper, paper craft, create, heat emboss, ink blending

This was such an easy winter card to make and I was inspired to make more cards using this Bare Branched Tree stamp so be on the lookout for those soon.
Cardbomb, Maria Willis, Hero Arts, cards, card making, stamping, handstamped, ink, paper, paper craft, create, heat emboss, ink blending


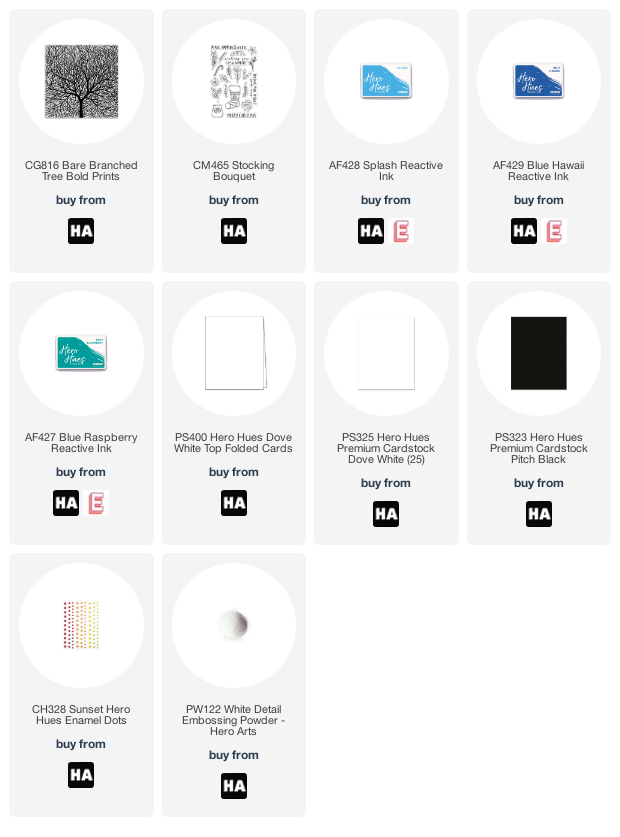
Ok, guys. That's it for today but before I go I'll link to the products I've used below in case you'd like to check any of them out.

Have an awesome day!
Maria


PRODUCT SUPPLY LIST:


Monday, September 17, 2018

Going Monochromatic with Distress Oxides and a Rad Background Stamp!

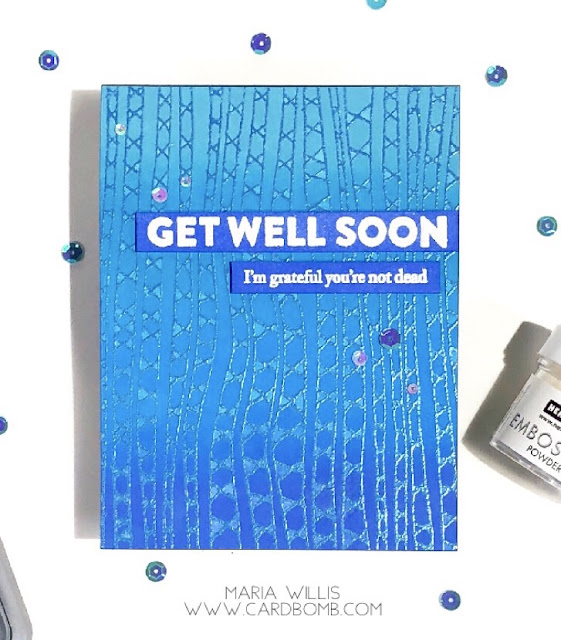
Hello! Today I've got a fun monochromatic card to share with you. The inspiration to make something monochromatic came from this month's challenge over at A Blog Named Hero. I bought this background stamp (Cross-Hatch Bold Prints) quite a while ago and I've been itching to use it. It's got such a fun, crazy pattern that I thought it would provide enough interest for  what is otherwise a simple card. 
#cardbomb, #mariawillis, #card, #cardmaking, #handmade, #heroarts, #distressoxides, #tonicstudiosusa, #monochromatic, #heatemboss, #technique, #create, #creative, #color, #art, #diy, #ink, #stamp, #paper, #papercraft,

I started out by heat embossing the background stamp with Tonic Nuvo Embossing Powder in Blue Odyssey (it's a sparkly, darker blue). Then I sponged the background with Distress Oxide Inks with the lightest color at the top (Broken China), then Salty Ocean, followed by Mermaid Lagoon and finally the darkest color, Blueprint Sketch. After that I used a wet paint brush (wet with water) to fill in the little triangles on each vertical "stripe." As I went along I used a clean, dry paper towel to dry the water and lift some of the Distress Oxide ink off of the card. The ink that was left on the card in the triangles oxidized when it came into contact with the water and turned a lighter shade of blue. 
#cardbomb, #mariawillis, #card, #cardmaking, #handmade, #heroarts, #distressoxides, #tonicstudiosusa, #monochromatic, #heatemboss, #technique, #create, #creative, #color, #art, #diy, #ink, #stamp, #paper, #papercraft,

I used Hero Arts White Satin Pearl Embossing Powder to heat emboss the sentiment. Then I sponged over it with Blueprint Sketch. I wiped the embossed sentiment clean of excess ink and cut my sentiment into strips. Then I mounted it onto the card using foam adhesive.
#cardbomb, #mariawillis, #card, #cardmaking, #handmade, #heroarts, #distressoxides, #tonicstudiosusa, #monochromatic, #heatemboss, #technique, #create, #creative, #color, #art, #diy, #ink, #stamp, #paper, #papercraft,

The last thing I did was to add some blue/iridescent sequins (they look pink with the light hitting them but they really are blue).
#cardbomb, #mariawillis, #card, #cardmaking, #handmade, #heroarts, #distressoxides, #tonicstudiosusa, #monochromatic, #heatemboss, #technique, #create, #creative, #color, #art, #diy, #ink, #stamp, #paper, #papercraft,

I mentioned at the beginning of this post that I am entering this card into the the A Blog Named Hero: Monochromatic themed challenge. If you'd like to check out the design team and the other challengers to see some beautiful projects just click HERE to head over there. 

Thanks for stopping by my blog today! I'm adding links to the products I've used below in case your curious about the products or you'd like to do a little shopping. 

That's it for today. Have an amazing day you all!

Maria


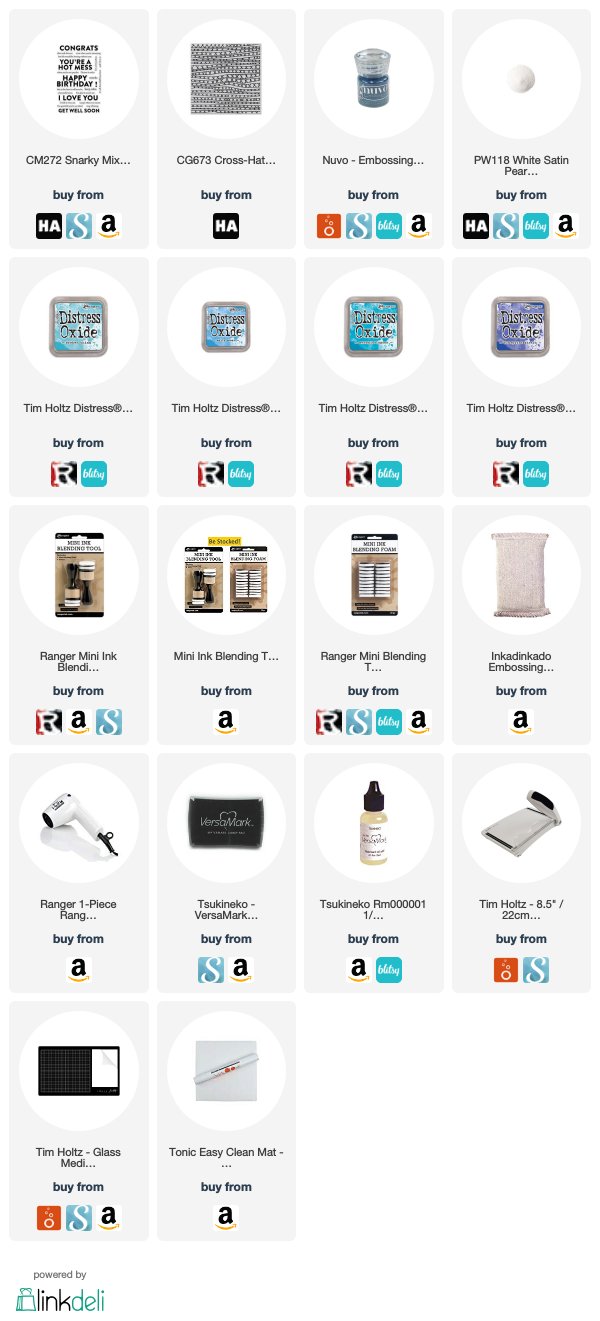
Product List: 

Wednesday, September 5, 2018

Let's Get Hopping Blog Hop: Not Your Standard Card

Hi Everybody! I'm so glad to have you here today because it's been forever since I've taken part in a blog hop and today I am hopping along with the crew from Let's Get Hopping. This month the theme is "Not Your Standard Card." Many card makers stick to making the standard A2 sized card (4.25" x 5.5") and don't deviate much from that size. This challenge is great because it forces us to think a little bit differently and I can't wait to see what sizes and shapes the rest of the crew has come up with. 

I've really been looking forward to using this gorgeous stamp that I just got from Concord & 9th called Grateful for Everything. It is such a beautiful floral image and even though it's intended for the Fall season I just wasn't ready to take it that direction yet. It's perfect for this challenge because the image is large and won't fit on an A2 sized card. This gave me the chance to make a narrower, wider card and fill it with this beautiful image. I heat embossed it in White Satin Pearl Embossing Powder (PW118) from Hero Arts. This embossing powder is so pretty because it takes on a little bit of the color of cardstock that it is embossed on and is pearlescent (sentiment is also embossed in this same EP but looks different because it's on black cardstock). 
#cardbomb, #mariawillis, #heroarts, #concord&9th, #c&9, #altenew, #card, #stamp, #ink, #paper, #technique, #watercolor, #watercolorbleaching, #distressoxideinks, #distressoxides, #distressinks, #timholtz, #copics, #heatemboss, #copicmarkers,

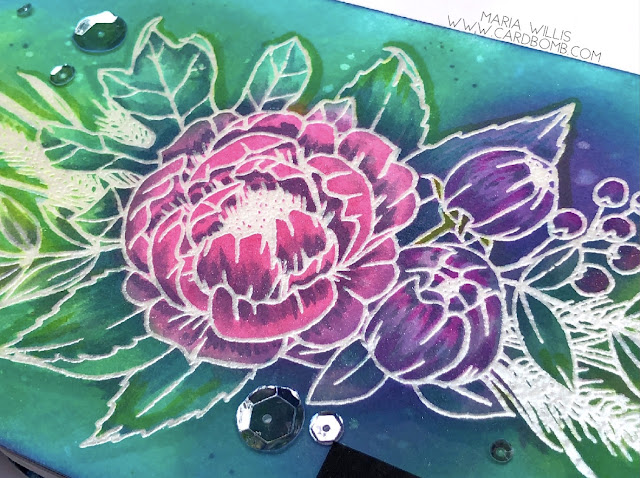
After heat embossing the image I sponged it using my Distress Oxide Inks (colors listed at bottom of post). These inks are such a dream to blend! They look creamy, have a matte finish and even oxidize when you add water. After sponging I flicked some water droplets onto my card with a wet paintbrush. Then I used a paper towel to absorb the water which left behind some pretty, light colored splatter. 
#cardbomb, #mariawillis, #heroarts, #concord&9th, #c&9, #altenew, #card, #stamp, #ink, #paper, #technique, #watercolor, #watercolorbleaching, #distressoxideinks, #distressoxides, #distressinks, #timholtz, #copics, #heatemboss, #copicmarkers,

Next, I used a technique that I learned from the talented Kelly Latevola. She calls it water color bleaching (I think I've called it ink lifting in the past) but then she takes it a step further and incorporates some copic coloring to make her images really pop off of the page. Here's a link to the video I watched where she demonstrates this technique: CLICK HERE. Anyhow, I used a wet paint brush to color over my image. As I wet the image I pressed a paper towel over it to remove some of the ink so that the image looked "bleached." This doesn't remove all of the color but it does leave it looking faded out. After that I went back to the image with my Copic Markers and added shading and drop shadows to give it more detail and add back in some more color where I wanted it. 
#cardbomb, #mariawillis, #heroarts, #concord&9th, #c&9, #altenew, #card, #stamp, #ink, #paper, #technique, #watercolor, #watercolorbleaching, #distressoxideinks, #distressoxides, #distressinks, #timholtz, #copics, #heatemboss, #copicmarkers,

I heat embossed the sentiment from Altenew in the same Hero Arts embossing powder that I used on the floral image. It looks a bit darker and more silvery against the darker cardstock. I popped the image up on foam tape to give it a bit of dimension. 
#cardbomb, #mariawillis, #heroarts, #concord&9th, #c&9, #altenew, #card, #stamp, #ink, #paper, #technique, #watercolor, #watercolorbleaching, #distressoxideinks, #distressoxides, #distressinks, #timholtz, #copics, #heatemboss, #copicmarkers,

To finish the card off I add a coat of Wink of Stella to my image. Then I added some clear sequins in a variety of sizes to give it a little more sparkle.
#cardbomb, #mariawillis, #heroarts, #concord&9th, #c&9, #altenew, #card, #stamp, #ink, #paper, #technique, #watercolor, #watercolorbleaching, #distressoxideinks, #distressoxides, #distressinks, #timholtz, #copics, #heatemboss, #copicmarkers,

Well, that is it for today folks. I hope you've enjoyed my project because I really enjoyed trying out a new (to me) technique. I've put a list of the products that I used and links to the shops where they can be purchased just in case you're interested in trying this technique out for yourself. I am also entering this card in the Simon Says Stamp Wednesday Challenge (Anything Goes)

I hope you'll keep on hopping along with us to check out what the rest of the crew has made for this hop. You can head on over to Jennifer Frost's blog by clicking the next button below.

Have an amazing day!
Maria


PRODUCT SUPPLY LIST AND SHOPS (just click the logos to shop):


-DISTRESS OXIDE INKS:
Picked Raspberry
Twisted Citron
Lucky Clover
Peacock Feathers
Wilted Violet

-BLENDING TOOLS
Ranger Mini Ink Blending Tool (Round)
Ranger Mini Blending Tool Replacement Foams 

-PAINT BRUSH
Tim Holtz Waterbrush Detailer Tip

-Tim Holtz Tools by Tonic Stamp Platform


-White Satin Pearl Embossing Powder (PW118)


-Hello Gorgeous Stamp Set


Wednesday, May 9, 2018

Hero Arts Mum

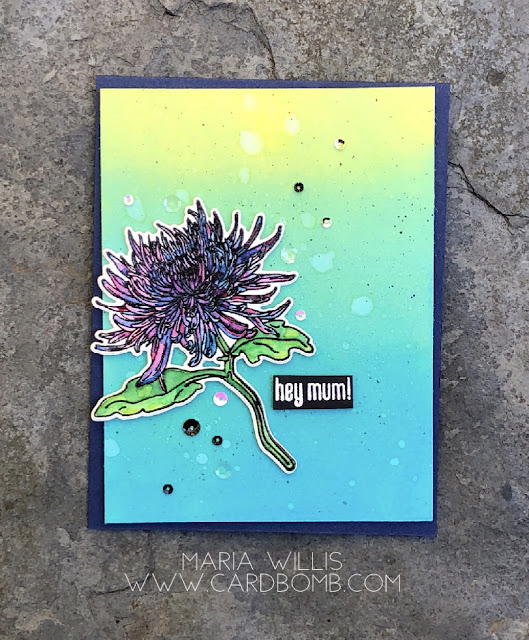
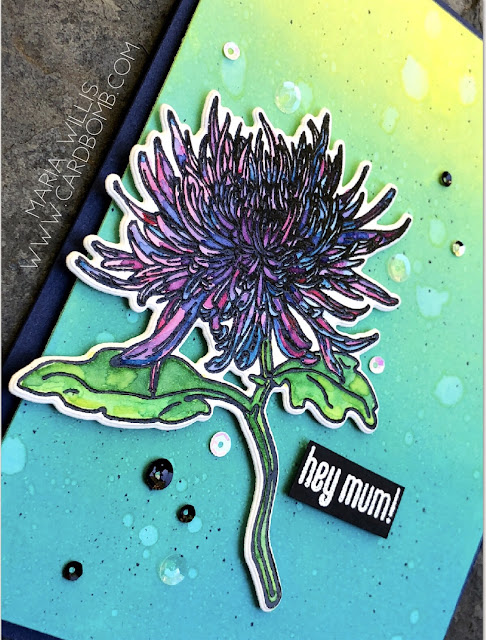
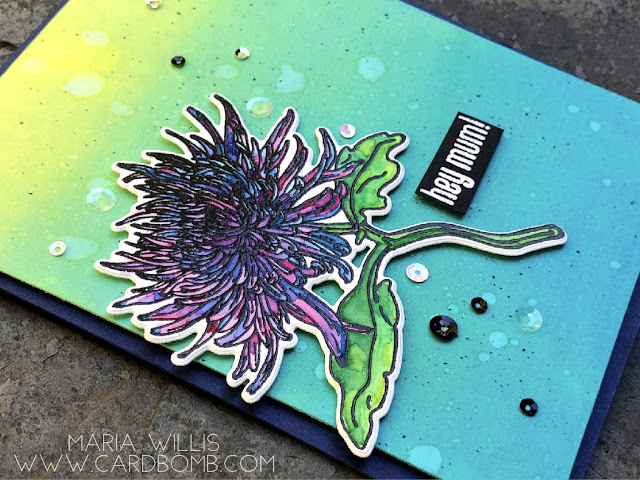
Hey Guys! Happy middle of the week! I'm back with another card using this gorgeous mum from Hero Arts and with another entry into the A Blog Named Hero: Put a Flower On It challenge. This flower has got so much detail in the petals and is really fun to watercolor. I used only two colors (Melon Mambo and Pacific Point) but they blended easily into many different shades of prettiness.

#cardbomb, #mariawillis, #heroarts, #simonsaysstamps, #stampinup, #ablognamedhero, #mum, #momsclematis, #timholtz, #watercolor, #embossingpaste, #heatemboss, #flowers, #sparkly, #stamps, #ink, #paper, #papercraft, creative, #craft, #handmade, #diy, #art,

I used Distress Oxide Inks to blend the background (Peacock Feathers, Lucky Clover, Crushed Pistachio and Twisted Citron) and then spritzed water over it to create the droplets. I also flicked some black ink over the top of that.
#cardbomb, #mariawillis, #heroarts, #simonsaysstamps, #stampinup, #ablognamedhero, #mum, #momsclematis, #timholtz, #watercolor, #embossingpaste, #heatemboss, #flowers, #sparkly, #stamps, #ink, #paper, #papercraft, creative, #craft, #handmade, #diy, #art,

I popped the mum and heat embossed sentiment up on foam adhesive to give them some dimension. Then I added sequins and put it all on a Night of Navy card base.
#cardbomb, #mariawillis, #heroarts, #simonsaysstamps, #stampinup, #ablognamedhero, #mum, #momsclematis, #timholtz, #watercolor, #embossingpaste, #heatemboss, #flowers, #sparkly, #stamps, #ink, #paper, #papercraft, creative, #craft, #handmade, #diy, #art,


I'm entering this card into the Put a Flower On It challenge over at A Blog Named Hero. If you're looking for some awesome flower themed inspiration using Hero Arts products I hope you'll go check out what their design team has created because it's all amazing! Just click HERE to head over to their blog.

Thanks for stopping by today! I'll be back tomorrow with the crew from One Stamp At a Time for a big blog hop. See you soon!

Have an amazing day!
Maria


Friday, March 16, 2018

#TGIFC151 - Inspiration Challenge

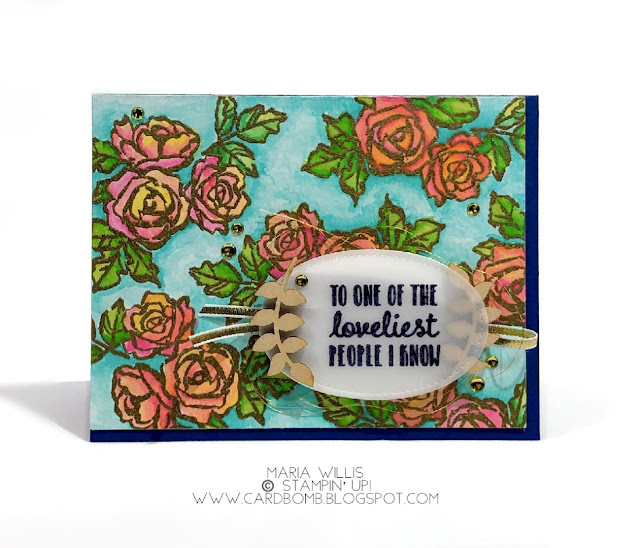
Hello, hello! I hope you're having a terrific day today! I'm glad to have you join me today as TGIF Challenges has a really fun theme this week. It's Inspiration week over at the challenge blog and TGIFC has shared a gorgeous picture to get everyone inspired to create along with them. Here's what I've created for the challenge (scroll down to see the inspiration picture). 
Card bomb, Maria Willis, Stampin' Up!, Petal Palette, stamp, stamping, ink, paper, watercolor, technique, paper craft, crafty, creative, handmade, diy, cards, heat emboss, flowers, SAB, Occasions, Sale-a-Bration

I heat embossed the roses from the Petal Palette stamp set multiple times on a piece of watercolor paper. Then I used just five colors to watercolor the whole thing: Melon Mambo, Daffodil Delight, Lemon Lime Twist, Emerald Envy and Bermuda Bay. I love the way these colors blend to make such vibrant and gorgeous shades of the colors. 


Card bomb, Maria Willis, Stampin' Up!, Petal Palette, stamp, stamping, ink, paper, watercolor, technique, paper craft, crafty, creative, handmade, diy, cards, heat emboss, flowers, SAB, Occasions, Sale-a-Bration

I heat embossed my sentiment on vellum and added some wooden embellishments to frame it out. I also added Gold Metallic Thread, Gold Ribbon and some Gold Enamel Embellishments. I offset the watercolored background on a base of Night of Navy cardstock and that was it for this card.
Card bomb, Maria Willis, Stampin' Up!, Petal Palette, stamp, stamping, ink, paper, watercolor, technique, paper craft, crafty, creative, handmade, diy, cards, heat emboss, flowers, SAB, Occasions, Sale-a-Bration


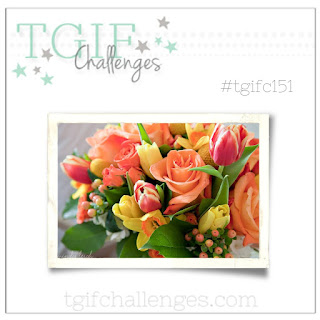
Here is the Inspiration picture from #TGIFC151. I tried to stay true to both the theme of flowers and to the color scheme as well. If you'd like to see some more amazing projects using this inspiration piece then head on over to the TGIF Challenge Blog and check out what the rest of the design team has made. If you've got a great idea of your own then we'd love to have you play along with us too!
Card bomb, Maria Willis, Stampin' Up!, Petal Palette, stamp, stamping, ink, paper, watercolor, technique, paper craft, crafty, creative, handmade, diy, cards, heat emboss, flowers, SAB, Occasions, Sale-a-Bration

That's all for today but I am so glad that you stopped by. If you have any questions please let me know. You can reach me by leaving a comment below or by shooting me an email. All of the products that I have used today are available for purchase in my store (link below).

Have an awesome day!

Maria
mariawillis@hotmail.com


Want to shop with me? No problem, just click the button below. 
Let me know if you have any questions!
Email: mariawillis@hotmail.com


Want a great discount on Stampin' Up! Products and to have a fun new stamping family? Join me on this fun adventure! I can't wait to be your super excited Stampin' Up! side kick and support lady! In case you didn't know, you can join Stampin' Up! just for the discount and never sell a single product. If you want to know the details just let me know. If you're looking for a discount on your favorite hobby (stamping and paper crafting with Stampin' Up! products) and want to earn money doing it... let me know! I'd love to talk with you whatever your interest might be! If you want to see a little more info go ahead and click the button below. Looking forward to hearing from you!


Monday, December 4, 2017

Give Thanks

Hey everybody! I've just got a quick share for today. This card is quick and easy and is actually a stepped down card from something I made a while back. Honestly, I made this a while back too and never got around to sharing it. Whoops!


A while back I did a tutorial for a technique called "Ink Smooshing." You can check out that tutorial here. It's a fun and easy technique but perhaps not something you want to try if you're in a hurry and need a card on the double. So, I decided to see if I could recreate my card technique card using DSP... Wouldn't ya know, it worked out pretty well. 

The card on the left has a background that was created with the Ink Smooshing Technique. The card on the right uses the Painted Autumn DSP as a background piece.

The sentiment that I used (heat embossed in gold) is from the Labels to Love stamp set. I also used the Starburst Punch with Gold Foil and added a strip of Gold Glimmer Paper for a little extra flair.

So, the next time you're looking for an easy Thank You card, look no further. 

Ok, I've got a gigantic task list for today so I am outta here.
Have an amazing day you all and I'll see you back here soon.

Maria.


Want to shop with me? No problem, just click the button below. 
Let me know if you have any questions!
Email: mariawillis@hotmail.com


Want a great discount on Stampin' Up! Products and to have a fun new stamping family? Join me on this fun adventure! I can't wait to be your super excited Stampin' Up! side kick and support lady! In case you didn't know, you can join Stampin' Up! just for the discount and never sell a single product. If you want to know the details just let me know. If you're looking for a discount on your favorite hobby (stamping and paper crafting with Stampin' Up! products) and want to earn money doing it... let me know! I'd love to talk with you whatever your interest might be! If you want to see a little more info go ahead and click the button below. Looking forward to hearing from you!


Sunday, October 29, 2017

Grid Paper Paper Notecards

Hey Everybody! Happy beginning of the week to you. Thanks for stopping by my blog today because I am excited to share something with you... I've been working on creating some fun background pieces with spritzing and splattering and watercoloring. I like to use Stampin' Up!'s Grid Paper to protect my work surface when I am getting messy. The other week I looked down at my grid paper and realized it was a really fun piece of art in itself. I decided to use it to make a set of birthday cards that I could give to my friends and I love how grungy and fun the set came out.

The huge Lemon Lime Twist blob on this card is what really caught my eye so I made sure that it wasn't covered up when I designed the cards.

I used the same Happy Birthday sentiment from the Big on Birthdays Stamp Set, heat embossed in white on Basic Black Cardstock for each card. Each background is different and fun in its' own way since the grid paper shows a collection of messes from different projects I've been working on. 

I wanted to keep with the grungy, messy look and thought some washi tape would be great for embellishing these cards. The Pick a Pattern Washi Tape and the Year of Cheer Specialty Washi Tape made for a winning combo. The geometric look of the Pick a Pattern went perfectly with the Grid Paper and the metallic finish of the Year of Cheer tape added some industrial looking flair.

I used the Starburst Punch with some Silver Foil to layer behind my sentiment. On each card decided to switch up the embellishments by using either Metallic Black or Silver Thread and Different enamel dots or rhinestones. 

Here's a look at the whole set together...

I already had the pleasure of giving one of these cards to a friend for her 25th birthday this weekend. 

So, let's hear it... Have you used your scratch paper or grid paper on your cards before? Looking forward to hearing back from you. If you've done something like this before please leave me a link in the comments below. I'd love to check out your work too!

Ok, Thanks for stopping by and if you have time tomorrow please come back as I've got something really exciting share. As always, if you have any questions please ask! Feel free to leave me a comment below or to email me directly at mariawillis@hotmail.com

Have an awesome day!
Maria.


Want to shop with me? No problem, just click the button below. 
Let me know if you have any questions!
Email: mariawillis@hotmail.com


Want a great discount on Stampin' Up! Products and to have a fun new stamping family? Join me on this fun adventure! I can't wait to be your super excited Stampin' Up! side kick and support lady! In case you didn't know, you can join Stampin' Up! just for the discount and never sell a single product. If you want to know the details just let me know. If you're looking for a discount on your favorite hobby (stamping and paper crafting with Stampin' Up! products) and want to earn money doing it... let me know! I'd love to talk with you whatever your interest might be! If you want to see a little more info go ahead and click the button below. Looking forward to hearing from you!


Saturday, October 7, 2017

World Card Making Day Blog Hop 2017

Hey Everybody! Hello and welcome to my blog. I'm so excited to have you here today because today is World Card Making Day! Pretty great day if you're asking me. To celebrate the occasion I am blog hopping with a phenomenally talented group of Stampin' Up! demonstrators. Just wait until you see what everyone has made...

For my card I decided to do some gold heat embossing along with some watercoloring. I've been doing a lot of this lately but it's hard to stop when the results can be so stunning. My flower image is from the Remarkable You Stamp Set and it is perfect for watercoloring because of the big, full leaves.
I used Melon Mambo and Daffodil Delight inks on the petals and Lemon Lime Twist and Emerald Envy on the stem and leaf. These are some of my favorite color combos for watercoloring because they blend into the most spectacular colors. I heat embossed my sentiment in gold on vellum. Then I layered it on top of a piece of Whisper White Cardstock, Gold Foil and a Whisper White background that was dry embossed with the Garden Trellis Embossing Folder. I added Black Metallic Thread and Iridescent Sequins to finish the card off.

The sentiment is from the Rose Wonder Stamp Set (so many great sentiments in that set). My card base is Thick Whisper White with a mat of Basic Black cardstock. 


I've made a video tutorial on how I watercolored this flower. If you haven't tried watercoloring before I hope that the tips I share in the video will help you get off to a good start. Enjoy!


As always, I'm thrilled to have you stop by my blog. I hope you've enjoyed my card and video today. If you're ready to see some incredible creations from the other artists on this blog hop then please click the next button and head on over to my incredibly talented friend over in Canada... The fabulous Carolynn Sander!

Thanks again for stopping by! See you soon!
Maria.


BLOG ROLL:

Need more stamps now? Never fear! I've got you covered!
Let me know if you have any questions!
Email: mariawillis@hotmail.com


Want a great discount on Stampin' Up! Products and to have a fun new stamping family? Join me on this fun adventure! I can't wait to be your super excited (possibly way too enthusiastic... No! That's not possible!) Stampin' Up! side kick and support lady! In case you didn't know, you can join Stampin' Up! just for the discount and never sell a single product. If you want to know the details just let me know. If you're looking for a discount on your favorite hobby (stamping and paper crafting with Stampin' Up! products) and want to earn money doing it... let me know! I'd love to talk with you whatever your interest might be! If you want to see a little more info go ahead and click the button below. Looking forward to hearing from you!


Thursday, October 5, 2017

Creating Kindness Blog Hop: Color Inspiration

Hey Everybody! I hope you're having a great day today! I am excited because it's time for another Creating Kindness around the world blog hop. We are a group of Independent Stampin' Up! Demonstrators who have teamed up to bring you crafty fun once a month, both via a blog and a video hop. This month our theme is Color Inspiration. Each of us has picked three colors (we are allowed to add neutrals if we'd like to) and had a good play. If you'd like to see the whole team's projects please be sure to click the next button at the bottom of my post.


I decided to use Pacific Point, Berry Burst and Daffodil Delight as my three colors. I picked these colors because I was pretty sure that when watercolored they would blend fantastically into a wider range of beautiful colors. 

I decided to use the largest stamp from the Hello Color stamp set to stamp a background on my watercolor paper. I had to stamp it twice to cover the background. I used Versamark ink and then heat embossed in gold. This stamp really has such a fun design.


After I embossed my watercolor paper I started watercoloring at the bottom with Pacific Point. I used my aqua painter to add water and then color. Soon I began to add Berry Burst and I made sure to blend the colors together where they met to create some purpley-blues that I just love. I carried the Berry Burst into the top half of the card where I finally blended it together with Daffodil Delight. 


I selected some parts of the design to highlight and added extra ink to those areas to make them stand out. I used the Basic Black 3/8" Shimmer Ribbon to cover the middle of the card (where there was a gap between the background stamps). I covered that with a sentiment that is heat embossed in gold on a basic black oval that was cut with my stitched shapes framelits. I finished my card off with Black Rhinestone Jewels. 


In case you're curious, I've made a video tutorial sharing how I created this card. There are some watercoloring tips included just in case you're interested. Enjoy!


That's it for today folks! Thank you so much for stopping by. Please the button below to continue on to my incredibly talented friend from Canada... Carolynn Sander!

See you back here real soon-Come back Saturday! It's World Card Making Day and I've got something fun planned for the occasion.

Maria.


BLOG ROLL:


Want to shop with me? No problem, just click the button below. 
Let me know if you have any questions!
Email: mariawillis@hotmail.com


Want a great discount on Stampin' Up! Products and to have a fun new stamping family? Join me on this fun adventure! I can't wait to be your super excited Stampin' Up! side kick and support lady! In case you didn't know, you can join Stampin' Up! just for the discount and never sell a single product. If you want to know the details just let me know. If you're looking for a discount on your favorite hobby (stamping and paper crafting with Stampin' Up! products) and want to earn money doing it... let me know! I'd love to talk with you whatever your interest might be! If you want to see a little more info go ahead and click the button below. Looking forward to hearing from you!


01 09 10