Wednesday, October 26, 2016

The Most Adorable Moose!

Hello there you jolly little moose! I love all of the stamps in this set but I think this moose is my favorite. I reserve the right to change my mind on that tomorrow, but, for today this guy is my fave! I wanted to make a simple Christmas card that I could easily reproduce but that still had some fun elements to it and this is what I came up with.

I stamped the moose in Basic Black Archival ink on Crumb Cake cardstock, fussy cut it out, and sponged the edges with Crumb Cake ink. I popped the moose up with dimensionals on top of some Gold Metallic Thread and a Real Red star that I embossed with the Festive embossing folder. 


The background is stamped in Versamark on Sahara Sand to create a subtle starry background behind our star of the show (the moose of course!). I finished the card off by layering Crumb Cake cardstock on a Basic Black card base. 


Easy peasy! I'm planning to make a set of these for a craft fair I'll be participating in at the beginning of December. Hopefully someone will take them home.

Would you like to make this project yourself? Please have it! Here are the directions:

Supplies:
  • Stamp Sets: Jolly Friends (P: 142112) & Snow Place (P: 139738)
  • Inks: Archival Black (140931), Crumb Cake (126975), Versamark (102283)
  • Paper: Basic Black (121045), Crumb Cake (120953), Sahara Sand (121043), Real Red (102482)
  • Other: Star Framelits Dies (133723), Paper Snips (103579), Sponge Daubers (133773), Gold Metallic Thread (138401), Festive Embossing Folder (141471), Fast Fuse (129026), Dimensionals (104430)
Measurements:
  • Card Base in Basic Black: 4 ¼” x 11” and scored at 5 ½”
  • Crumb Cake Mat: 3-5/8” x 4-7/8”
  • Basic Black Mat: 3-5/16” x 4-9/16”
  • Sahara Sand Mat: 3¼ x 4½

Instructions:

  1. Stamp images onto a scrap of Crumb Cake cardstock using Black Archival Ink. Cut it out and sponge the edges using Crumb Cake ink and a sponge dauber. Set Aside.
  2. Stamp the stars from Jolly Friends onto the Sahara Sand mat using Versamark ink. Then stamp the sentiment from Snow Place at the bottom in Archival Basic Black ink.
  3. Using the Stars Framelits Dies cut a star out of Real Red Cardstock. Then emboss the star using the Festive Embossing Folder.
  4. Using Fast Fuse adhere the Crumb Cake mat to the card base.
  5. Using Fast Fuse adhere the Sahara Sand mat to the Basic Black mat.
  6. Use Dimensionals to adhere the Basic Black/Sahara Sand piece on top of the Crumb Cake mat on the card base.
  7. Put Dimensionals on the back of the Moose. Coil Gold Metallic thread around your fingers and place it on the star. Adhere the Moose onto the star using it to hold the Gold thread in place.
  8. Adhere the Star/Moose to the card using Dimensionals.

Thanks for stopping by today! You know you've made my day!
If you'd like to make this project yourself check out my product list below and be sure to let me know if you need any help or have questions.

Take care,
-Maria.

PRODUCT LIST:


Need more stamps now? Never fear! I've got you covered!


Want a great discount on Stampin' Up! Products and to have a fun new stamping family? Join me on this fun adventure! I can't wait to be your super excited (possibly way too enthusiastic... No! That's not possible!) Stampin' Up! side kick and support lady! In case you didn't know, you can join Stampin' Up! just for the discount and never sell a single product. If you want to know the details just let me know. If you're looking for a discount on your favorite hobby (stamping and paper crafting with Stampin' Up! products) and want to earn money doing it... let me know! I'd love to talk with you whatever your interest might be! If you want to see a little more info go ahead and click the button below. Looking forward to hearing from you!


Tuesday, October 25, 2016

Wishing you Warmth & Cheer!

Do you every just fall in love with a set and you just think it is SO amazing and then it doesn't seem like you see very many people using it...? That's what's happened to me with the Warmth & Cheer set from the Holiday Catalog. I LOVE it!! I haven't had much time to play around with it yet but here's my first card with it. If you can believe it I've used six of the stamps from the set on this card!!

I love the adorable little ornaments that come in this set and I can't wait to use them again! On this card I used them as background design and stamped them in Cucumber Crush ink on Cucumber Crush paper. I used the stitched stamp to create some background interest on the sides of my card and stamped that using Emerald Envy.


The greens I used both go well with Real Red ink and Tempting Turquoise so I added the sentiment and fun, stitched/knitted heart in these colors. The Layering Circle Framelits  were perfect to add some scalloped glimmer paper frames on top of some ruched ribbon and a Bermuda Bay banner.

This card was so fun to make and even though it is full of stamping it was quick and easy too! I'll be back soon with more Warmth & Cheer fun! 

Have an awesome day!
-Maria.

PRODUCT LIST:


Need more stamps now? Never fear! I've got you covered!


Want a great discount on Stampin' Up! Products and to have a fun new stamping family? Join me on this fun adventure! I can't wait to be your super excited (possibly way too enthusiastic... No! That's not possible!) Stampin' Up! side kick and support lady! In case you didn't know, you can join Stampin' Up! just for the discount and never sell a single product. If you want to know the details just let me know. If you're looking for a discount on your favorite hobby (stamping and paper crafting with Stampin' Up! products) and want to earn money doing it... let me know! I'd love to talk with you whatever your interest might be! If you want to see a little more info go ahead and click the button below. Looking forward to hearing from you!


Monday, October 24, 2016

WWYW #87: Labeler Alphabet

Hey, hey, and happy Monday! This week over at What Will You Stamp we've been challenged to use the Labeler Alphabet stamp set. This was the perfect set for me to use as my husband's coworker Kurt, was having a retirement party. My husband and I settled on the sentiment, "Kurt, You are old as dirt," and I got to work on the card...  This card was quick and easy since I was pressed for time. I heat embossed the dinosaur in white onto some shimmery white paper. Then I watercolored the background and splattered it with water to get those specks in the sky. 

I love how easy it is to stamp with this alphabet set. My favorite letters are these block style letters but I've also found some good use for the the regular style letters as well. For this card I heat embossed the text in white embossing powder on Basic Black Cardstock then I cut the words out and adhered them to the card.

One of the best things about this set is that there are multiples of some of the more popular letters which makes it easier to stamp full words all at once instead of letter by letter. 

If you have a minute head on over to the What Will You Stamp Challenge blog and check out what the rest of the design team has come up with this week. If you have this set then please join us! We would love to see what you make with this set!

Have an amazing day!
-Maria

Monday, October 17, 2016

WWYS #86: Cookie Cutter Halloween

Hello! Guess what day it is?! Yep! It's What Will You Stamp Monday and this week we have a new challenge for you: Cookie Cutter Halloween! I have seen so many fun projects with this set and am really excited to see what the rest of the WWYS design team has come up with. I decided to use the "mummy" as someone who got hurt... so I guess that's a full body bandage or full body cast. Haha! Poor little guy!
I thought that this sentiment went perfectly with this bandaged up little guy. Hopefully someone will get a kick out of this card.

I added some detail to my card by adding some Pop of Pink DSP, Gorgeous Grunge splatter, a Ghoulish Grunge banner, some Silver Metallic Thread and some enamel dots. Hot Tip: if you want black enamel dots just use a black Sharpie to color over any color enamel dot.

Guess What?! Today I have directions with measurements for you. Have fun with them!

Measurements:
  • Card Base in Basic Gray: 11” x 4¼” and scored at 5½”
  • Basic Black Mat: 4” x 5¼”
  • Whisper White Mat (with Images): 3¼” x 5¼”
  • Old Olive Strip: ½” x 5¼”
  • Pop of Pink DSP Strip: 1” x 5¼”
  • Old Olive Cake Banner: ¾” x 3½”
  • Whisper White Banner: 2-14/16” x 1¼”

Instructions:

  1. Stamp the mummy image onto Shimmery White paper using Basic Gray Archival Ink. Use an aqua painter and Smoky Slate Ink to color the image. Then punch the image out. Set aside.
  2. Stamp the sentiment in Basic Black Archival Ink on the Old Olive Banner. Set Aside.
  3. Stamp the mesh/net image in Smoky Slate on the Whisper White banner. Flag the left side with Paper Snips. Set Aside.
  4. On the large Whisper White Mat stamp the splatter image from Gorgeous Grunge repeatedly using Smoky Slate Ink.
  5. Put a strip of adhesive down the back side of the DSP strip. Adhere it to the left side of the Basic Black Mat.
  6. Put a strip of adhesive on the back of the left side of the large Whisper White Mat with Smoky Slate spatters. Adhere it to the long strip of Old Olive.
  7. Put adhesive on the back of the Whisper White/Old Olive combo mat and then adhere to the Basic Black mat making sure that the borders are even.
  8. Put adhesive on the back of the Whisper White banner with the mesh/net image. Do not adhere yet.
  9. Take a length of Silver Metallic Thread and wrap it multiple times around your fingers. Stick it in the adhesive on the back of the Whisper White banner.
  10.  Adhere the Whisper White banner to the card.
  11.  Using Dimensionals adhere the sentiment banner to card lining the left side up with the left edge of the card.
  12. Using Dimensionals adhere the mummy piece to the card. You may need to use two layers of Dimensionals in some places so that the mummy will lay flat.
  13.  Using the Sharpie marker color in three enamel dot circles changing them to black.
  14.  Add the Old Olive and newly colored Black enamel shapes to the card front.

And that's it for today folks! I sure hope I don't have to give this card away soon! Here's a look at the whole Cookie Cutter Halloween stamp set. It's really fun! If you have it and you'd like to play along with us this week we would love to see what you make! Add a photo of your own project to the What Will You Stamp Challenge blog!

Thanks for stopping by!
-Maria


PRODUCT LIST:


Need more stamps now? Never fear! I've got you covered!


Want a great discount on Stampin' Up! Products and to have a fun new stamping family? Join me on this fun adventure! I can't wait to be your super excited (possibly way too enthusiastic... No! That's not possible!) Stampin' Up! side kick and support lady! In case you didn't know, you can join Stampin' Up! just for the discount and never sell a single product. If you want to know the details just let me know. If you're looking for a discount on your favorite hobby (stamping and paper crafting with Stampin' Up! products) and want to earn money doing it... let me know! I'd love to talk with you whatever your interest might be! If you want to see a little more info go ahead and click the button below. Looking forward to hearing from you!


Thursday, October 13, 2016

OSAT Blog Hop: Oh My Pumpkins and Pie


Hi everybody and happy Thursday! Thanks for stopping by my blog today because it's gonna be a fun one! Today I'm hopping along with the One Stamp At a Time crew and our theme is "Oh My Pumpkins and Pie!" It's a broad theme that encompasses Thanksgiving, Halloween, Fall... Pumpkins, Pies... Each of the artists on this hop has both a card and a project to share with you. If you arrived here from Wendy Cranford's blog then thank you for hopping along to me! I hope you'll hit the next button at the bottom of my post to see all of the amazing projects on this hop. 

For my card I used a stamp set called Totally Trees. It's an awesome set with so many trees for all occasions. I decided to make a set of 3"x3" Fall cards and wanted them to be bright and cheerful. I heat embossed the trunk and branches in Copper Emboss Powder. Then I stamped the leaves in Daffodil Delight and added some extra color with my Stampin' Write Markers (Pumpkin Pie and Real Red). I spritzed the stamp with water and then stamped it onto Shimmery White cardstock. I used my layering circle framelits to cut out the tree and the scalloped circle behind it. I added a banner and sentiment from the Thoughtful Banners stamp set and layered it all with dimensionals and gold metallic thread on a base of Bermuda Bay. I love how bright and vibrant these came out!


For my project I made a Fall Candy gift box. I used the Gift Box Punch board to make my box out of Crumb Cake cardstock. I love the Gift Box Punch Board. If you haven't used it before I've gotta tell you that it is such a quick and easy way to make a custom size box (this one is 2.5" squared). Another thing that I love about these boxes is that you don't need any adhesive to close them. They fold right up and the tabs at the top have little slots that hook together for closure. Pretty awesome! 
I used the Leaflets Framelits to cut a leaf out of the front of my box and sponged a little around the edges. I used a piece of window sheet to cover the hole from the inside of the box. I filled the box with mini candy corns and closed it up.

Next I made a belly band using Daffodil Delight and Bermuda Bay cardstock. I used the leaf that I had cut out of the front of my box to decorate the top. I sponged the edges of the leaf and added a banner and sentiment from Thoughtful Banners.  I added a little Gold 1/8" Ribbon, Metallic Gold Thread and some Linen Thread to finish my project off. 

Here's what the goody box looks like without the belly band and ready for someone to eat. Yum!

Thanks for stopping by my blog today! I hope you liked my projects today and that you'll keep hopping along to check out the rest of the amazing projects on this hop! Next up is the amazing Tina Rackley Riddle!

See you all soon!
-Maria


BLOG ROLL:
Anna Smith
Melissa Davies
Sara Levin
Wynne Grob
Kayla McGinnis
Wendy Cranford
Maria Willis: YOU ARE HERE
Tina Rackley Riddle: NEXT
Renee Romain Ondrajka
Andrea Tracy-Tucker
Pam Staples
Jeanna Bohanon
Lisa Altman
Lori Mueller
Justin Krieger
Dena Rekow


CARD SUPPLIES:


GIFT BOX PROJECT SUPPLIES:


Need more stamps now? Never fear! I've got you covered!


Want a great discount on Stampin' Up! Products and to have a fun new stamping family? Join me on this fun adventure! I can't wait to be your super excited (possibly way too enthusiastic... No! That's not possible!) Stampin' Up! side kick and support lady! In case you didn't know, you can join Stampin' Up! just for the discount and never sell a single product. If you want to know the details just let me know. If you're looking for a discount on your favorite hobby (stamping and paper crafting with Stampin' Up! products) and want to earn money doing it... let me know! I'd love to talk with you whatever your interest might be! If you want to see a little more info go ahead and click the button below. Looking forward to hearing from you!


Monday, October 3, 2016

WWYS #84: Ghoulish Grunge

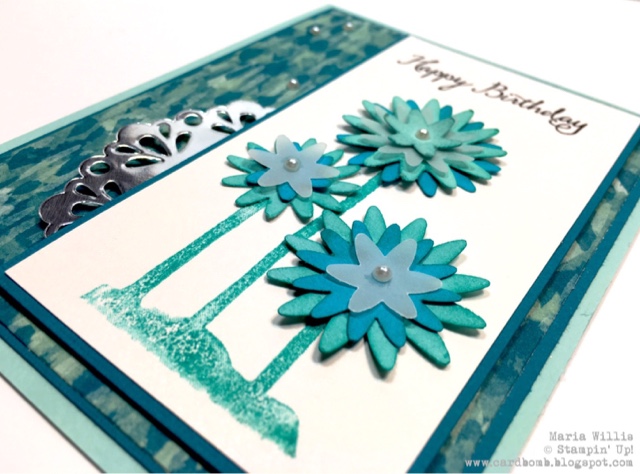
Happy Monday! This week over at What Will You Stamp we have been challenged to use the Ghoulish Grunge stamp set from the new Holiday Catalog. I love figuring out different ways to use seasonal or holiday sets so this was a fun challenge for me. Here's my card... can you tell which of the  "ghoulish" stamps I used? Yup, I used the blood drips. At least that's what I see when I look at this stamp (am I making myself sound like a serial killer?).

I turned the blood drips upside down, stamped them in Bermuda Bay and used the "drips" as stems for flowers. Then I used the Blossom Bunch Punch to punch out flowers in Pool Party, Tempting Turquoise and Vellum. I sponged the flowers with Bermuda Bay ink to create a more monochromatic look and topped the flowers off with pearls. 


Ghoulish Grunge has some pretty fun stamps in it! If you have this set please join us for the fun over at What Will You Stamp this week! I can't wait to see what you will stamp!

Thanks for stopping by by blog today! See you back here soon!
-Maria


PRODUCT LIST:


Need more stamps now? Never fear! I've got you covered!


Want a great discount on Stampin' Up! Products and to have a fun new stamping family? Join me on this fun adventure! I can't wait to be your super excited (possibly way too enthusiastic... No! That's not possible!) Stampin' Up! side kick and support lady! In case you didn't know, you can join Stampin' Up! just for the discount and never sell a single product. If you want to know the details just let me know. If you're looking for a discount on your favorite hobby (stamping and paper crafting with Stampin' Up! products) and want to earn money doing it... let me know! I'd love to talk with you whatever your interest might be! If you want to see a little more info go ahead and click the button below. Looking forward to hearing from you!


Ultimate Pink Blog Hop!


Hello and welcome to the First Annual Ultimate Pink Blog Hop! This year a huge group of Stampin' Up! Demonstrators from all over the world are coming together to color the internet, Facebook, Pinterest... everything Pink in honor of Breast Cancer Awareness month. If this is your first time visiting my blog-Welcome! My name is Maria Willis and I am a Stampin' Up! Demonstrator from California, USA. I'm so glad you've stopped by my blog today. I hope you'll take the time to see all of the amazing projects that we have created to share with you today (full list of participants below). Without further adieu... here is my project.

I decided to make a Happy Birthday card with a watercolor background. I kept it simple using only two colors of pink-Melon Mambo and Flirty Flamingo- and Basic Black so that my design would pop. 

I watercolored on shimmery white paper and wanted to add a little more shine to my card so I splattered the background with Clear Wink of Stella. I also added a Silver Metallic enamel dot and Metallic Black Thread to top it all off.

Thank you so much for stopping by my blog today and I hope you'll come back soon! Please keep on hopping along to see all of the amazing projects from around the world that we have to share with you today. The list of all participants is below and all you have to do is click on the name after mine. Enjoy and have a wonderful day!

-Maria Willis

BLOG ROLL:


PRODUCT LIST:

Need more stamps now? Never fear! I've got you covered!


Want a great discount on Stampin' Up! Products and to have a fun new stamping family? Join me on this fun adventure! I can't wait to be your super excited (possibly way too enthusiastic... No! That's not possible!) Stampin' Up! side kick and support lady! In case you didn't know, you can join Stampin' Up! just for the discount and never sell a single product. If you want to know the details just let me know. If you're looking for a discount on your favorite hobby (stamping and paper crafting with Stampin' Up! products) and want to earn money doing it... let me know! I'd love to talk with you whatever your interest might be! If you want to see a little more info go ahead and click the button below. Looking forward to hearing from you!


01 09 10