Friday, June 25, 2021

Video: Tonic Studios Stamp Club Release of Sunshine & Sunflowers- Blog Hop & Giveaway!

Hi everybody! It's the last Friday of the month and you know what that means? Yes, release day for the Tonic Studios Stamp Club! This month's release is called Sunshine & Sunflowers and it is gorgeous! The stamp set includes some really lovely sentiments, some beautiful sunflower images and some really fun lady bugs and bees. Some of the dies coordinate with the stamp set but many of them are designed to cut layers of paper so that you can build paper sunflowers. I've got a VIDEO below showing off the whole release especially those layering dies so I hope you'll check that out.

GIVEAWAY: There is an awesome giveaway and one lucky winner will win a $50 gift certificate to Tonic Studios AND the Sunshine & Sunflowers Bundle. All the details for the giveaway are at the bottom of my post. This post is also part of a blog hop so be sure to hop along with us to catch all of the inspiration using this set.

If you want to check this bundle out in the Tonic Studios shop then here you go:

    Tonic Studios USA

    Tonic Studios UK 


Ok! Let's get onto my cards now because there are nine of them! For my first card I used the paper layering sunflower dies that come with the bundle.

Cardbomb, Maria Willis,Tonic Studios,Tonic Studios Stamp Club,#tonicstudiosstampclub,stamps, cards, card making, paper, ink, papercraft, art, color, watercolor, inkblending,die cutting, flowers

You can watch me make this card in the video below...

If you are having trouble viewing this video please CLICK HERE to watch it on YouTube.


I used almost all of the layering dies on this card including the dies that coordinate with the stamps. 
Cardbomb, Maria Willis,Tonic Studios,Tonic Studios Stamp Club,#tonicstudiosstampclub,stamps, cards, card making, paper, ink, papercraft, art, color, watercolor, inkblending,die cutting, flowers

This card has a ton of dimension and was really easy to put together!
Cardbomb, Maria Willis,Tonic Studios,Tonic Studios Stamp Club,#tonicstudiosstampclub,stamps, cards, card making, paper, ink, papercraft, art, color, watercolor, inkblending,die cutting, flowers


On my next card I used the large sunflower corner piece. I stamped it once in black ink and then colored the flowers in with my copic markers.
Cardbomb, Maria Willis,Tonic Studios,Tonic Studios Stamp Club,#tonicstudiosstampclub,stamps, cards, card making, paper, ink, papercraft, art, color, watercolor, inkblending,die cutting, flowers

After using my copics I added more detail with a black sharpie and some colored pencils.
Cardbomb, Maria Willis,Tonic Studios,Tonic Studios Stamp Club,#tonicstudiosstampclub,stamps, cards, card making, paper, ink, papercraft, art, color, watercolor, inkblending,die cutting, flowers

I cut the image out using the coordinating die and popped it up on foam tape for dimension.
Cardbomb, Maria Willis,Tonic Studios,Tonic Studios Stamp Club,#tonicstudiosstampclub,stamps, cards, card making, paper, ink, papercraft, art, color, watercolor, inkblending,die cutting, flowers

The final touches were to add a cute little lady bug, a bee and some nuvo drops.
Cardbomb, Maria Willis,Tonic Studios,Tonic Studios Stamp Club,#tonicstudiosstampclub,stamps, cards, card making, paper, ink, papercraft, art, color, watercolor, inkblending,die cutting, flowers


This next card has a totally different look from my other cards. I heat embossed the sunflowers in gold onto red cardstock. Then I colored them in with colored pencils.
Cardbomb, Maria Willis,Tonic Studios,Tonic Studios Stamp Club,#tonicstudiosstampclub,stamps, cards, card making, paper, ink, papercraft, art, color, watercolor, inkblending,die cutting, flowers

I used a black copic marker to color in all of the background space.
Cardbomb, Maria Willis,Tonic Studios,Tonic Studios Stamp Club,#tonicstudiosstampclub,stamps, cards, card making, paper, ink, papercraft, art, color, watercolor, inkblending,die cutting, flowers

I used the "Happy Birthday" die from a previous release (Happy Hibiscus) to add my sentiment in gold glitter cardstock.
Cardbomb, Maria Willis,Tonic Studios,Tonic Studios Stamp Club,#tonicstudiosstampclub,stamps, cards, card making, paper, ink, papercraft, art, color, watercolor, inkblending,die cutting, flowers

This next card is a mini slimline card that I used the sunflower layering dies on. This time I did not use the dies that coordinate with the stamps and the result is a more delicate flower.
Cardbomb, Maria Willis,Tonic Studios,Tonic Studios Stamp Club,#tonicstudiosstampclub,stamps, cards, card making, paper, ink, papercraft, art, color, watercolor, inkblending,die cutting, flowers

I used the Mini Slimline Essential Bundle Die Set from Pinkfresh Studio to cut out the detailed frame on my card.
Cardbomb, Maria Willis,Tonic Studios,Tonic Studios Stamp Club,#tonicstudiosstampclub,stamps, cards, card making, paper, ink, papercraft, art, color, watercolor, inkblending,die cutting, flowers

I love the sentiments on this card as they perfect for letting a friend know that you care.
Cardbomb, Maria Willis,Tonic Studios,Tonic Studios Stamp Club,#tonicstudiosstampclub,stamps, cards, card making, paper, ink, papercraft, art, color, watercolor, inkblending,die cutting, flowers

On my next card I heat embossed my image in white embossing powder and then watercolored with my Nuvo Aquaflow pens.
Cardbomb, Maria Willis,Tonic Studios,Tonic Studios Stamp Club,#tonicstudiosstampclub,stamps, cards, card making, paper, ink, papercraft, art, color, watercolor, inkblending,die cutting, flowers

These pens are so easy to watercolor with. My preference is to use them to add color to my work surface. Then, I add a little bit of water and use a paint brush to watercolor with them.
Cardbomb, Maria Willis,Tonic Studios,Tonic Studios Stamp Club,#tonicstudiosstampclub,stamps, cards, card making, paper, ink, papercraft, art, color, watercolor, inkblending,die cutting, flowers

I love that lazy little bee. He looks like he's for a flower to nap on.
Cardbomb, Maria Willis,Tonic Studios,Tonic Studios Stamp Club,#tonicstudiosstampclub,stamps, cards, card making, paper, ink, papercraft, art, color, watercolor, inkblending,die cutting, flowers


This next card shares another way to use heat embossing. This time I paired it with some inkblending for a very easy, bright and happy card.
Cardbomb, Maria Willis,Tonic Studios,Tonic Studios Stamp Club,#tonicstudiosstampclub,stamps, cards, card making, paper, ink, papercraft, art, color, watercolor, inkblending,die cutting, flowers

After heat embossing I ink blended my card with Distress Oxide inks. Then I sprayed the background with White Iridescent Shimmer Mist from Hero Arts and splattered it with White Glimmer Metallic ink, also from Hero Arts.
Cardbomb, Maria Willis,Tonic Studios,Tonic Studios Stamp Club,#tonicstudiosstampclub,stamps, cards, card making, paper, ink, papercraft, art, color, watercolor, inkblending,die cutting, flowers

I know I keep saying it, but I really love the sentiments in this set! I would love to receive a card that says I brighten someone's day.
Cardbomb, Maria Willis,Tonic Studios,Tonic Studios Stamp Club,#tonicstudiosstampclub,stamps, cards, card making, paper, ink, papercraft, art, color, watercolor, inkblending,die cutting, flowers


My next card is another mini slimline card. I went super basic on this card because these stamps are so beautiful that all you need to do is stamp them in black and you've got a gorgeous card.
Cardbomb, Maria Willis,Tonic Studios,Tonic Studios Stamp Club,#tonicstudiosstampclub,stamps, cards, card making, paper, ink, papercraft, art, color, watercolor, inkblending,die cutting, flowers

I heat embossed the images and sentiment in black onto yellow cardstock. 
Cardbomb, Maria Willis,Tonic Studios,Tonic Studios Stamp Club,#tonicstudiosstampclub,stamps, cards, card making, paper, ink, papercraft, art, color, watercolor, inkblending,die cutting, flowers

Then, I added a black mat and put all of that on a white mini slimline cardbase.
Cardbomb, Maria Willis,Tonic Studios,Tonic Studios Stamp Club,#tonicstudiosstampclub,stamps, cards, card making, paper, ink, papercraft, art, color, watercolor, inkblending,die cutting, flowers

I've already shared two mini slimline cards so it only made sense to share an easy slimline card as well.
Cardbomb, Maria Willis,Tonic Studios,Tonic Studios Stamp Club,#tonicstudiosstampclub,stamps, cards, card making, paper, ink, papercraft, art, color, watercolor, inkblending,die cutting, flowers

To make this card I used Versamark Ink to stamp the Sunflowers repeatedly onto the background. This gave me a crisp but subtle, tone-on-tone look.
Cardbomb, Maria Willis,Tonic Studios,Tonic Studios Stamp Club,#tonicstudiosstampclub,stamps, cards, card making, paper, ink, papercraft, art, color, watercolor, inkblending,die cutting, flowers

I stamped a sentiment strip from the Sunshine & Sunflowers bundle and then added the HUGS sentiment from the Backgrounds & Borders bundle.
Cardbomb, Maria Willis,Tonic Studios,Tonic Studios Stamp Club,#tonicstudiosstampclub,stamps, cards, card making, paper, ink, papercraft, art, color, watercolor, inkblending,die cutting, flowers

This next card is a little 3"x3" card that goes with the first slimline card I shared above.
Cardbomb, Maria Willis,Tonic Studios,Tonic Studios Stamp Club,#tonicstudiosstampclub,stamps, cards, card making, paper, ink, papercraft, art, color, watercolor, inkblending,die cutting, flowers

I cut my flowers out of white cardstock and then ink blended them with Distress Oxide inks.
Cardbomb, Maria Willis,Tonic Studios,Tonic Studios Stamp Club,#tonicstudiosstampclub,stamps, cards, card making, paper, ink, papercraft, art, color, watercolor, inkblending,die cutting, flowers

The textured piece in the center of the flower is so fun. There are three different sizes of textured centers and if you prefer a smooth center there are three of those too!
Cardbomb, Maria Willis,Tonic Studios,Tonic Studios Stamp Club,#tonicstudiosstampclub,stamps, cards, card making, paper, ink, papercraft, art, color, watercolor, inkblending,die cutting, flowers


Now, before I go here's a look at the whole Sunshine & Sunflowers Bundle. The stamp and die sets are both 6"x8" which is a nice, large size. The bundle is just $34.99 so you get a lot of bang for your buck!

Cardbomb, Maria Willis,Tonic Studios,Tonic Studios Stamp Club,#tonicstudiosstampclub,stamps, cards, card making, paper, ink, papercraft, art, color, watercolor, inkblending,die cutting, flowers


Ok, that's all for today. I hope you all enjoyed my video and cards today. Have an awesome day!

Maria.


GIVEAWAY:
One lucky winner will win a £50/$50 Giftcard to Tonic Studios and the Sunshine & Sunflowers Bundle!
To enter comment on the blogs in the hop by 11:59pm PST on June 30, 2021/ 7:59am GST on June 1, 2021
Comment on as many hop stops as possible as every comment is an additional chance to win!
Winner will be announced on July 2, 2021 on IG and FB so make sure you're following all Tonic accounts!


BLOG HOP LIST:
Maria Willis: You are here.


PRODUCT SUPPLY LIST:

Monday, June 21, 2021

Hero Arts Color Layering Strawberries: Hey There Shortcake!

Hey, everybody! I hope you all had an awesome weekend. I'm just popping in today to let you guys know that I'm up over on the Hero Arts blog sharing this fun card and a video too. 

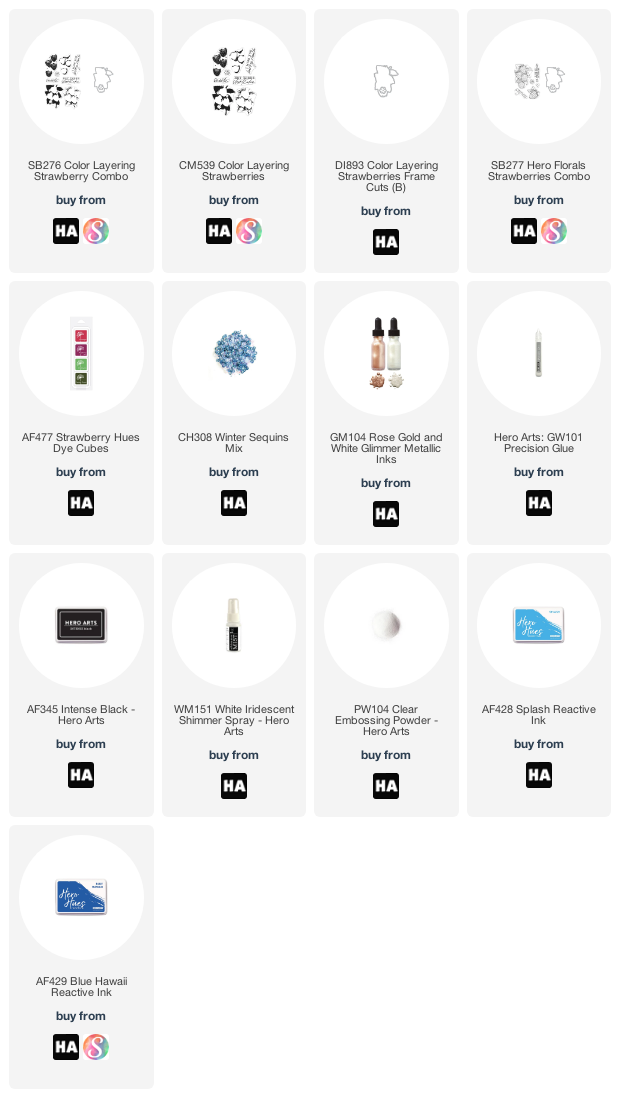
I have to start out today by making a confession... I am terrible with color layering stamps! Since I wanted to use the Color Layering Strawberry stamp set today I decided I needed to come up with some tips for success with your color layering stamps. 

Cardbomb, Maria Willis, Hero Arts, Cards, cardmaking,video,video tutorial,stamps, stamping, art, ink, paper, papercraft, die cutting, color layering

My first tip for success with color layering stamps is to check out the guide that Hero Arts provides for every color layering stamp set. You can find these guides on the packaging your stamps come in as well as on the Hero Arts website. Stamping in the order suggested by these guides will help your stamps layer properly and may help you line them up more easily. Here is the guide for the Color Layering Strawberry stamp set.

Cardbomb, Maria Willis, Hero Arts, Cards, cardmaking,video,video tutorial,stamps, stamping, art, ink, paper, papercraft, die cutting, color layering


So, I stamped the background of the strawberries, then the strawberry detail, then the background of the leaves and then the detail of the leaves. One of the things I struggle with is picking just the right colors of ink to use. Today I did not have any issues without because today a new four pack of cube inks called Strawberry Hues Dye Inks was released and it was made to be used in combination with this stamp set. That's my second tip: check to see if Hero already offers inks in the perfect color combo so that there is no guess work.
Cardbomb, Maria Willis, Hero Arts, Cards, cardmaking,video,video tutorial,stamps, stamping, art, ink, paper, papercraft, die cutting, color layering


I have some more tips in my video which you can watch on the Hero Arts YouTube Channel. After stamping and die cutting my strawberries I added them along with a sentiment on top of an ink-blended background.
Cardbomb, Maria Willis, Hero Arts, Cards, cardmaking,video,video tutorial,stamps, stamping, art, ink, paper, papercraft, die cutting, color layering


The last step was to add a few sequins from the Winter Sequins Mix. And, that's it folks! There is more info and a video over on the Hero Arts blog so please head over there if you'd like more info!

Have an awesome day!
Maria


PRODUCT SUPPLY LIST:

Friday, June 11, 2021

Ellen Hutson Release: Abstract One-Layer Card!

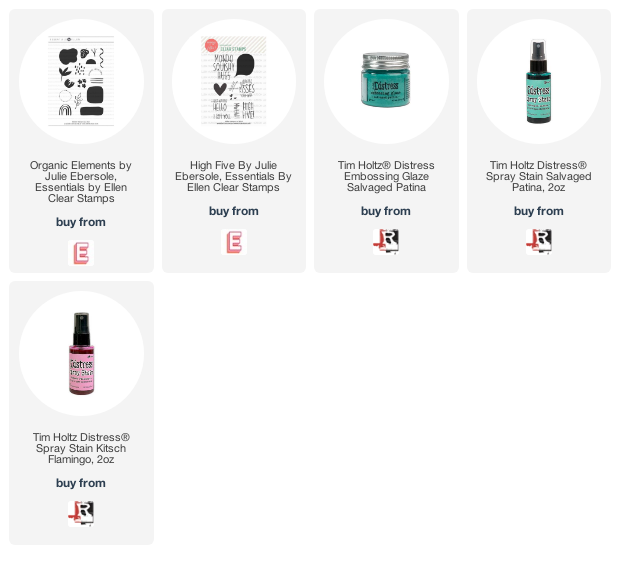
Hey everybody! I hope your week is off to a great start. Did you catch the latest release from Ellen Hutson? One of the new stamp sets is called, Organic Elements and it's full of abstract little shapes that can be used in a variety of different ways.

I decided to use the set to create a simple, one-layer card that has a lot of visual texture to it. I started by spraying my background with Kitsch Flamingo and Salvaged Patina Distress Stains. Then I started stamping the shapes from the stamp set randomly on the background.


I used ink colors from Pinkfresh Studio to do the stamping. Then I stamped the chunky, rounded square in embossing ink three times and heat embossed them in Salvaged Patina Distress Embossing Glaze (bottom one) and clear embossing powder (upper two).


To finish off my card I heat embossed a sentiment by stamping in Versafine black ink and then heat embossing in clear embossing powder. This is such a fool proof way to heat emboss a black sentiment without ending up with the mess that black embossing powder can sometimes cause. My sentiment is from an older set called, High Five.


Ok, that's it for now. I hope you all have an amazing day!!!

Maria.


PRODUCT SUPPLY LIST:

Wednesday, June 9, 2021

Gina K Designs New Release: Beautiful Butterflies 2

Heyooooo! It's Gina K Designs release day and boy do I have a beautiful stamp set to share with you! Today I will be using the new Beautiful Butterflies 2 stamp set. It coordinates with the existing Beautiful Butterflies Dies set and the new Beautiful Butterflies 2 Dies.


I started out by inkblending a piece of white cardstock in Abandoned Coral and Wild Honey Distress Oxide Inks. Then I heat embossed the butterfly using Versamark Ink and Clear Embossing Powder and cut it out. I added some white detail using a gel pen just to add a little bit of contrast and show off the gorgeous design inside of the butterfly.
Cardbomb, Maria Willis,#ginakdesigns, Gina K Designs, butterflies, cards, cardmaking,inkblending,stamps, stamping,heat embossing,color, art, diy,distress oxide inks,

Next, I inkblended a piece of watercolor cardstock using Blueprint Sketch, Broken China and Tumbled Glass. I sprayed this with Iridescent Shimmer Spray and then splattered it with White Metallic Ink while it was still wet (this allowed the white to bleed and spread a little). I cut this panel down to 3.75" x 5" stamped my sentiment before adding it to a black cardbase with foam tape.

Cardbomb, Maria Willis,#ginakdesigns, Gina K Designs, butterflies, cards, cardmaking,inkblending,stamps, stamping,heat embossing,color, art, diy,distress oxide inks,

The final step was to attach this gorgeous butterfly to my card with foam tape and some embellishments to up the pretty factor.
Cardbomb, Maria Willis,#ginakdesigns, Gina K Designs, butterflies, cards, cardmaking,inkblending,stamps, stamping,heat embossing,color, art, diy,distress oxide inks,

Ok, that's it for me today you guys! This card was super easy to pull together quickly as there was no coloring involved and the rest was pretty straight forward. Let me know if you decided to give something like this a try!

Have an awesome day!
Maria

PRODUCT SUPPLY LIST:

Monday, June 7, 2021

VIDEO: Hero Arts My Monthly Hero Kit Release, Blog Hop and Giveaway!

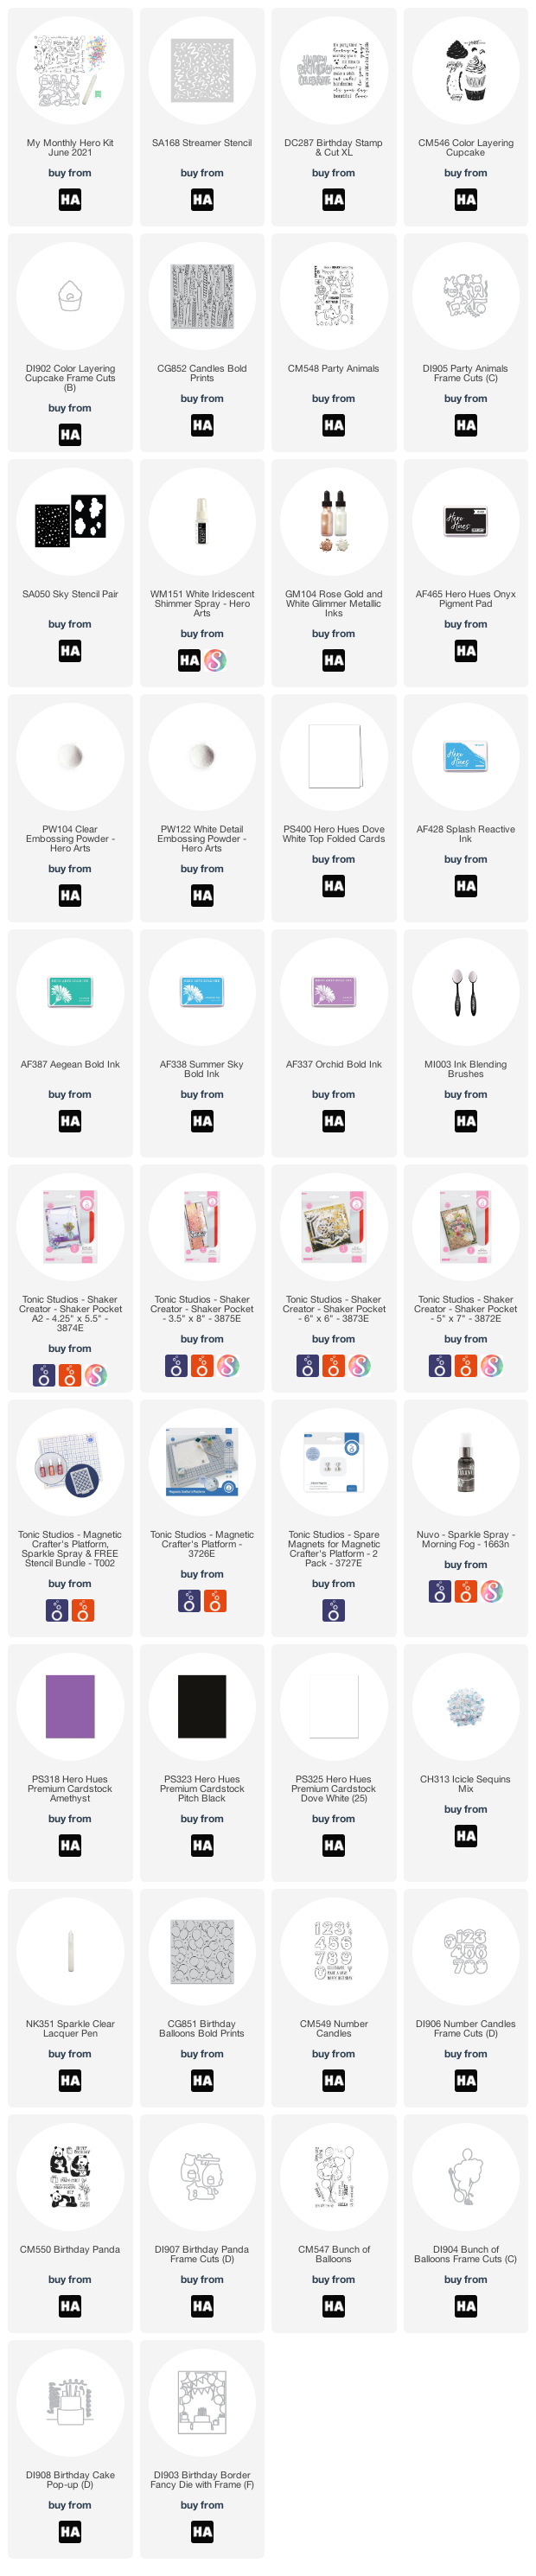
Hi everybody and happy Hero Arts release day! The June My Monthly Hero Kit is here and it is the purrrfect set for birthdays... Ha! Sorry that was so cheesy but I couldn't help it.

If you aren't familiar with the My Monthly Hero kit, it's a kit that is released by Hero Arts on the first Monday of every month. It always has a fun, themed collection of stamps, dies and other goodies. The cost is just $34.99/month and the value is always much greater! This month's kit is valued at $72!

You have the option to subscribe (subscribing now means your first kit will be the July release), or, to buy your favorite kits as a one-off purchases. Be aware that once these kits sell out they are gone for good. If you see a kit you like make sure to snatch it up quickly! There are also always a ton of fantastic add-on products offered. You can choose to buy your favorites or buy them all at a discounted rate.

Ok now let's get on to my cards because I've got four cards and a VIDEO to share with you today and there's also a GIVEAWAY (details at bottom of post)! My first card is a shaker card and let me tell you that this is the easiest shaker card I've made in my life! You can watch me quickly put it together in the video but here's how I made it... I started out by stamping two adorable kitties and a cake from the kit in INTENSE-ified Black Ink. I colored my images with copic markers and then die cut them (the kit always comes with coordinating dies) and set them aside.
Cardbomb, Maria Willis Hero Arts, My Monthly Hero Kit June 2021, Video, video tutorial,#shaker card, cards, cardmaking, ink blending, paper craft, art, diy, handmade, copic coloring, birthday,die cutting,


If you'd prefer to watch me put this together in the video then here you go!

 
If you're having trouble viewing this video you can watch it HERE.


Next, I used the new Streamer Stencil to ink blend my background using Agean, Summer Sky and Orchid Bold Inks. These three colors blend beautifully together and you'll see this combo on three of my cards today. Ink blending was made totally easy bc I held the stencil down with my magnetic platform from Tonic Studios. After ink blending, I left the magnets in place to hold the stencil down and I used the White Iridescent Shimmer Spray to spritz on a coating of beautiful, transparent shimmer (which of course doesn't show up in the pics). I put this background face down on a Tonic Shaker Pocket and adhered three of the flaps to the back, leaving the top flap open. I poured in a bunch of shaker guts including confetti from the kit and some Icicle Sequins. When my shaker had enough shaker guts I sealed the top flap of the shaker pocket to seal my card front. I've made shaker cards like this before and have done it all from scratch. Having these precut acetate pieces with adhesive flaps is a total shaker card game changer!
Cardbomb, Maria Willis Hero Arts, My Monthly Hero Kit June 2021, Video, video tutorial,#shaker card, cards, cardmaking, ink blending, paper craft, art, diy, handmade, copic coloring, birthday,die cutting,

After sealing up my shaker card I used foam tape to add all of the adorable images from the kit that I had already colored. The sentiments that I used were from the new Party Animals set. If two kitties diving head first into a cake isn't wild then I don't know what is, lol!
Cardbomb, Maria Willis Hero Arts, My Monthly Hero Kit June 2021, Video, video tutorial,#shaker card, cards, cardmaking, ink blending, paper craft, art, diy, handmade, copic coloring, birthday,die cutting,


For my next card I ink blended the same trio of inks as on my last card. Then, I used Morning Fog Sparkle Spray and the Streamer Stencil to create a bold and sparkly background.
Cardbomb, Maria Willis Hero Arts, My Monthly Hero Kit June 2021, Video, video tutorial,#shaker card, cards, cardmaking, ink blending, paper craft, art, diy, handmade, copic coloring, birthday,die cutting,

Next, I used the Color Layering Cupcake to create a focal point for my card. Now, I am the worst at color layering stamps and I hardly ever use them but, I'd like to get better at them so I decided to go for it because this cupcake is awesome! I made a few blunders along the way but nothing that couldn't be fixed with a copic marker (I didn't line the cake up properly with the liner and had a gap but a marker quickly fixed that). I die cut the cupcake with the coordinating dies and added some sparkle laquer and confetti bits from the main kit.
Cardbomb, Maria Willis Hero Arts, My Monthly Hero Kit June 2021, Video, video tutorial,#shaker card, cards, cardmaking, ink blending, paper craft, art, diy, handmade, copic coloring, birthday,die cutting,

I wanted to add a candle to my cupcake so I stamped the Candles Bold Prints stamp in black ink. I selected the candle with the stars and cut it out with my scissors after coloring it with copic markers. I cut the bottom of the candle off in a curve so that it would look like it was stuck in the frosting. I added the cupcake and candle to my card and finished it off with a sentiment from the Color Layering Cupcake set.
Cardbomb, Maria Willis Hero Arts, My Monthly Hero Kit June 2021, Video, video tutorial,#shaker card, cards, cardmaking, ink blending, paper craft, art, diy, handmade, copic coloring, birthday,die cutting,


 For my next card I again used the Streamer Stencil and Hero Arts Bold Inks to ink blend my background. 

Cardbomb, Maria Willis Hero Arts, My Monthly Hero Kit June 2021, Video, video tutorial,#shaker card, cards, cardmaking, ink blending, paper craft, art, diy, handmade, copic coloring, birthday,die cutting,

Then, I added my sentiment from the Birthday Stamp & Cut XL. I die cut the sentiment three times (Amethyst, Pitch Black and Silver Glitter) and layered them together using liquid adhesive. I heat embossed the sentiment in white on black and cut it out with my paper trimmer.
Cardbomb, Maria Willis Hero Arts, My Monthly Hero Kit June 2021, Video, video tutorial,#shaker card, cards, cardmaking, ink blending, paper craft, art, diy, handmade, copic coloring, birthday,die cutting,

After adhering my card face to a black cardbase I added the sentiment pieces with foam tape. The final touch was to add some confetti bits for a little bit of texture.
Cardbomb, Maria Willis Hero Arts, My Monthly Hero Kit June 2021, Video, video tutorial,#shaker card, cards, cardmaking, ink blending, paper craft, art, diy, handmade, copic coloring, birthday,die cutting,


This last card is the one that I shared a couple days as a sneak peek. You can learn more about this card by heading over to the original blog post by clicking HERE.
Cardbomb, Maria Willis Hero Arts, My Monthly Hero Kit June 2021, Video, video tutorial,#shaker card, cards, cardmaking, ink blending, paper craft, art, diy, handmade, copic coloring, birthday,die cutting,

Ok, you guys, that's it for today! I hope that you think the June My Monthly Hero Kit and add-ons are as much fun as I do. We've got a blog hop with a ton of inspiration so I hope you'll keep hopping along with us (blog list below). Also, check out the giveaway details below!

Have an awesome day!
Maria


GIVEAWAY:
Hero Arts will give away one $50 gift card, drawn from the comments left across the hop. Enter by Sunday, June 13th at 11:59pm pacific, and the winner will be announced on the Hero Arts blog the following week.


PRODUCT SUPPLY LIST:

Friday, June 4, 2021

Hero Arts Countdown to Creativity: You Lift Me Up!

Hey everybody! It's almost time for the June Hero Arts My Monthly Hero release and this month's kit is super cute!

But first, if you aren't familiar with the My Monthly Hero kit, it's a kit that is released by Hero Arts on the first Monday of every month. It always has a fun, themed collection of stamps, dies and other goodies. The cost is just $34.99/month and the value is always much greater! 

You have the option to subscribe (subscribing now means your first kit will be the July release), or, to buy your favorite kits as one-off purchases. Be aware that once these kits sell out they are gone for good. If you see a kit you like make sure to snatch it up quickly!

Ok, on to my card! This month's kit has at least one adorable kitty and a huge set of balloons. From the moment I saw this kit I knew that I'd be making a slimline card with a kitty floating away.


I inkblended the background using the cloud stencil from the Sky Stencil Pair. I used Splash Reactive Ink and then spritzed with white iridescent spray and splattered the sky using White Metallic Ink. I colored the mountains and grass using copic images because I wanted it to feel like the poor kitty was really high up in the sky.

After finishing the background I matted on black cardstock and stamped my sentiment from the kit. I stamped in Onyx Black Pigment ink and heat embossed in clear embossing powder for some mess-free heat embossing. Finally, I added my copic-colored balloons and cat using foam adhesive tape. I tucked the balloon string piece behind the kitty's paw and then used a fine tip black pen to draw the string into the cat's paw. 

...and, that is all I can tell you for today you guys! If you'd like a chance to win a kit before you can buy it then head on over to the Hero Arts blog today. We will also have sneak peeks everyday from now until Monday when this full kit is revealed (so make sure to check the Hero Arts blog each day)! 

I hope you have an amazing weekend and enjoy the sneak peeks until Monday's full release!

Bye for now,
Maria


PRODUCT SUPPLY LIST:

Thursday, June 3, 2021

Mixed Media Background Using Just One Stencil!

Hi everybody! I hope you're having an awesome day! I've got a fun mixed media card to share with you today and I made the background using just one stencil and some sprays, inks and gloss medium. 

I started out by spraying the Art Deco Arches Stencil from Hero Arts with Dina Wakley Gloss Spray in Eggplant. I then layed my sprayed stencil onto a piece of white cardstock and pressed down over it with a paper towel. Some of the purple ink stuck to my cardstock leaving a purple ghosted image of the stencil. This gloss spray is acrylic paint and once it's dry it is permanent and will resist other mediums. After it was dry I sprayed over it with Distress Oxide Spray in Salvage Patina. I inkblended around that with Lemon Drop and Fruit Punch Reactive Inks. Then, I splattered the background with some white acrylic paint that I had watered down. The final step was to place my clean stencil back on the background. I lined it up with the purple paint that was showing and applied a clear gloss medium (Liquitex) over the top. I didn't cover the entire background but applied the gloss coat randomly. This trapped some of the layers I had already applied behind the gloss layer and added cool texture and sheen. This is hard to see in the photographs but I have a quick video clip at the end of my post to show you.

Cardbomb, Maria Willis,Hero Arts, Mixed Media, Stencil, Inkblending, distress oxide spray,Dina Wakley Gloss Sprays, Ranger Ink, Cards, card making,die cutting, stamping, ocean, grunge


After making my background I thought that the stenciled arches looked a little bit like fish scales or waves so I decided to go with an ocean theme. I added die cut elements from the Hero Lifestyle Mermaid and Seashells Fancy Dies to the card after coloring them in matching colors. I layered them on top of a shredded piece of burlap using glue dots and foam tape.
Cardbomb, Maria Willis,Hero Arts, Mixed Media, Stencil, Inkblending, distress oxide spray,Dina Wakley Gloss Sprays, Ranger Ink, Cards, card making,die cutting, stamping, ocean, grunge

I heat embossed my sentiment from the Sea You Soon stamp set by stamping first in Sapphire Pigment Ink and then heat embossing that with Clear Embossing Powder. This is such an awesome way to heat emboss in color because there is basically no risk of making a mess. After heat embossing my sentiment I inkblended it using Lemon Drop Reactive so that it would pop off of my card.
Cardbomb, Maria Willis,Hero Arts, Mixed Media, Stencil, Inkblending, distress oxide spray,Dina Wakley Gloss Sprays, Ranger Ink, Cards, card making,die cutting, stamping, ocean, grunge

The last thing I did was to splatter my mermaid tail using blue (copic marker) and then the whole card using Gold Metallic Ink.

Cardbomb, Maria Willis,Hero Arts, Mixed Media, Stencil, Inkblending, distress oxide spray,Dina Wakley Gloss Sprays, Ranger Ink, Cards, card making,die cutting, stamping, ocean, grunge


It's hard to see all of the background details in the pictures I took so here is a quick video clip for you to get a better look...

 
If you are having trouble viewing this video please click HERE to watch it on YouTube.


Ok, that's it for today you guys! I'm curious to know if you have used clear, gloss medium before? This was my first time using it and I loved it! 

Have an awesome day! Bye for now!
Maria


PRODUCT SUPPLY LIST:

01 09 10