Hey everybody! I'm so glad you are stopping by today because is release day for the brand new
Hero Arts Summer Catalog 2021! For this release we have a really cool combination of things to share. We've got brand new products, brand new mixed media products (
waxes,
pearls,
paste and a fabulous
palette knife!) and we are even putting a mixed media style twist on some products that you may already know and love. Fun! The
new catalog is absolutely gorgeous so if you'd like to get a copy for yourself
click here.
Today I'll be sharing some of the projects that I made for the catalog as well as a look at the new mixed media products so make sure to stick around until the end of my post (especially if you want to enter the GIVEAWAY). For my first two projects I used exactly the same products to create two very different looks. I used liquid watercolors (as DIY sprays), the
Togetherness Flower Bouquet Stamp, the
Newspaper Bold Prints, the
Diamond Stencil and the
Luggage Tag Alphabet Frame Cuts. For my first piece I tore a piece of Strathmore watercolor paper out of a notebook and left the holes on the left side. I cut the piece down and sprayed it DIY sprays made from both liquid water colors and Reactive Ink Inkers. Then, I stamped the floral stamp repeatedly in Onyx Pigment ink and heat embossed it in clear.

On the left side of the piece I added dark shadows behind the flowers using a black watercolor pencil and a sharpie. This made the flowers pop forward more. On the right side of the background I stamped the
Newspaper Bold Prints into the background in Splash Reactive Ink. Then I used the
Diamond stencil and Unicorn White ink to create more subtle background interest. I heat embossed some of the sentiments from the new
Art Journal Messages onto the background in white.
After splattering the background with both gold and white Glimmer Metallic ink I added a black sentiment die cut using the
Luggage Tag Alphabet dies. I love the bold font of these dies and the fact that I can make any sentiment I want with them. To finish this piece up I add highlights with a white posca pen and a few black enamel dots for accents.

This card uses the same products for a totally different look. This time I used the Hero Arts watercolor paper (A2 sized) and sprayed it with Liquid Watercolor sprays (Indigo and Pink). Then I stamped
Newspaper Bold Prints onto some deli paper with permanent ink. I glued a strip of this stamped paper to my card base before applying Hero Paste over the background using the
Diamond Stencil and the NEW
PALETTE KNIFE which I absolutely love! While the paste was still wet I sprinkled it with White Puff Embossing Powder and heat set it. While the embossing powder was still hot I sprinkled it with Sand Embossing Powder and heat set that to add more texture. I splattered the background with with both white and gold Glimmer Metallic Ink as well as black acrylic paint and set it aside to dry.

I stamped the
flowers in Onyx Pigment Ink and heat embossed them in clear embossing powder before cutting them out with the coordinating die. Then I watercolored them with liquid watercolors (Pink, Orange, Dandelion, Leaf and Jungle Mist). I added extra detail and shadows with black sharpie and gray copic markers before adhering them to my card with foam adhesive.
To finish the card off I added a "HEY" sentiment cut using the
Luggage Tag Alphabet dies. I adhered the letters using foam tape and then added some black enamel dots.
My next three projects again use the same products but combine them in different ways for different outcomes. For these projects I am using the
Bug Collections Bold Prints Stamp, the
Novel Prose Bold Prints Stamp, and, the
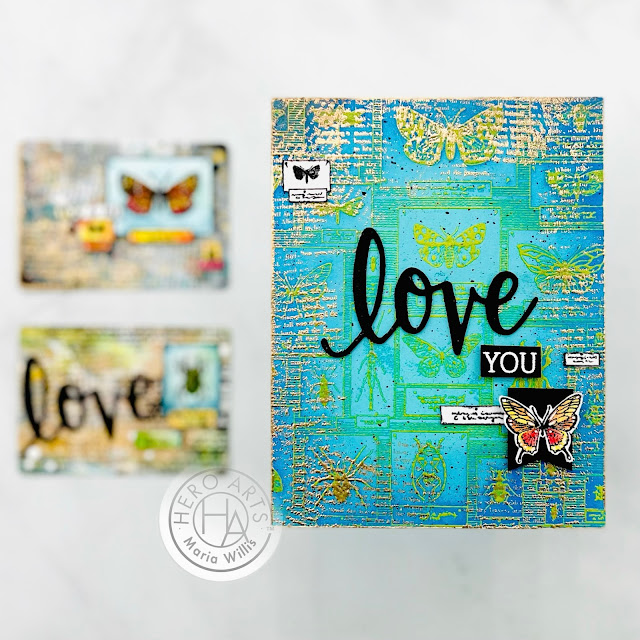
Love Stamp & Cut. For this card I started out with an A2 sized piece of Paradise cardstock. I used a MISTI to stamp the Bug Collections BP in Canary Pigment ink and heat embossed it in clear. Then, I ink-blended around the edges of the card using Blue Hawaii Reactive Ink and a blending brush. This darkened up the edges and gave the center of the card a glow. Next, I stamped around the edges again using Versamark ink and the
Novel Prose BP stamp. I heat embossed that in gold. To finish the background off I added splatters of black acrylic paint.

Next, I stamped the
Bug Collection Bold Prints stamp onto watercolor cardstock in Onyx Pigment ink and heat set it with clear embossing powder. Then, I cut out a little piece for the top, left of my card and a butterfly for the bottom right. I also cut out a couple specimen labels to add to the background. I watercolored the butterfly with liquid watercolors and outlined the other pieces in black sharpie. I layered the butterfly onto a black banner from the
Love Stamp & Cut set. I also created my sentiment from this set. I placed all of my pieces onto the background and when I was happy with the layout I glued them all done and that was all she wrote!
For my next two projects I used playing cards. There were two extra cards in the deck so I just grabbed those and I added a layer of both white and black acrylic paint as a backdrop to get started. On this first card I stamped
Novel Prose randomly into the background using black ink.
I added circles using bubble wrap and Aquamarine Pigment Ink that I heat embossed in clear. Then, I stamped
Novel Prose again, this time using Versamark ink and I heat embossed that in Sand Embossing Powder. I splattered the background with white acrylic paint and Gold Glimmer Metallic Ink before smearing more gold and black acrylic paint around the edges. At some point in this process I also stamped some "
XOXO" sentiments into the background.
To finish this playing card up I added cuttings from the
Bug Collections stamp and
Love Stamp & Cut that I watercolored and outlined in black. I also added some gold string behind them and some enamel dots to add a little extra texture.
For this Love Bug playing card I basically applied the same techniques as on the butterfly playing card. I heat embossed
Novel Prose in white and then again with Sand Embossing Powder.
I wanted to add more color to the background so I smeared some Leaf and Jungle Mist Liquid Watercolor on with my finger. It worked better than I thought it would and I think it looks really cool.
When I added the "Love" die cut I covered it in Clear Lacquer so that it would be shiny. I also added Clear Lacquer to the beetle so he looked three dimensional and to the "Bug" sentiment. I did the the "Bug" sentiment by hand since there wasn't one in the set. The final step was to add some white enamel dots.
Ok! Now let's move on and check out some of the new and super awesome mixed media products that are launching today! We've got two brand new mediums and an addition to one existing product line. Here's what we've got:
-Gold
-Black
-White (Pearlescent finish)
-Gold
-Silver
-Pewter
-White (Pearlescent finish)
-Pearl
Now, here's a look at what we've got. These are swatches of all three colors of the new HERO WAXES. The waxes are a wax based product that dries permanent on most surfaces. They are great for doing a variety of techniques with. On these swatches I show that they can be applied smoothly with a palette knife (top left), textured (bottom left), heated with a heat tool to bubble them (top right), and applied with a dry brush to add texture (bottom right). They are amazing to burnish over texture on your projects, for use with stencils and for many other techniques. You can buy these waxes individually or as a bundle.

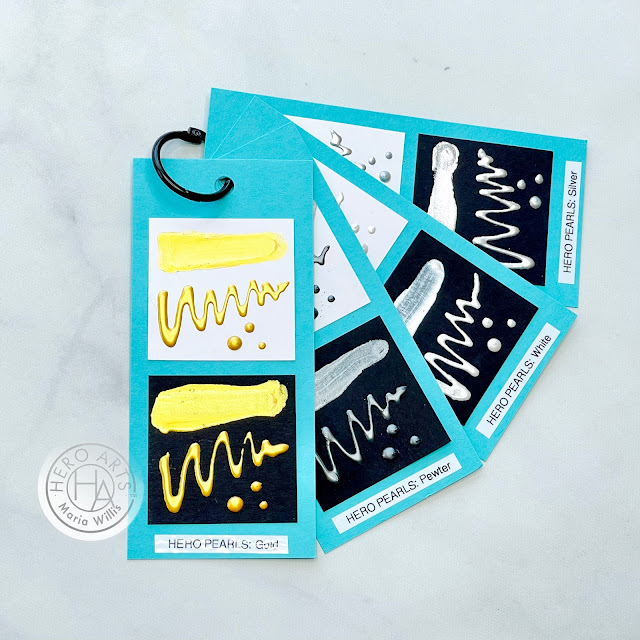
Next up we have the new HERO PEARLS in four gorgeous colors! All four of these of a striking, metallic finish that is very eyecatching. As you can see from the swatches they can be applied in a variety of ways-here, I've used my finger, used the tip to draw a squiggle, and then made some pearls as embellishments. The colors all look stunning on both dark and light cardstock and are easy to make beautiful "pearls" with (no hershey's kiss look with these drops as they are self-leveling). You can buy these individually or as a bundle.

Finally, we have the newest addition to our Hero Paste line with this gorgeous, new HERO PEARL PASTE. This paste is similar to others in our line (currently we have our original paste, glitter paste and now Pearl paste). It is white with a pearlescent finish and had great coverage on both light and dark cardstocks. You can add color this paste by adding a few drops of either liquid watercolor or Inkers. If you already have the two existing pastes you can pick up the Pearl paste by itself, or, if you want all three pastes you can grab the bundle.
Here's a look at all of the swatches for the new mediums together... Aren't they fun?!
Before I go there are two new tools that I have to tell you about because you are going to need them!
First we've got the
new stamp Scrubbing Block! This is a block that is easy to hold in your hand and allows you scrub your stamps clean while they are in your MISTI! This tool makes it easy to clean your Bold Print stamps too!
Check it out HERE!
We've also got a brand new
Palette Knife! I absolutely love because it's made out of metal and wood. I love tools made of natural materials so much more than plastic tools. This palette knife is also really great because of the shape of the knife. It is shaped like an elongated diamond and has a narrow tip that is easy to dip into your product containers to pick up your product. Check out this awesome,
new Palette Knife HERE!
Ok, you guys! That is it for today so I hope you'll keep hopping along with us to check out the new goodies and tons of creative inspiration from the Hero Arts Creative Team. Remember to enter our giveaway too (details below)!
Have an awesome day!
Maria
GIVEAWAY:
BLOG HOP LIST:
PRODUCT SUPPLY LIST (Affiliate Links may be used at no extra cost to you):


