Hi Everybody! I'm popping by with a quick share today. I'm participating in The Daily Marker 30 Coloring Challenge hosted the fabulous Kathy Racoosin. If you haven't heard of this challenge I urge you to go check it out and participate if you can. The idea is to try to get a little coloring in every day for 30 days. You don't have to finish a project or even color an entire image... just sit down and take ten minutes for yourself each day. Here's a link to Kathy's blog where you can read about the challenge and participate if you want. She has some great giveaways and a team of encouraging people helping her out.
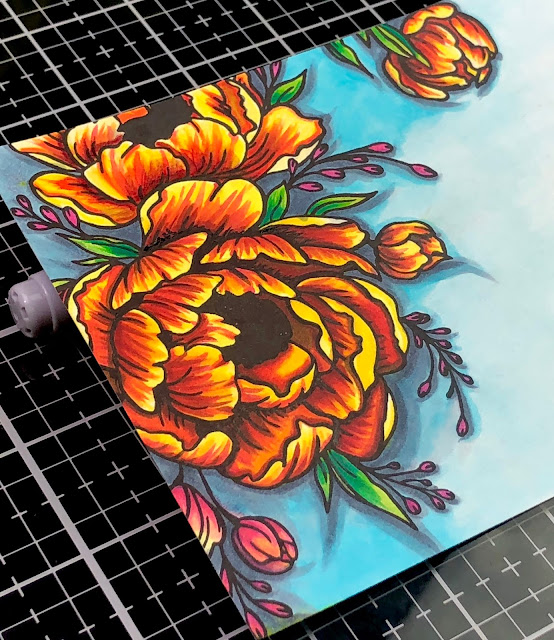
I decided that when I can (meaning I have time to both color and blog) I will share some of my coloring challenge posts. Today I am sharing both my day one and day 2 coloring. I used a gorgeous stamp set from Gina K. Designs called Majestic Peony. I colored the floral image with my Copic Markers in yellows, oranges, reds, pinks and greens. It had been a long time since I've last colored with my Copic markers and I felt really rusty. It took a little while to find my groove. If you look closely you can see that on the upper floral images I tried to add some depth and extra shading with my pencils. I was not thrilled with how it was looking. By the time I got to the largest flower I was feeling a little bit smoother and instead of grabbing pencils for shading I grabbed a brown marker and that helped a lot with the depth and contrast. I ditched the pencils on the larger floral and was happier with the look.
For day two of the coloring challenge I decided to try to keep working on the same piece and take it up a notch. I added a blue background with deeper shading behind the flowers. Then I grabbed my cool grays and added even more shading with drop shadows to try to pop the image forward. The last thing I did was to grab a sharpie and add some extra depth and some extra detail to the image. It worked much more easily on the large flower than it did on the upper ones. Can you guess why? Yup, the pencil shading I had laid down created a barrier which meant that the paper wasn't taking the ink the way I wanted it to. Live and learn. I do love adding pencil shading on top of my coloring in a lot of situations but with this image it didn't turn out the way I had hoped.
Looking at this coloring piece I have some things that I'd like to work on and improve at... and, that's what this coloring challenge can be all about! Using our coloring to just relax or to improve our skills...Whatever works for each of us!
Alright guys, that's all I've got for today. I'm sure you'll see this image on a finished card at some point soon. Let me know if you're participating in the coloring challenge this time around. I also want to know if any of you have have successfully finished a coloring challenge? Truth be told I've never completed all thirty days even though I've tried.
Ok, bye! Have an awesome day/night and I hope you find a little time to color!
Maria
PRODUCT LINKS:


Dear Maria
ReplyDeleteI am a new bee joining and to me the coloring looks superb. Thanks for the detailed explanation as it will help me a lot. I will always look forward to your very detailed explanations. Love and blessings to you and your family
Hi Surekah,
ReplyDeleteThank you so much for your kind words. I’m glad the explanation helped. If you enjoy watching video tutorials I do have a YouTube channel.
Have a wonderful day!
Maria