Showing posts with label card bomb. Show all posts

Thursday, April 12, 2018

OSAT Blog Hop: Pocket Full of Posies

#cardbomb, Stampin' Up!, Card bomb, #stampinup, Blooms & Wishes, #watercolor, flowers, technique, Stamparatus, #stamparatus, stamp positioner, stamp, ink, paper, paper craft, handmade, cards,

Hey Everybody! I'm here with the OSAT crew today for a Black Plague themed blog hop... ok, the theme is really "Pocket Full of Posies" but that's basically a throw back to the Black Plague. Ring around the rosie, pocket full of posies, ashes, ashes, we all fall down! The ring around the rosies were the rosy cheeks the diseased people had from the fever. The Pockets full of posies were the pockets full of flowers the dead people had to mask the smell of their decaying bodies (I'm so serious). Ashes, ashes we all fall down... they burned the bodies and pretty much every died (fell down). Ok, so that's morbid and I stopped singing that song to kids for a while after I learned what it was really about. 

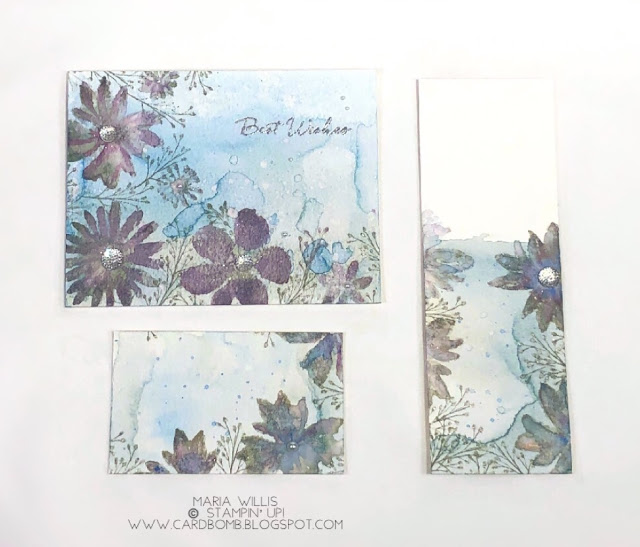
I wanted to keep with the theme of flowers but also go a little dark with my card and projects today. I used a watercolor paper base and the Blooms & Wishes stamp set (retiring soon so get it now!) along with my Stamparatus to make this card. I started by watercoloring multiple layers of Smoky Slate and Island Indigo (retiring soon) inks on the background. Then I flicked some ink on top to add some splatters. I arranged the stamps on my stamparatus and stamped repeated layers of Smoky Slate ink (I applied it to the stamp with a paint brush so it would be watered down but not bleed on my paper). I used either Elegant Eggplant or Perfect Plum to stamp another layer and also added more detail with my aqua painter. Both of those purples are retiring soon so get 'em both before they are gone. 
#cardbomb, Stampin' Up!, Card bomb, #stampinup, Blooms & Wishes, #watercolor, flowers, technique, Stamparatus, #stamparatus, stamp positioner, stamp, ink, paper, paper craft, handmade, cards,

For the finishing details I heat embossed that sentiment in silver, added Clear Wink of Stella to the wispy flowers and then added faceted gems and pearls to finish off the card front.
#cardbomb, Stampin' Up!, Card bomb, #stampinup, Blooms & Wishes, #watercolor, flowers, technique, Stamparatus, #stamparatus, stamp positioner, stamp, ink, paper, paper craft, handmade, cards,

I added the watercolored piece to a base of thick whisper white cardstock and left the inside blank.
#cardbomb, Stampin' Up!, Card bomb, #stampinup, Blooms & Wishes, #watercolor, flowers, technique, Stamparatus, #stamparatus, stamp positioner, stamp, ink, paper, paper craft, handmade, cards,

For my projects I decided to do something I've never done before. I made what I'm calling "Secret Notes." I cut a couple extra pieces water color paper and repeated the same process as on the card.
#cardbomb, Stampin' Up!, Card bomb, #stampinup, Blooms & Wishes, #watercolor, flowers, technique, Stamparatus, #stamparatus, stamp positioner, stamp, ink, paper, paper craft, handmade, cards,

I can write sweet little notes on these and leave them for someone. They could be kept and used as a bookmark or even added to a scrapbook or photo frame as an accent piece.
#cardbomb, Stampin' Up!, Card bomb, #stampinup, Blooms & Wishes, #watercolor, flowers, technique, Stamparatus, #stamparatus, stamp positioner, stamp, ink, paper, paper craft, handmade, cards,

Well, that's it for today folks. I hope you've enjoyed my projects for today. If you'd like to purchase any of the products I've used today please click on the links below. If you have any questions please leave me a comment below or shoot me an email. If you want to see more Pocket Full of Posie themed projects then keep on hopping along with us! There's a list of bloggers below and all you need to do is click on the next person in the list. Enjoy!

Maria Willis
mariawillis@hotmail.com

BLOG ROLL:


PRODUCT SUPPLY LIST:


Want to shop with me? No problem, just click the button below. 
Let me know if you have any questions!
Email: mariawillis@hotmail.com


Want a great discount on Stampin' Up! Products and to have a fun new stamping family? Join me on this fun adventure! I can't wait to be your super excited Stampin' Up! side kick and support lady! In case you didn't know, you can join Stampin' Up! just for the discount and never sell a single product. If you want to know the details just let me know. If you're looking for a discount on your favorite hobby (stamping and paper crafting with Stampin' Up! products) and want to earn money doing it... let me know! I'd love to talk with you whatever your interest might be! If you want to see a little more info go ahead and click the button below. Looking forward to hearing from you!


Friday, March 30, 2018

#TGIFC153 - March Madness - Anything Goes!

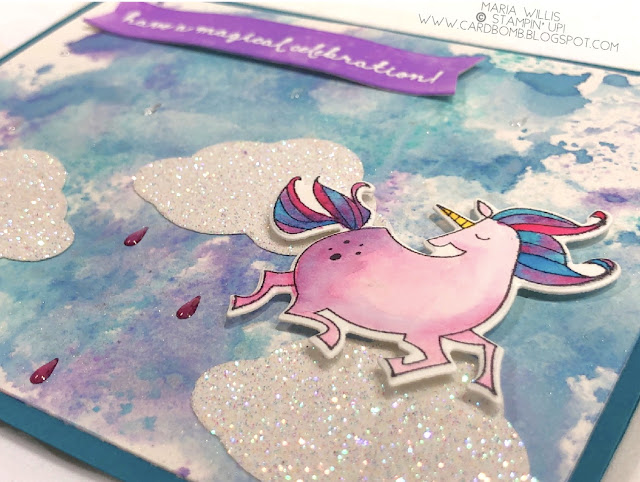
Hey! It's Thursday night/Friday morning at midnight and that means we've got another amazing challenge for you over at TGIF Challenges! This is a really good one too so you might want to play along with us. The theme is March Madness and anything goes this week (yes, that's right, make anything you want to)! I took this opportunity to mix and match some of the random things I had sitting on my desk to make a card. I watercolored this unicorn months ago and smooched that background weeks ago. Unfortunately, this is the nature of my desk... I have half-finished crafty things all over the place and I've been thinking lately that I should really make an effort to get all these fun pieces onto cards.
Card bomb, Maria Willis, Stampin' Up!, Unicorn, Magical Day, SAB, Occasions 2018, watercolor, technique, stamping, stamp, ink, Paper, paper craft, diy, handmade, creative, crafty, ink smooshing, color, magic, birthday

The unicorn was watercolored with Pacific Point and Melon Mambo inks with Daffodil Delight for the horn. I cannot remember what colors I used on the background although it appears to be Melon Mambo, Pacific Point... and maybe something else thrown int there. I'm sorry that I can't remember exactly what I did but on that day I went on a background making rampage and ended up with a bunch of different backgrounds of unknown color combos. The sentiment is from Fairy Celebrations and is just perfect with this unicorn.
Card bomb, Maria Willis, Stampin' Up!, Unicorn, Magical Day, SAB, Occasions 2018, watercolor, technique, stamping, stamp, ink, Paper, paper craft, diy, handmade, creative, crafty, ink smooshing, color, magic, birthday


That's all I've got for today folks but if you've got a second then head on over to the TGIF Challenge Blog to see what the rest of the design team has made to share with you today. With an anything goes theme the projects are sure to be amazing! Another cool thing for this week is that if you decide to play along you can case any design team member that you want! Have fun!


Have an amazing day you all! See you back here soon!

Maria 
mariawillis@hotmail.com


Want to shop with me? No problem, just click the button below. 
Let me know if you have any questions!
Email: mariawillis@hotmail.com


Want a great discount on Stampin' Up! Products and to have a fun new stamping family? Join me on this fun adventure! I can't wait to be your super excited Stampin' Up! side kick and support lady! In case you didn't know, you can join Stampin' Up! just for the discount and never sell a single product. If you want to know the details just let me know. If you're looking for a discount on your favorite hobby (stamping and paper crafting with Stampin' Up! products) and want to earn money doing it... let me know! I'd love to talk with you whatever your interest might be! If you want to see a little more info go ahead and click the button below. Looking forward to hearing from you!


Friday, January 5, 2018

#TGIFC141 - Color Challenge

Hey everybody! I'm back with another fun challenge from TGIF today! If you missed my announcement last week... I am thrilled to say that I have been invited to join the amazing design team over at TGIF Challenges and this is my second week joining in the fun!

This week's challenge is a color challenge... Yikes! I usually shy away from color challenges because they are often colors that I don't usually reach for. I guess that's why they call it a "challenge," right? Well, this color scheme of Night of Navy, Island Indigo and Fresh Fig was no exception. Fresh Fig is a color I tend to steer clear of. When I do use it I like to add bright colors to it to change it up a bit. I decided to watercolor so that I could mix the three colors to get shades of color that I really love. Here's what I came up with...

I used Fresh Fig, Island Indigo and Night of Navy with my Aquapainter to watercolor in this image from a new stamp set called Lots of Lavender (147194). During Sale-A-Bration/SAB (happening now) you can get this set for FREE with any $50 purchase! I like free stuff so I find this to be pretty amazing. After watercoloring the image, I used my Fine-tip Glue pen to add a thick layer of adhesive to the image. It added some nice texture and shine without hiding the watercoloring. That strip of DSP is also in the new SAB catalog and is another one of your "freebie" choices.

These framelits are also new and in the SAB catalog (yep, FREE with a $100 purchase!) and they are "amazing." Those beautiful little embellishments are actually clear (new in the Occasions catalog) and I've colored them with my Night of Navy Stampin' Blends alcohol marker. My background is Shimmery White Cardstock spritzed with an alcohol and Island Indigo ink mixture.


That's it for today. Please let me know if you have any questions. We would love to have you play along with #TGIF141 for this week's color challenge. If you'd like to play along, or, just check out what the rest of the Design Team has made then head on over to the TGIF Challenges Blog to see some other fun projects. 

Thanks for stopping by my blog today. It's always great to have you! If you're interested in purchasing any of the supplies I've used in today's project please let me know or click the "shop online" button below. I'm here to answer any questions that you may have.

Have an amazing day!
Maria

mariawillis@hotmail.com


Want to shop with me? No problem, just click the button below. 
Let me know if you have any questions!
Email: mariawillis@hotmail.com


Want a great discount on Stampin' Up! Products and to have a fun new stamping family? Join me on this fun adventure! I can't wait to be your super excited Stampin' Up! side kick and support lady! In case you didn't know, you can join Stampin' Up! just for the discount and never sell a single product. If you want to know the details just let me know. If you're looking for a discount on your favorite hobby (stamping and paper crafting with Stampin' Up! products) and want to earn money doing it... let me know! I'd love to talk with you whatever your interest might be! If you want to see a little more info go ahead and click the button below. Looking forward to hearing from you!


Thursday, January 4, 2018

Creating Kindness: Celebrate

Hi Everybody! Happy Thursday or whichever day it might be in your part of the world. I'm happy to have you stop by today because today is the Creating Kindness Blog and Video Hop day. Myself and some other talented Stampin' Up! demonstrators from around the world have gotten together to share some fun projects and video tutorials as well!

Our theme for this month's hop is "Celebrate." There is always so much to celebrate at this time of year (Winter Holidays, New Year's Eve, and five December birthdays for me)... but right now, as I've taken a couple of days off of work, I am choosing to celebrate the little things. For me, that means some time in my craft room to experiment with my supplies. That's something to celebrate, right?! So, as I celebrated my alone time in my craft room I tried this new (to me anyways) technique. I don't know what it's called so I'm calling it Alcohol Stamping and I've got a video tutorial at the end of my blog post. Here's what I made with this fun technique...

Believe it or not, this technique is so easy! I started with a piece of Shimmery White Cardstock and sponged it with Tempting Turquoise and Melon Mambo (the purple hue in the middle is where I overlapped the two colors). After that I took a stamp from Flirty Flowers and a Stampin' Spritzer filled with rubbing alcohol and spritzed my stamp. I pressed it firmly onto the sponged background, held it there for a couple of seconds to let the paper absorb the alcohol, and lifted the stamp off the paper. The watermark-like effect is visible immediately and is stunning! I dried off my stamp and block with a paper towel and repeated the alcohol stamping multiple times until I had the background I desired.

I added a silver embossed "celebrate" sentiment (from Weather Together), some Glitter & Clear Epoxy Shapes (145632) which are new in the Occasions Catalog, and some Black Metallic Thread. I wanted the background to be the star of show so I tried not to over do it. The background is layered on a Basic Black mat and that is popped up on dimensionals on a Pool Party card base.


Want to try this technique out for yourself? Here's a quick video tutorial with some tips to help you out. 


And that's it for today folks. I am sure glad that you've stopped by to visit my blog today and I hope you will continue on the hop by heading down under to my visit my friend Cheryll! Just click her name or the next button below. 

In case you didn't know Sale-A-Bration has just begun! It's the best time of year to buy all of your favorite things as you get rewarded for every $50 you spend! It's also an amazing time to join my team-so if you've been thinking about it let me know. I'm happy to answer any questions and generally enable you to fill your craft space with fun things.

Have an amazing day you guys!
Maria Willis


BLOG ROLL:

Want to shop with me? No problem, just click the button below. 
Let me know if you have any questions!
Email: mariawillis@hotmail.com


Want a great discount on Stampin' Up! Products and to have a fun new stamping family? Join me on this fun adventure! I can't wait to be your super excited Stampin' Up! side kick and support lady! In case you didn't know, you can join Stampin' Up! just for the discount and never sell a single product. If you want to know the details just let me know. If you're looking for a discount on your favorite hobby (stamping and paper crafting with Stampin' Up! products) and want to earn money doing it... let me know! I'd love to talk with you whatever your interest might be! If you want to see a little more info go ahead and click the button below. Looking forward to hearing from you!


Thursday, September 14, 2017

Paper Tole Tutorial with an Adorable Elf!

Hey everybody! I'm really excited today because I've just tried a new, and super awesome technique for the first time and I absolutely love it. The technique is called Paper Tole and it's a fairly simple technique that has a lot of wow factor. It's hard to see the 3D effect in this pic because the pic was taken straight on...


but check this pic out! See how the image is lifting off of the page? That's what Paper Tole is all about. 

I'm happy to say that I've got a full tutorial to share with you today. Here's what you will need...

Supplies:
·      Stamp Set: Festive Phrases
·      Cardstock: Basic Black, Shimmery White, Merry Little Christmas DSP
·      Ink: Basic Black Archival, Real Red, Old Olive, Chocolate Chip, Powder Pink, Soft Sky
·      Other: Aquapainter, Iridescent Sequin Assortment, Fast Fuse, Mini Dimensionals, X-acto  Knife

Measurements:
·      Card Base (Basic Black): 4 ¼” X 11” and scored at 5 ½”
·      Shimmery White: 2 5/8” X 4”
·      Basic Black Mat: 2 ¾” X 4 1/8”
·      DSP strip (black): 2”X 5 ¼”
·      Basic Black Mat: 2 1/8” X 5 ¼”
·      DSP (green): 4” X 5 ¼”
·      Basic Black Mat: 4 1/8” X 5 7/8”

Instructions:

1.     Stamp the image in Basic Black Archival ink on Shimmery White Cardstock.


2.  Use your Aquapainter to color the image using Real Red, Old Olive, Chocolate Chip, Powder Pink and Soft Sky inks.


Here's what it will look like...


3. Put your image piece on top of a safe cutting surface. I used a thick piece of cardboard.  


4. Using the X-acto knife cut carefully around the elf’s hat, right side ear, bangs, shoe tops and the four corners of the sign. These are the areas that will be raised on your finished card. Make sure that you leave space between the cuts (do not connect the cuts or the image will become disconnected from the page).


5. Flip your cut image piece over and add mini dimensionals to the areas that are to be raised. Add a strong adhesive to the rest of the background. It is important to make sure you have adhesive between the areas with dimensionals. If you don’t add enough adhesive then the image piece will raise up and become level with the cut/raised edges and you will lose the 3D effect.


6. Adhere your image piece to the appropriately sized black mat using Fast Fuse and do the same with the DSP pieces. Adhere the black strip of DSP vertically to the green DSP using fast fuse. Adhere the DSP to the card base using dimensionals. Finally, adhere the image piece to the card using dimensional and embellish with sequins.


This technique is so easy and fun! I can't believe that I haven't seen it used very often. I hope this tutorial will help you feel confident enough to give it a try. If you do give it a shot please let me know how it turned out.

Thanks for stopping by my blog today. I always love having you visit. If you'd like to purchase the materials to make this card on your own please click the shop now button below or shoot me an email as I'd love to help with any of your questions. 

Have an amazing day!
Maria.


Want to shop with me? No problem, just click the button below. 
Let me know if you have any questions!
Email: mariawillis@hotmail.com


Want a great discount on Stampin' Up! Products and to have a fun new stamping family? Join me on this fun adventure! I can't wait to be your super excited Stampin' Up! side kick and support lady! In case you didn't know, you can join Stampin' Up! just for the discount and never sell a single product. If you want to know the details just let me know. If you're looking for a discount on your favorite hobby (stamping and paper crafting with Stampin' Up! products) and want to earn money doing it... let me know! I'd love to talk with you whatever your interest might be! If you want to see a little more info go ahead and click the button below. Looking forward to hearing from you!

01 09 10