Showing posts with label #technique. Show all posts

Thursday, June 6, 2019

Watercoloring with Nuvo Shimmer Powders on Black Cardstock


Hey Everybody! It's Maria (Cardbomb) here today with a fun way to use your Nuvo Shimmer Powders. I love using my Shimmer Powders to watercolor and wanted to share how I used them to watercolor on black cardstock. They look so metallic and vibrant against the black that you can achieve quite a different look than you do on white cardstock. I've made a video tutorial sharing how to do this so be sure to check that out if you are interested (the video is at the bottom of the post).
#cardbomb, #mariawillis, #tonicstudios, #tonicstudiosusa, #nuvo, #nuvoshimmerpowder, watercolor, #card, #cards, #stamp, #ink, #paper, #papercraft, #handmadecards, #diy, #greetingcards, #color, #technique, #video, #videotutorial,

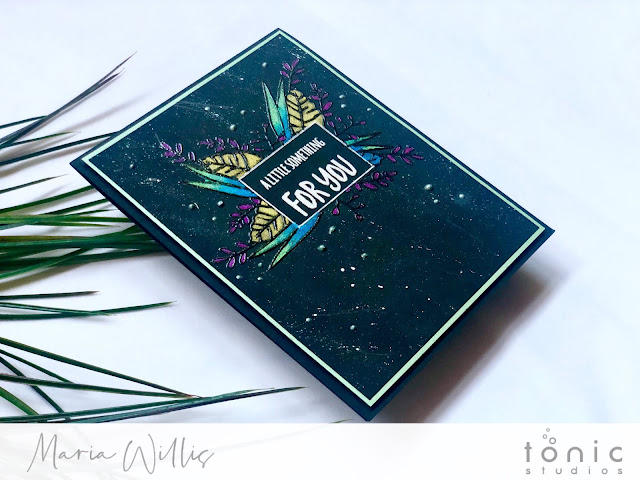
I started out by heat embossing the sentiment from Little Something for Harry in white, then masking the sentiment off using a post it note that I cut out with my rectangle dies. Then, using my stamping platform and this gorgeous floral stamp from the Dainty Daisies set I repeatedly stamped the flower in Clear Mark ink and heat embossed the images in Clear Embossing Powder. After that I put little puffs of Shimmer Powder onto the surface of my work space. I added drops of rubbing alcohol/surgical spirits to the powder and mixed until it was a consistency that I could paint with. I started out using a brush with a thicker tip and quickly decided to switch to a number 2 round brush so that I could easily stay within the lines.
#cardbomb, #mariawillis, #tonicstudios, #tonicstudiosusa, #nuvo, #nuvoshimmerpowder, watercolor, #card, #cards, #stamp, #ink, #paper, #papercraft, #handmadecards, #diy, #greetingcards, #color, #technique, #video, #videotutorial,

After I finished watercoloring the floral images I used a white gel pen to outline the rectangle defining the sentiment. In hindsight I realize that it would've been much easier to stamp the sentiment onto a rectangle die cut and pop it up as it would've allowed me to be a bit less careful when I embossed the images. Anyhow, that's something for me to try next time. Then I used some white acrylic paint, and the leftover shimmer powders to splatter the background. I added Nuvo Crystal Drops in Neptune Turquoise to finish it off and mounted the card front onto some gorgeous Pearlescent Card from the Craft Perfect line (Fresh Mint). This cardstock is textured and shimmery and was the perfect compliment to the card front. After that I mounted the whole thing onto a black card base using foam adhesive to give the card a bit of dimension.
#cardbomb, #mariawillis, #tonicstudios, #tonicstudiosusa, #nuvo, #nuvoshimmerpowder, watercolor, #card, #cards, #stamp, #ink, #paper, #papercraft, #handmadecards, #diy, #greetingcards, #color, #technique, #video, #videotutorial,

Here's that video I promised you...


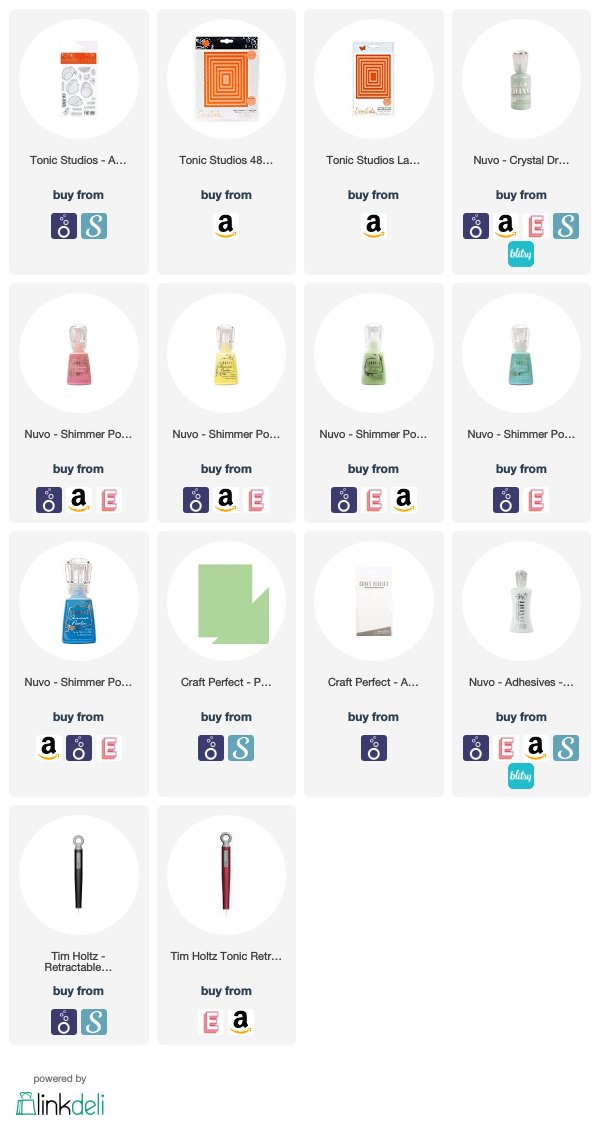
Well, that's it for today you guys! It's late and I am wicked tired so I'm heading off to bed. I'm adding product links below in case you are interested in checking out anything that I've used for today's project. There are links to both the UK and USA Tonic stores (just scroll until you find your preferred shop). Thank you!

Have an amazing day!
Maria


SUPPLY LIST: TONIC UK


SUPPLY LIST: TONIC USA & OTHER SHOPS
Monday, September 17, 2018

Going Monochromatic with Distress Oxides and a Rad Background Stamp!

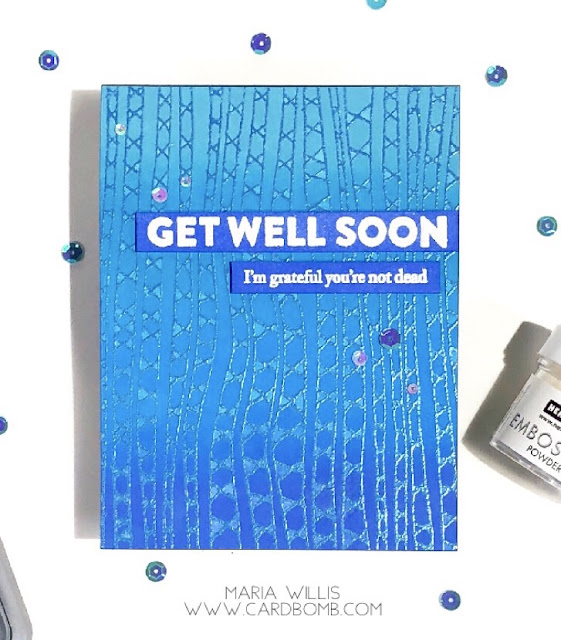
Hello! Today I've got a fun monochromatic card to share with you. The inspiration to make something monochromatic came from this month's challenge over at A Blog Named Hero. I bought this background stamp (Cross-Hatch Bold Prints) quite a while ago and I've been itching to use it. It's got such a fun, crazy pattern that I thought it would provide enough interest for  what is otherwise a simple card. 
#cardbomb, #mariawillis, #card, #cardmaking, #handmade, #heroarts, #distressoxides, #tonicstudiosusa, #monochromatic, #heatemboss, #technique, #create, #creative, #color, #art, #diy, #ink, #stamp, #paper, #papercraft,

I started out by heat embossing the background stamp with Tonic Nuvo Embossing Powder in Blue Odyssey (it's a sparkly, darker blue). Then I sponged the background with Distress Oxide Inks with the lightest color at the top (Broken China), then Salty Ocean, followed by Mermaid Lagoon and finally the darkest color, Blueprint Sketch. After that I used a wet paint brush (wet with water) to fill in the little triangles on each vertical "stripe." As I went along I used a clean, dry paper towel to dry the water and lift some of the Distress Oxide ink off of the card. The ink that was left on the card in the triangles oxidized when it came into contact with the water and turned a lighter shade of blue. 
#cardbomb, #mariawillis, #card, #cardmaking, #handmade, #heroarts, #distressoxides, #tonicstudiosusa, #monochromatic, #heatemboss, #technique, #create, #creative, #color, #art, #diy, #ink, #stamp, #paper, #papercraft,

I used Hero Arts White Satin Pearl Embossing Powder to heat emboss the sentiment. Then I sponged over it with Blueprint Sketch. I wiped the embossed sentiment clean of excess ink and cut my sentiment into strips. Then I mounted it onto the card using foam adhesive.
#cardbomb, #mariawillis, #card, #cardmaking, #handmade, #heroarts, #distressoxides, #tonicstudiosusa, #monochromatic, #heatemboss, #technique, #create, #creative, #color, #art, #diy, #ink, #stamp, #paper, #papercraft,

The last thing I did was to add some blue/iridescent sequins (they look pink with the light hitting them but they really are blue).
#cardbomb, #mariawillis, #card, #cardmaking, #handmade, #heroarts, #distressoxides, #tonicstudiosusa, #monochromatic, #heatemboss, #technique, #create, #creative, #color, #art, #diy, #ink, #stamp, #paper, #papercraft,

I mentioned at the beginning of this post that I am entering this card into the the A Blog Named Hero: Monochromatic themed challenge. If you'd like to check out the design team and the other challengers to see some beautiful projects just click HERE to head over there. 

Thanks for stopping by my blog today! I'm adding links to the products I've used below in case your curious about the products or you'd like to do a little shopping. 

That's it for today. Have an amazing day you all!

Maria


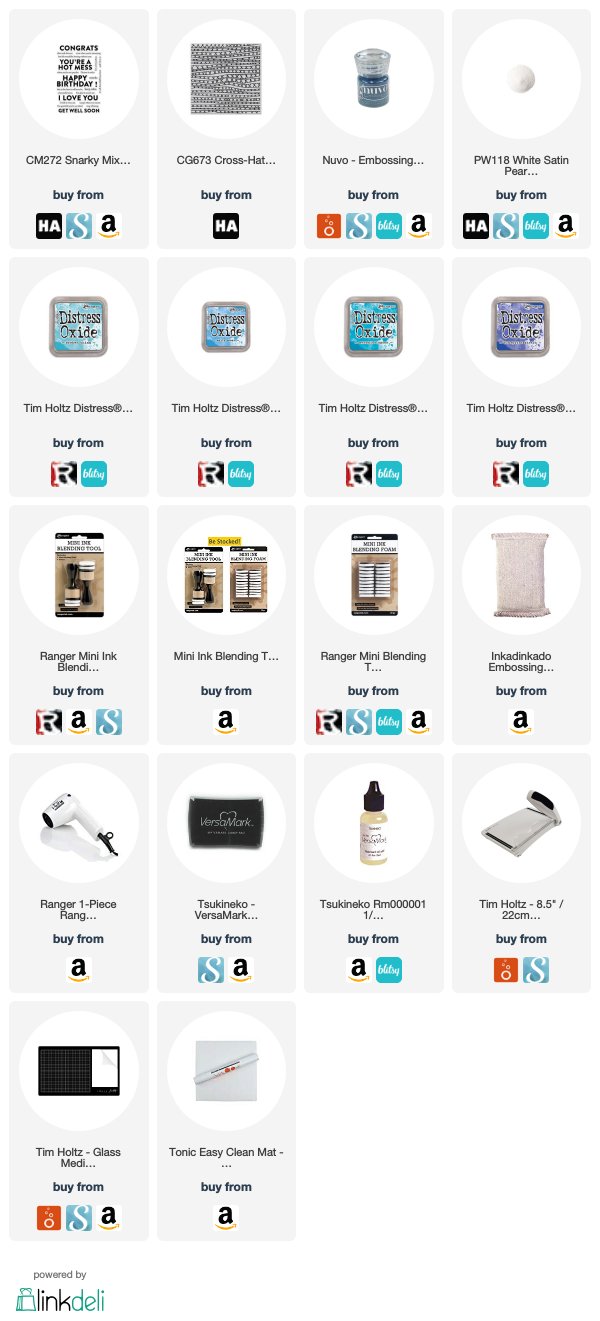
Product List: 

Wednesday, September 5, 2018

Let's Get Hopping Blog Hop: Not Your Standard Card

Hi Everybody! I'm so glad to have you here today because it's been forever since I've taken part in a blog hop and today I am hopping along with the crew from Let's Get Hopping. This month the theme is "Not Your Standard Card." Many card makers stick to making the standard A2 sized card (4.25" x 5.5") and don't deviate much from that size. This challenge is great because it forces us to think a little bit differently and I can't wait to see what sizes and shapes the rest of the crew has come up with. 

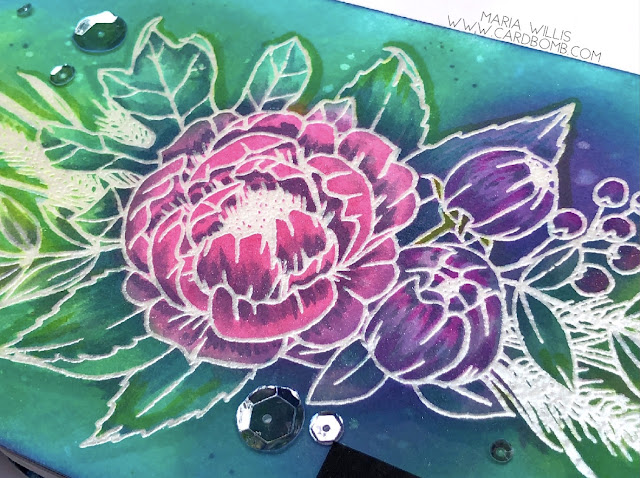
I've really been looking forward to using this gorgeous stamp that I just got from Concord & 9th called Grateful for Everything. It is such a beautiful floral image and even though it's intended for the Fall season I just wasn't ready to take it that direction yet. It's perfect for this challenge because the image is large and won't fit on an A2 sized card. This gave me the chance to make a narrower, wider card and fill it with this beautiful image. I heat embossed it in White Satin Pearl Embossing Powder (PW118) from Hero Arts. This embossing powder is so pretty because it takes on a little bit of the color of cardstock that it is embossed on and is pearlescent (sentiment is also embossed in this same EP but looks different because it's on black cardstock). 
#cardbomb, #mariawillis, #heroarts, #concord&9th, #c&9, #altenew, #card, #stamp, #ink, #paper, #technique, #watercolor, #watercolorbleaching, #distressoxideinks, #distressoxides, #distressinks, #timholtz, #copics, #heatemboss, #copicmarkers,

After heat embossing the image I sponged it using my Distress Oxide Inks (colors listed at bottom of post). These inks are such a dream to blend! They look creamy, have a matte finish and even oxidize when you add water. After sponging I flicked some water droplets onto my card with a wet paintbrush. Then I used a paper towel to absorb the water which left behind some pretty, light colored splatter. 
#cardbomb, #mariawillis, #heroarts, #concord&9th, #c&9, #altenew, #card, #stamp, #ink, #paper, #technique, #watercolor, #watercolorbleaching, #distressoxideinks, #distressoxides, #distressinks, #timholtz, #copics, #heatemboss, #copicmarkers,

Next, I used a technique that I learned from the talented Kelly Latevola. She calls it water color bleaching (I think I've called it ink lifting in the past) but then she takes it a step further and incorporates some copic coloring to make her images really pop off of the page. Here's a link to the video I watched where she demonstrates this technique: CLICK HERE. Anyhow, I used a wet paint brush to color over my image. As I wet the image I pressed a paper towel over it to remove some of the ink so that the image looked "bleached." This doesn't remove all of the color but it does leave it looking faded out. After that I went back to the image with my Copic Markers and added shading and drop shadows to give it more detail and add back in some more color where I wanted it. 
#cardbomb, #mariawillis, #heroarts, #concord&9th, #c&9, #altenew, #card, #stamp, #ink, #paper, #technique, #watercolor, #watercolorbleaching, #distressoxideinks, #distressoxides, #distressinks, #timholtz, #copics, #heatemboss, #copicmarkers,

I heat embossed the sentiment from Altenew in the same Hero Arts embossing powder that I used on the floral image. It looks a bit darker and more silvery against the darker cardstock. I popped the image up on foam tape to give it a bit of dimension. 
#cardbomb, #mariawillis, #heroarts, #concord&9th, #c&9, #altenew, #card, #stamp, #ink, #paper, #technique, #watercolor, #watercolorbleaching, #distressoxideinks, #distressoxides, #distressinks, #timholtz, #copics, #heatemboss, #copicmarkers,

To finish the card off I add a coat of Wink of Stella to my image. Then I added some clear sequins in a variety of sizes to give it a little more sparkle.
#cardbomb, #mariawillis, #heroarts, #concord&9th, #c&9, #altenew, #card, #stamp, #ink, #paper, #technique, #watercolor, #watercolorbleaching, #distressoxideinks, #distressoxides, #distressinks, #timholtz, #copics, #heatemboss, #copicmarkers,

Well, that is it for today folks. I hope you've enjoyed my project because I really enjoyed trying out a new (to me) technique. I've put a list of the products that I used and links to the shops where they can be purchased just in case you're interested in trying this technique out for yourself. I am also entering this card in the Simon Says Stamp Wednesday Challenge (Anything Goes)

I hope you'll keep on hopping along with us to check out what the rest of the crew has made for this hop. You can head on over to Jennifer Frost's blog by clicking the next button below.

Have an amazing day!
Maria


PRODUCT SUPPLY LIST AND SHOPS (just click the logos to shop):


-DISTRESS OXIDE INKS:
Picked Raspberry
Twisted Citron
Lucky Clover
Peacock Feathers
Wilted Violet

-BLENDING TOOLS
Ranger Mini Ink Blending Tool (Round)
Ranger Mini Blending Tool Replacement Foams 

-PAINT BRUSH
Tim Holtz Waterbrush Detailer Tip

-Tim Holtz Tools by Tonic Stamp Platform


-White Satin Pearl Embossing Powder (PW118)


-Hello Gorgeous Stamp Set


Wednesday, July 11, 2018

New Distress Oxides are Available Now!

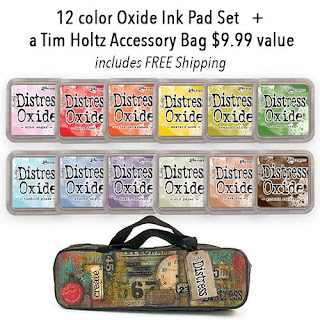
Surprise, surprise!! Tim Holtz just released set number four of his amazing Distress Oxide inks! If you follow my blog at all you have definitely seen these in action but if you are new and haven't seen them before... They are truly amazing inks! They have the properties of both dye and pigment inks mixed into one ink. You can stamp or blend with them just as you would a normal ink but when you add water to these inks things start to get a little crazy (crazy amazing!). These inks oxidize when they are combined with water and you can get some really cool effects by doing this. You can also layer these inks because of their pigment ink qualities. This gives you opportunity to create in ways that you never could with regular dye inks. I'll share a couple of cards that I've made using Distress Oxide inks in the past but first let me share the link to the new set of inks as they are sure to sell out fast. 

Ranger is offering a FREE Tim Holtz bag to carry your inks in as well as FREE SHIPPING so snatch up this deal on the double! I just ordered mine and the other thing I added to my order was the new Alcohol Lift Ink which I cannot wait to get my hands on! 


#distressoxideinks, #timholtz, #newdistressoxides, #newrelease, #ink, #rangerink, #cardbomb, #alcolholliftink, #cards, #stamp, #paper, #papercraft, #technique,     #distressoxideinks, #timholtz, #newdistressoxides, #newrelease, #ink, #rangerink, #cardbomb, #alcolholliftink, #cards, #stamp, #paper, #papercraft, #technique,


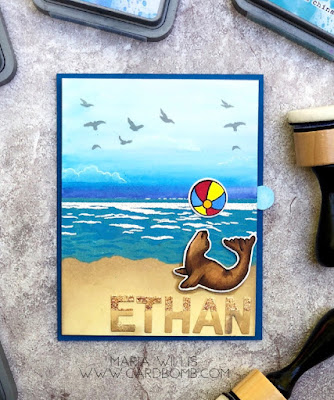
Ok! Here are a few examples of cards that I've made using the Distress Oxide inks in previously released colors.

This background for this seal card was made by sponging, blending and watercoloring with Distress Oxides.
#distressoxideinks, #timholtz, #newdistressoxides, #newrelease, #ink, #rangerink, #heroarts,  #cardbomb, #alcolholliftink, #cards, #stamp, #paper, #papercraft, #technique,

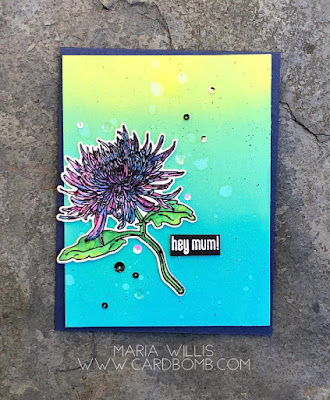
This bright background was created by blending the Distress Oxide inks and that spritzing with water to oxidize the ink.
#distressoxideinks, #timholtz, #heroarts, #newdistressoxides, #newrelease, #ink, #rangerink, #cardbomb, #alcolholliftink, #cards, #stamp, #paper, #papercraft, #technique, #heroarts

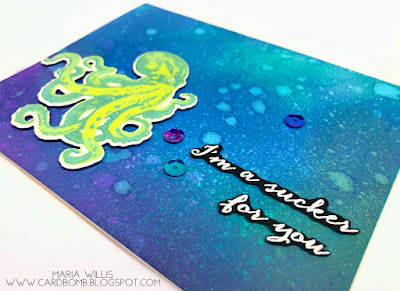
Both of these octopus cards were created by blending Distress Oxide Inks, spritzing with water, spritzing with Distress Spray and repeating the process multiple times. The effect is really cool in person as the background has texture from the Distress Spray. I wish you could touch it and feel for yourself!
#distressoxideinks, #timholtz, #newdistressoxides, #newrelease, #ink, #rangerink, #cardbomb, #alcolholliftink, #cards, #stamp, #paper, #papercraft, #technique, #heroarts

#distressoxideinks, #timholtz, #newdistressoxides, #newrelease, #ink, #rangerink, #cardbomb, #alcolholliftink, #cards, #stamp, #paper, #papercraft, #technique, #heroarts


This background was made by using the Ink Smooshing technique with Distress Oxides.
#distressoxideinks, #timholtz, #newdistressoxides, #newrelease, #ink, #rangerink, #cardbomb, #alcolholliftink, #cards, #stamp, #paper, #papercraft, #technique,


These two were ink blended and then both lightly misted and heavily splattered with water.
#distressoxideinks, #timholtz, #newdistressoxides, #newrelease, #ink, #rangerink, #cardbomb, #alcolholliftink, #cards, #stamp, #paper, #papercraft, #technique, #distressoxideinks, #timholtz, #newdistressoxides, #newrelease, #ink, #rangerink, #cardbomb, #alcolholliftink, #cards, #stamp, #paper, #papercraft, #technique,

This last card was ink blended and then I flicked water onto the background at an angle to make the drops appear like falling rain. In this card you can really get an idea how these just blend like butter. They are so smooth and forgiving to work with and I love the chalky, matte finish they have (with no chalky residue!).
#distressoxideinks, #timholtz, #newdistressoxides, #newrelease, #ink, #rangerink, #cardbomb, #alcolholliftink, #cards, #stamp, #paper, #papercraft, #technique,


Ok, guys! That's it for today! If you want to check out any of Ranger's other amazing products I will leave you with the link below. Enjoy and have an amazing day!

Maria

#distressoxideinks, #timholtz, #newdistressoxides, #newrelease, #ink, #rangerink, #cardbomb, #alcolholliftink, #cards, #stamp, #paper, #papercraft, #technique,


Thursday, June 14, 2018

Waffleflower Crafts Meets Tonic Nuvo Mousse Background

Hey guys! Guess what? I have a new blog header...did you notice? I don't make big changes very often and the colors in my new header make grin stupidly so I'd say I'm pretty happy with it (Thank you for the pretty work Fancy That Jane!).

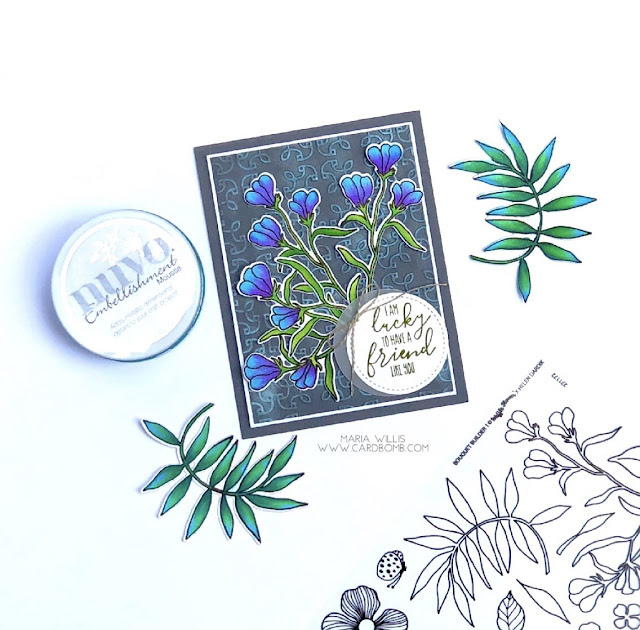
Today I want to share a card I made using a set from Waffleflower Crafts called Bouquet Builder 1 Combo. I love these long stemmed buds of flowers and I decided to color them in using my Copic markers (I can't remember which colors I used-I'm sorry!). 

#cardbomb, #mariawillis, #tonicstudiosusa, #tonicstudios, #nuvo, #nuvoembellishmentmousse, #copics, #waffleflowercrafts, #technique, #color, #stamp, #ink, #paper, #papercraft, #cardmaking,

I wanted to do something different for the background so I decided to try sponging on some Nuvo Embellishment Mousse with a sponge dauber. I started by embossing my background piece. Then I light sponged the mousse over the raised areas of the background to make them pop (and shine because this mousse is so glimmery!). I got a little heavy handed in the bottom corner but overall, as long as I was careful, this technique was pretty easy to pull off.
#cardbomb, #mariawillis, #tonicstudiosusa, #tonicstudios, #nuvo, #nuvoembellishmentmousse, #copics, #waffleflowercrafts, #technique, #color, #stamp, #ink, #paper, #papercraft, #cardmaking,

Here's a close up of those gorgeous flowers... even the stems and leaves are beautiful. I colored and die cut two sets of flowers and then layered them to get a fuller look. 
#cardbomb, #mariawillis, #tonicstudiosusa, #tonicstudios, #nuvo, #nuvoembellishmentmousse, #copics, #waffleflowercrafts, #technique, #color, #stamp, #ink, #paper, #papercraft, #cardmaking,

Here's a last look look at the full card. Have you tried out this Nuvo Embellishment Mousse yet? This was my first time using it and I found it really easy to work with. I just ordered a few more colors because there's a lot you can do with it. Aside from sponging it onto your cards, you can also use it with a mask like texture paste, watercolor with it, or even make your own custom spritzers with it. It's pretty cool stuff and I'm looking forward to playing around with it more now that I have more colors. I will add a link below just in case you're interested in picking some up for yourself.
#cardbomb, #mariawillis, #tonicstudiosusa, #tonicstudios, #nuvo, #nuvoembellishmentmousse, #copics, #waffleflowercrafts, #technique, #color, #stamp, #ink, #paper, #papercraft, #cardmaking,


Alright folks, it's late and I have work tomorrow. Even crazier than that, my son has his first job interview tomorrow and I need to go make sure I don't have to iron a shirt for him (Update: I ironed four shirts...). Fingers crossed he gets the job!


Good night!
Maria

mariawillis@hotmail.com


PRODUCT SUPPLY LIST:
-Nuvo Embellishment Mousse
-Tim Holtz 8.5" / 22cm Trimmer


Sunday, April 15, 2018

Simon Says Stamps Texture Challenge!

Hey everybody! Happy gorgeous Sunday to you! Well, it's an amazing day here in Northern California so I apologize to those of you around the world who are bogged down in snow. I need to get outside and enjoy this sunshine before it starts raining again tomorrow so this blog post will be short and sweet.

I was inspired by the amazing Simon Says Wednesday Challenge this week. They've got an "Add Some Texture" theme going on and they are also showcasing Tim Holts products... Yes, Please! The design team over there has some incredible projects and you can check them out HERE.

I had so much fun making this card and I've gotta say using Tim Holtz's Distress products made it easy!
#cardbomb, Maria Willis, Stampin' Up!, Tim Holtz, Hero Arts, #heroarts, #timholtz, #distressoxideinks, #distresscrayons, #texture, #embossingpaste, #cards, #stamps, #ink, #paper, #papercraft, #handmade, #technique, #color, #birdbanter

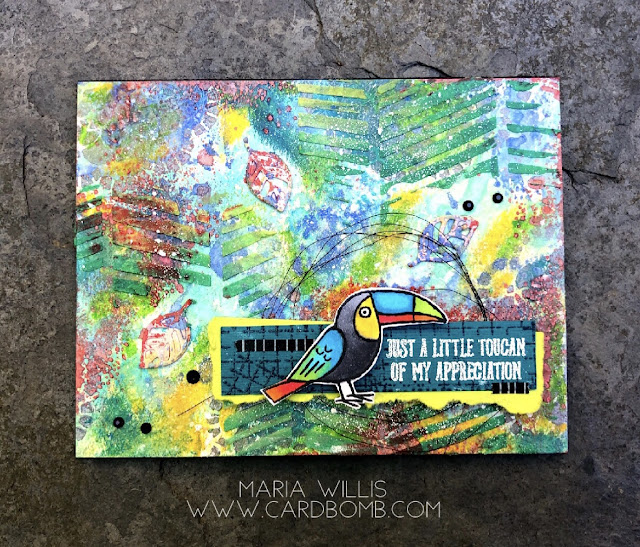
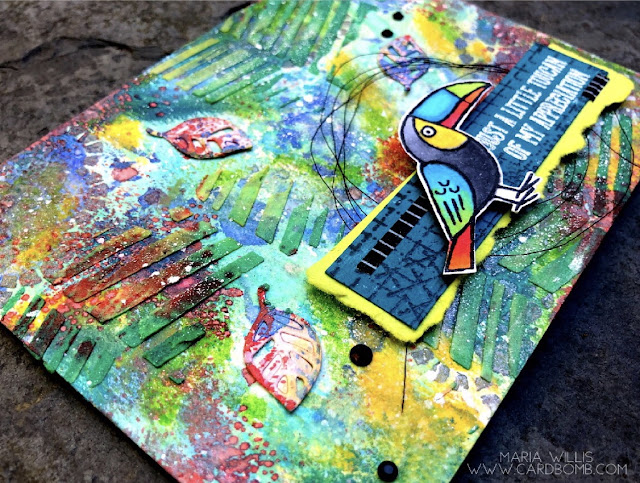
I started out by adding a few die cut leaves to the background and then added many layers of Distress Oxide inks. I also used Distress Crayons (pewter and colored) and added pops of color to the areas that needed a little more brightness. I love that the Distress Crayons can be smeared upon application but then set and won't go anywhere (or make a huge mess) after that.
#cardbomb, Maria Willis, Stampin' Up!, Tim Holtz, Hero Arts, #heroarts, #timholtz, #distressoxideinks, #distresscrayons, #texture, #embossingpaste, #cards, #stamps, #ink, #paper, #papercraft, #handmade, #technique, #color, #birdbanter

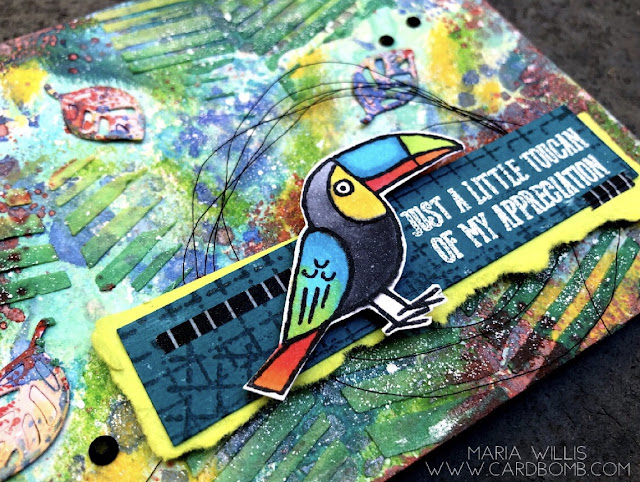
I colored this fun toucan from Stampin' Ups! Bird Banter set with my Copic markers and layered it over the sentiment piece using dimensional adhesive. I added some clear embossing powder and white grunge to the sentiment piece to give it some texture.
#cardbomb, Maria Willis, Stampin' Up!, Tim Holtz, Hero Arts, #heroarts, #timholtz, #distressoxideinks, #distresscrayons, #texture, #embossingpaste, #cards, #stamps, #ink, #paper, #papercraft, #handmade, #technique, #color, #birdbanter

I wanted the background to have even more texture than it did so I used my new stencil from Hero Arts and some embossing paste to create some depth. The embossing paste is white so I mixed some ink into it (Emerald Envy and Lemon Lime Twist) to add color.
#cardbomb, Maria Willis, Stampin' Up!, Tim Holtz, Hero Arts, #heroarts, #timholtz, #distressoxideinks, #distresscrayons, #texture, #embossingpaste, #cards, #stamps, #ink, #paper, #papercraft, #handmade, #technique, #color, #birdbanter

Another way that I was able to add texture to this card (that is hard to photograph) was to add some Distress Resist Spray. Have you used that stuff yet? It's awesome!! It adds shine and sandpaper-like texture and it also seals whatever it covers. Really cool stuff! I added a few black rhinestones, some metallic thread and washi tape and called it good for this card.
#cardbomb, Maria Willis, Stampin' Up!, Tim Holtz, Hero Arts, #heroarts, #timholtz, #distressoxideinks, #distresscrayons, #texture, #embossingpaste, #cards, #stamps, #ink, #paper, #papercraft, #handmade, #technique, #color, #birdbanter

The process of making this card was really fun. My favorite thing was just layering color after color, different type of texture after texture. I'll definitely be making more cards like this in the future. Thanks for the fun challenge Simon Says Stamps!

Have an awesome day you guys!

Maria


PS: April is Autism Awareness month and I'm in a blog hop on Wednesday, April 18th that will be promoting Autism Awareness. I hope you'll come back for a visit then. Thanks!


PRODUCT SUPPLY LIST (Stampin' Up! supplies only):


Friday, April 13, 2018

#TGIFC155 - Sketch Challenge

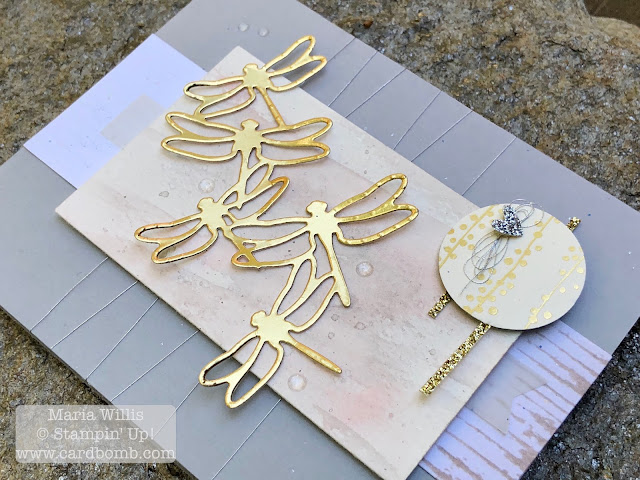
Hello! I'm here for a quick post today. I've been really sick all week and didn't think I'd be able to participate in this challenge but thankfully I was able to pull it off. The crew over at TGIF Challenges has an awesome Sketch Challenge for you this week and this is my interpretation of the sketch. I started off by watercoloring (on watercolor paper) a background of Smoky Slate and Pink Pirouette. Then, as I often do when I'm in a bind for time, I reached for my trusty "scrap" bin. Everything on this card was in the bin except for the watercolor piece I painted, the vellum and the tiny glimmer paper heart. That makes for some fun putting together!

cardbomb, Maria Willis, Stampin' Up!, TGIF Challenges, #TGIF155, #cards, #handmade, #watercolor, #technique, #dragonflydreams, #dragonfly, #papercraft, #creative, #stamps, #ink, #paper,

I thought the dragonflies flying up into the sky would be a really fun way to mimic the circles that are on the sketch. I used the Wood Grain DSP as a back drop piece and added lots of metallic thread instead of one bow. Instead of adding a sentiment to the top right I opted to eliminate a word sentiment and add the heart and the pretty layers behind it to the bottom right. I think the heart still conveys a sweet message without being too wordy. The final touch to this card was adding the clear epoxy embellishments. I think these are my favorite embellishments of all time and as they are retiring soon I think I'm going to have to order a kazillion packs. I love them because they add a little magic to your project without being overkill.
cardbomb, Maria Willis, Stampin' Up!, TGIF Challenges, #TGIF155, #cards, #handmade, #watercolor, #technique, #dragonflydreams, #dragonfly, #papercraft, #creative, #stamps, #ink, #paper,


Here's a look at the sketch that inspired my card today. If you'd like to see more cards inspired by this sketch head on over to TGIF Challenges to see what the design team has made to share with you. I have seen some of the cards already and they are amazing! One thing I love about sketch challenges is seeing the different and creative ways that each designer interprets it. Anyhoo, head on over to #TGIFC155 for some eye candy and to submit your own fantastic idea if you have one. 


That's it for today folks. As always I am so glad to have you drop by. If you'd like to purchase any of the products I've used today please feel free to shop in my store via the product carousel below or the Shop Now button. If you have questions or need any help please leave me a comment below or shoot me an email.

Have an awesome day! See you soon!
Maria

mariawillis@hotmail.com


PRODUCT SUPPLY LIST:


Want to shop with me? No problem, just click the button below. 
Let me know if you have any questions!
Email: mariawillis@hotmail.com


Want a great discount on Stampin' Up! Products and to have a fun new stamping family? Join me on this fun adventure! I can't wait to be your super excited Stampin' Up! side kick and support lady! In case you didn't know, you can join Stampin' Up! just for the discount and never sell a single product. If you want to know the details just let me know. If you're looking for a discount on your favorite hobby (stamping and paper crafting with Stampin' Up! products) and want to earn money doing it... let me know! I'd love to talk with you whatever your interest might be! If you want to see a little more info go ahead and click the button below. Looking forward to hearing from you!


Monday, April 9, 2018

Hero Arts: My Favorite Things Challenge

Hey everybody! If this is your first time visiting my blog, my name is Maria Willis and I am from a little mountain town in Northern California called Boulder Creek. I'm stopping by for a late night post so that I can play along with this month's challenge over at A Blog Named Hero. This is an awesome challenge because you literally just get to pick some of your favorite products from Hero Arts and make whatever you want. About two weeks ago I had the opportunity to visit the Hero Arts warehouse for the first time and had a blast picking out a huge bag of amazing products. This Color Layering Octopus stamp is the first thing I wanted to use...
#cardbomb, Cardbomb, Maria Willis, Hero Arts, #heroarts, Color Layering Octopus, octopus, distress oxide inks, resist spray, #technique,
I stamped the octopus in Distress Oxides inks in Twisted Citron and Mermaid Lagoon. The background is a blend of (I'm trying to remember because I actually made this background over a week ago)... Seedless Preserves, Blueprint Sketch, Peacock Feathers and Twisted Citron. There may well have been a couple more colors in there too but I apologize because I cannot remember what they are. I also layered this background with multiple layers of Tim Holtz's Resist Spray. I cannot tell you how amazing that stuff is. It gave my card a cool speckled look as well as a sandpaper like texture that reminds me of salt water. After layering the color and resist spray I also flicked some water over the background to oxidize it and to lift some of the color off. 
#cardbomb, Cardbomb, Maria Willis, Hero Arts, #heroarts, Color Layering Octopus, octopus, distress oxide inks, resist spray, #technique,

I fussy cut the sentiment out after heat embossing it in white and added some sequins to finish of my card. This is my first time playing along with the A Blog Named Hero Challenge and there is a lot of great design inspiration from both the Creative Design Team as well as from the challengers. If you haven't been over there yet I hope you will go check it out (just click the link above or the badge below)!


That's all for today folks! Thanks for stopping by and I will see you back here soon!

Maria

mariawillis@hotmail.com


Monday, April 2, 2018

World Autism Awareness Day Blog Hop

Hello everybody and welcome to my blog. If this is your first time visiting me- Hi! My name is Maria Willis and I am a Stampin' Up! demonstrator from California, USA. Today I am participating in a very special blog hop and I will be "Lighting It Up Blue" for Autism...
#autism, #autismawareness, #cardbomb, #Lightitupblue, #LIUB, #mariawillis, #stampinup, #technique, #watercolor, #worldautismday2018, Stampin' Up!, #ribbonofcourage, #hometown greetings edgelits dies, blue, #blue,

All around the world April 2nd is Autism Awareness Day. I am so happy to be collaborating with this amazing group of people to help spread awareness and to raise money for autism. 

#autism, #autismawareness, #cardbomb, #Lightitupblue, #LIUB, #mariawillis, #stampinup, #technique, #watercolor, #worldautismday2018, Stampin' Up!, #ribbonofcourage, #hometown greetings edgelits dies, blue, #blue,

One of the ways that people show their support for both individuals on the Autism spectrum, and, families of those on the spectrum is to wear the color blue. A number of years ago I read an article explaining that on April 2nd many people put blue light bulbs in their outside lights and turn them on. The idea is that even if you personally are not affected by Autism that someone may see your blue light and know that they are not alone. This idea that we can let people know that they are not alone through such a simple and beautiful gesture has stuck with me. This idea of "lighting it up blue"is the inspiration for my card today...
#autism, #autismawareness, #cardbomb, #Lightitupblue, #LIUB, #mariawillis, #stampinup, #technique, #watercolor, #worldautismday2018, Stampin' Up!, #ribbonofcourage, #hometown greetings edgelits dies, blue, #blue,
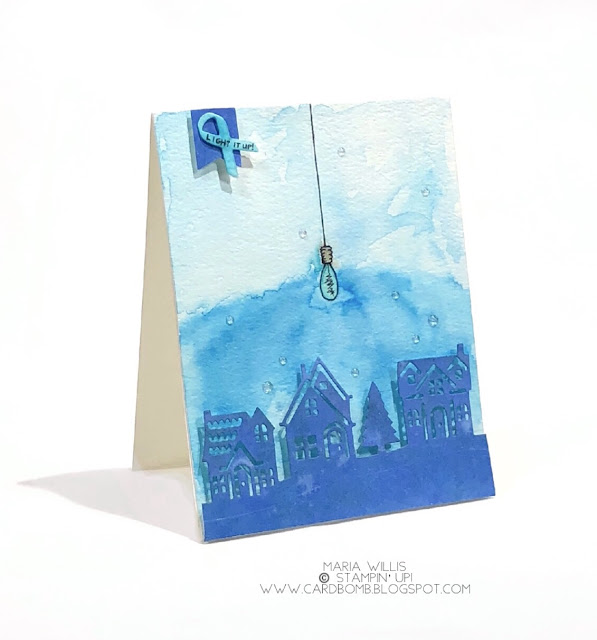
I drew the lightbulb by hand and watercolored my background attempting to make it look like the lightbulb was shining down on all of the houses flooding them with blue light. In my mind shining the light over all of the houses is symbolic of unity, support and understanding.#autism, #autismawareness, #cardbomb, #Lightitupblue, #LIUB, #mariawillis, #stampinup, #technique, #watercolor, #worldautismday2018, Stampin' Up!, #ribbonofcourage, #hometown greetings edgelits dies, blue, #blue,

The little houses are all sponged with ink (multiple colors) and are popped up on foam strips to give them dimension. I like that when you look through the house you can see blue inside... as if that light has shown through and has filled each home with care and understanding. In the top left corner I've cut a tiny ribbon and written "light it up" on it.

#autism, #autismawareness, #cardbomb, #Lightitupblue, #LIUB, #mariawillis, #stampinup, #technique, #watercolor, #worldautismday2018, Stampin' Up!, #ribbonofcourage, #hometown greetings edgelits dies, blue, #blue,

Today's blog hop is more than just an artistic interpretation of the "light it up" movement though. I thought I might share some Autism facts or statistics with you now but luckily I am able to do something more personal. I have multiple friends with children on the Autism Spectrum. I asked one of them if she had a platform to share just one thing about Autism that she wished everybody knew, what would that one thing be? She thought for only just a second before she said, "If you've met one kid with autism... You've met ONE kid with autism." I love this reminder that every individual on the spectrum is an individual with their own unique interests, personalities and needs. 

I have a goal today to help fundraise for the Organization for Autism Research. My goal is to raise $1500 by the end of the month. It'll be tough I'm sure but every dollar counts and if you have a few bucks to spare (or a lot of bucks-lol!) I would greatly appreciate your donation. Your donation will go directly to the Organization for Autism Research and is tax deductible (tax ID info is available on their website through the link provided). If you are interested in making a donation please click the donation button below and Thank You!

 Organization for Autism Research, #autism, #autismawareness, #cardbomb, #Lightitupblue, #LIUB, #mariawillis, #stampinup, #technique, #watercolor, #worldautismday2018, Stampin' Up!, #ribbonofcourage, #hometown greetings edgelits dies, blue, #blue,
Organization for Autism Research


That's it for today but I hope you will continue on this World Autism Awareness Day Blog Hop. Just click on the next button below to head to the next blog.

Thank you so much for stopping by today and I hope you have an amazing day!

Maria Willis
E-mail: mariawillis@hotmail.com


#autism, #autismawareness, #cardbomb, #Lightitupblue, #LIUB, #mariawillis, #stampinup, #technique, #watercolor, #worldautismday2018, Stampin' Up!, #ribbonofcourage, #hometown greetings edgelits dies, blue, #blue,


BLOG ROLL:


Want to shop with me? No problem, just click the button below. 
Let me know if you have any questions!
Email: mariawillis@hotmail.com


Want a great discount on Stampin' Up! Products and to have a fun new stamping family? Join me on this fun adventure! I can't wait to be your super excited Stampin' Up! side kick and support lady! In case you didn't know, you can join Stampin' Up! just for the discount and never sell a single product. If you want to know the details just let me know. If you're looking for a discount on your favorite hobby (stamping and paper crafting with Stampin' Up! products) and want to earn money doing it... let me know! I'd love to talk with you whatever your interest might be! If you want to see a little more info go ahead and click the button below. Looking forward to hearing from you!


01 09 10